The Pickle Code Injection Proof of Concept (PoC) demonstrates the security vulnerabilities in Python's pickle module, which can be exploited to execute arbitrary code during deserialization. This method is inherently insecure because it allows execution of arbitrary functions without restrictions or security checks.
Core Code Overview
Custom Pickle Injector:
Example Exploits
Print Injection:
Install Packages:
Adversarial Command Execution: Upon loading the tampered model:
Output:
Installs the package or executes the payload.
Alters model behavior: changes predictions, losses, etc.
Attacker Use Cases
Spreading Malware: The injected code can download and install malware on the target machine, which can then be used to infect other systems in the network or create a botnet.
Backdoor Installation: An attacker can use pickle injection to install a backdoor that allows persistent access to the system, even if the original vulnerability is patched.
Data Exfiltration: An attacker can use pickle injection to read sensitive files or data from the system and send it to a remote server. This can include configuration files, database credentials, or any other sensitive information stored on the machine.
Key Risks
The pickle module is inherently insecure for handling untrusted input due to its ability to execute arbitrary code.
Note that the above command doesn't installs the recommended packages, as we ship object files along with the package file. In case you don't have BTF, consider removing --no-install-recommends flag.
Save the above policy to hostpolicy.yaml and apply:
karmor vm policy add hostpolicy.yaml
Now if you run sleep command, the process would be denied execution.
Note that sleep may not be blocked if you run it in the same terminal where you apply the above policy. In that case, please open a new terminal and run sleep again to see if the command is blocked.
Welcome back to the KubeArmor tutorial! In the previous chapters, we've built up our understanding of how KubeArmor defines security rules using Security Policies, how it figures out who is performing actions using Container/Node Identity, and how it configures the underlying OS to actively enforce those rules using the Runtime Enforcer.
But even with policies and enforcement set up, KubeArmor needs to constantly know what's happening inside your system. When a process starts, a file is accessed, or a network connection is attempted, KubeArmor needs to be aware of these events to either enforce a policy (via the Runtime Enforcer) or simply record the activity for auditing and visibility.
This is where the System Monitor comes in.
What is the System Monitor?
Think of the System Monitor as KubeArmor's eyes and ears inside the operating system on each node. While the Runtime Enforcer acts as the security guard making decisions based on loaded rules, the System Monitor is the surveillance system and log recorder that detects all the relevant activity.
Its main job is to:
Observe: Watch for specific actions happening deep within the Linux kernel, like:
Processes starting or ending.
Files being opened, read, or written.
Network connections being made or accepted.
Changes to system privileges (capabilities).
Collect Data: Gather detailed information about these events (which process, what file path, what network address, etc.).
Add Context: Crucially, it correlates the low-level event data with the higher-level Container/Node Identity information KubeArmor maintains (like which container, pod, or node the event originated from).
Prepare for Logging and Processing: Format this enriched event data so it can be sent for logging (via the Log Feeder) or used by other KubeArmor components.
The System Monitor uses advanced kernel technology, primarily eBPF, to achieve this low-overhead, deep visibility into system activities without requiring modifications to the applications or the kernel itself.
Why is Monitoring Important? A Use Case Example
Let's revisit our web server example. We have a policy to Block the web server container (app: my-web-app) from reading /etc/passwd.
You apply the Security Policy.
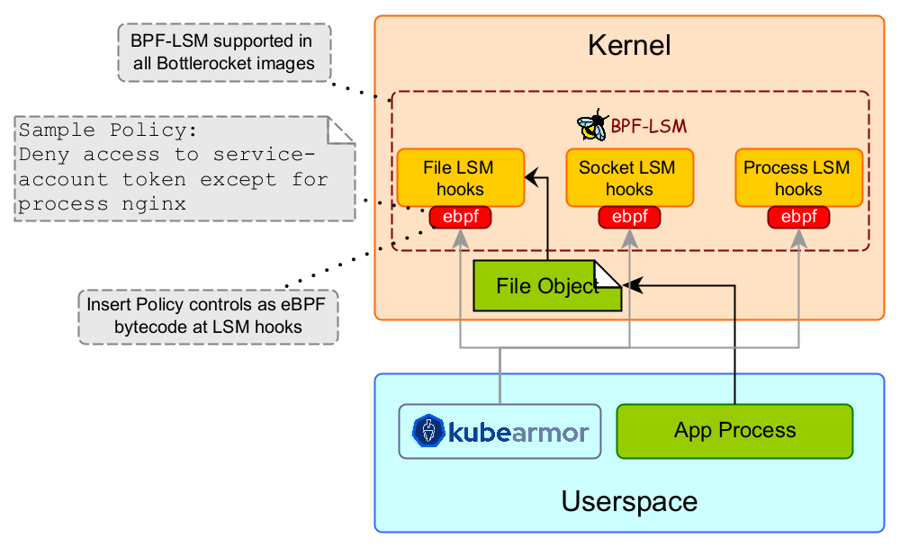
KubeArmor's Runtime Enforcer translates this policy and loads a rule into the kernel's security module (say, BPF-LSM).
An attacker compromises your web server and tries to read /etc/passwd.
The OS kernel intercepts this attempt (via the BPF-LSM hook configured by the Runtime Enforcer).
Based on the loaded rule, the Runtime Enforcer's BPF program blocks the action.
So, the enforcement worked! The read was prevented. But how do you know this happened? How do you know someone tried to access /etc/passwd?
This is where the System Monitor is essential. Even when an action is blocked by the Runtime Enforcer, the System Monitor is still observing that activity.
When the web server attempts to read /etc/passwd:
The System Monitor's eBPF programs, also attached to kernel hooks, detect the file access attempt.
It collects data: the process ID, the file path (/etc/passwd), the type of access (read).
It adds context: it uses the process ID and Namespace IDs to look up in KubeArmor's internal map and identifies that this process belongs to the container with label app: my-web-app.
It also sees that the Runtime Enforcer returned an error code indicating the action was blocked.
The System Monitor bundles all this information (who, what, where, when, and the outcome - Blocked) and sends it to KubeArmor for logging.
Without the System Monitor, you would just have a failed system call ("Permission denied") from the application's perspective, but you wouldn't have the centralized, context-rich security alert generated by KubeArmor that tells you which container specifically tried to read /etc/passwd and that it was blocked by policy.
The System Monitor provides the crucial visibility layer, even for actions that are successfully prevented by enforcement. It also provides visibility for actions that are simply Audited by policy, or even for actions that are Allowed but that you want to monitor.
How the System Monitor Works (Under the Hood)
The System Monitor relies heavily on eBPF programs loaded into the Linux kernel. Here's a simplified flow:
Initialization: When the KubeArmor Daemon starts on a node, its System Monitor component loads various eBPF programs into the kernel.
Hooking: These eBPF programs attach to specific points (called "hooks") within the kernel where system events occur (e.g., just before a file open is processed, or when a new process is created).
Event Detection: When a user application or system process performs an action (like open("/etc/passwd")), the kernel reaches the attached eBPF hook.
Data Collection (in Kernel): The eBPF program at the hook executes. It can access information about the event directly from the kernel's memory (like the process structure, file path, network socket details). It also gets the process's Namespace IDs Container/Node Identity.
Event Reporting (Kernel to User Space): The eBPF program packages the collected data (raw event + Namespace IDs) into a structure and sends it to the KubeArmor Daemon in user space using a highly efficient kernel mechanism, typically an eBPF ring buffer.
Data Reception (in KubeArmor Daemon): The System Monitor component in the KubeArmor Daemon continuously reads from this ring buffer.
Context Enrichment: For each incoming event, the System Monitor uses the Namespace IDs provided by the eBPF program to look up the corresponding Container ID, Pod Name, Namespace, and Labels in its internal identity map (the one built by the Container/Node Identity component). It also adds other relevant details like the process's current working directory and parent process.
Log/Alert Generation: The System Monitor formats all this enriched information into a structured log or alert message.
Forwarding: The formatted log is then sent to the Log Feeder component, which is responsible for sending it to your configured logging or alerting systems.
Here's a simple sequence diagram illustrating this:
This diagram shows how the eBPF programs in the kernel are the first point of contact for system events, collecting the initial data before sending it up to the KubeArmor Daemon for further processing, context addition, and logging.
Looking at the Code (Simplified)
Let's look at tiny snippets from the KubeArmor source code to see hints of how this works.
The eBPF programs (written in C, compiled to BPF bytecode) define the structure of the event data they send to user space. In KubeArmor/BPF/shared.h, you can find structures like event:
// KubeArmor/BPF/shared.h (Simplified)
typedef struct {
u64 ts; // Timestamp
u32 pid_id; // PID Namespace ID
u32 mnt_id; // Mount Namespace ID
// ... other process IDs (host/container) and UID ...
u32 event_id; // Identifier for the type of event (e.g., file open, process exec)
s64 retval; // Return value of the syscall (useful for blocked actions)
u8 comm[TASK_COMM_LEN]; // Process command name
bufs_k data; // Structure potentially holding file path, source process path
u64 exec_id; // Identifier for exec events
} event;
struct {
__uint(type, BPF_MAP_TYPE_RINGBUF); // The type of map used for kernel-to-userspace communication
__uint(max_entries, 1 << 24);
__uint(pinning, LIBBPF_PIN_BY_NAME);
} kubearmor_events SEC(".maps"); // This is the ring buffer map
This shows the event structure containing key fields like timestamps, Namespace IDs (pid_id, mnt_id), the type of event (event_id), the syscall result (retval), the command name, and potentially file paths (data). It also defines the kubearmor_events map as a BPF_MAP_TYPE_RINGBUF, which is the mechanism used by eBPF programs in the kernel to efficiently send these event structures to the KubeArmor Daemon in user space.
On the KubeArmor Daemon side (in Go), the System Monitor component (KubeArmor/monitor/systemMonitor.go) reads from this ring buffer and processes the events.
// KubeArmor/monitor/systemMonitor.go (Simplified)
// SystemMonitor Structure (partially shown)
type SystemMonitor struct {
// ... other fields ...
// system events
SyscallChannel chan []byte // Channel to receive raw event data
SyscallPerfMap *perf.Reader // Reads from the eBPF ring buffer
// PidID + MntID -> container id map (from Container/Node Identity)
NsMap map[NsKey]string
NsMapLock *sync.RWMutex
// context + args
ContextChan chan ContextCombined // Channel to send processed events
// ... other fields ...
}
// TraceSyscall Function (Simplified)
func (mon *SystemMonitor) TraceSyscall() {
if mon.SyscallPerfMap != nil {
// Goroutine to read from the perf buffer (ring buffer)
go func() {
for {
record, err := mon.SyscallPerfMap.Read() // Read raw event data from the ring buffer
if err != nil {
// ... error handling ...
return
}
// Send raw data to the processing channel
mon.SyscallChannel <- record.RawSample
}
}()
} else {
// ... log error ...
return
}
// Goroutine to process events from the channel
for {
select {
case <-StopChan:
return // Exit when told to stop
case dataRaw, valid := <-mon.SyscallChannel: // Receive raw event data
if !valid {
continue
}
// Read the raw data into the SyscallContext struct
dataBuff := bytes.NewBuffer(dataRaw)
ctx, err := readContextFromBuff(dataBuff) // Helper to parse raw bytes
if err != nil {
// ... handle parse error ...
continue
}
// Get argument data (file path, network address, etc.)
args, err := GetArgs(dataBuff, ctx.Argnum) // Helper to parse arguments
if err != nil {
// ... handle args error ...
continue
}
containerID := ""
if ctx.PidID != 0 && ctx.MntID != 0 {
// Use Namespace IDs from the event to look up Container ID in NsMap
containerID = mon.LookupContainerID(ctx.PidID, ctx.MntID) // This uses the map from Chapter 2 context
}
// If lookup failed and it's a container NS, maybe replay (simplified out)
// If it's host (PidID/MntID 0) or lookup succeeded...
// Push the combined context (with ContainerID) to another channel for logging/policy processing
mon.ContextChan <- ContextCombined{ContainerID: containerID, ContextSys: ctx, ContextArgs: args}
}
}
}
// LookupContainerID Function (from monitor/processTree.go - shown in Chapter 2 context)
func (mon *SystemMonitor) LookupContainerID(pidns, mntns uint32) string {
// ... implementation using NsMap map ...
// This is where the correlation happens: Namespace IDs -> Container ID
}
// ContextCombined Structure (from monitor/systemMonitor.go)
type ContextCombined struct {
ContainerID string // Added context from lookup
ContextSys SyscallContext // Raw data from eBPF
ContextArgs []interface{} // Parsed arguments from raw data
}
This Go code shows:
The SyscallPerfMap reading from the eBPF ring buffer in the kernel.
Raw event data being sent to the SyscallChannel.
A loop reading from SyscallChannel, parsing the raw bytes into a SyscallContext struct.
Using ctx.PidID and ctx.MntID (Namespace IDs) to call LookupContainerID and get the containerID.
Packaging the raw context (ContextSys), parsed arguments (ContextArgs), and the looked-up ContainerID into a ContextCombined struct.
Sending the enriched ContextCombined event to the ContextChan.
This ContextCombined structure is the output of the System Monitor – it's the rich event data with identity context ready for the Log Feeder and other components.
Types of Events Monitored
The System Monitor uses different eBPF programs attached to various kernel hooks to monitor different types of activities:
Event Type
Monitored Activities
Primary Mechanism
Process
Process execution (execve, execveat), process exit (do_exit), privilege changes (setuid, setgid)
The specific hooks used might vary slightly depending on the kernel version and the chosen Runtime Enforcerconfiguration (AppArmor/SELinux use different integration points than pure BPF-LSM), but the goal is the same: intercept and report relevant system calls and kernel security hooks.
System Monitor and Other Components
The System Monitor acts as a fundamental data source:
It provides the event data that the Runtime Enforcer's BPF programs might check against loaded policies in the kernel (BPF-LSM case). Note that enforcement happens at the hook via the rules loaded by the Enforcer, but the Monitor still observes the event and its outcome.
It uses the mappings maintained by the Container/Node Identity component to add context to raw events.
It prepares and forwards structured event logs to the Log Feeder.
Essentially, the Monitor is the "observer" part of KubeArmor's runtime security. It sees everything, correlates it to your workloads, and reports it, enabling both enforcement (via the Enforcer's rules acting on these observed events) and visibility.
Conclusion
In this chapter, you learned that the KubeArmor System Monitor is the component responsible for observing system events happening within the kernel. Using eBPF technology, it detects file access, process execution, network activity, and other critical operations. It enriches this raw data with Container/Node Identity context and prepares it for logging and analysis, providing essential visibility into your system's runtime behavior, regardless of whether an action was allowed, audited, or blocked by policy.
Understanding the System Monitor and its reliance on eBPF is key to appreciating KubeArmor's low-overhead, high-fidelity approach to runtime security. In the next chapter, we'll take a deeper dive into the technology that powers this monitoring (and the BPF-LSM enforcer)
Harden Infrastructure
KubeArmor is a security solution for the Kubernetes and cloud native platforms that helps protect your workloads from attacks and threats. It does this by providing a set of hardening policies that are based on industry-leading compliance and attack frameworks such as CIS, MITRE, NIST-800-53, and STIGs. These policies are designed to help you secure your workloads in a way that is compliant with these frameworks and recommended best practices.
One of the key features of KubeArmor is that it provides these hardening policies out-of-the-box, meaning that you don't have to spend time researching and configuring them yourself. Instead, you can simply apply the policies to your workloads and immediately start benefiting from the added security that they provide.
Additionally, KubeArmor presents these hardening policies in the context of your workload, so you can see how they will be applied and what impact they will have on your system. This allows you to make informed decisions about which policies to apply, and helps you understand the trade-offs between security and functionality.
Overall, KubeArmor is a powerful tool for securing your Kubernetes workloads, and its out-of-the-box hardening policies based on industry-leading compliance and attack frameworks make it easy to get started and ensure that your system is as secure as possible.
What is the source of these hardening policies?
Hardening policies are derived from industry leading compliance standards and attack frameworks such as CIS, MITRE, NIST, STIGs, and several others. contains the latest hardening policies.
KubeArmor client tool (karmor) provides a way (karmor recommend) to fetch the policies in the context of the kubernetes workloads or specific container using command line.
The output is a set of or that can be applied using k8s native tools (such as kubectl apply).
The rules in hardening policies are based on inputs from:
Get the hardening policies in context of all the deployment in namespace NAMESPACE:
Sample recommended hardening policies
Key highlights:
The hardening policies are available by default in the out folder separated out in directories based on deployment names.
Get an HTML report by using the option --report report.html with karmor recommend.
Advanced
Service Account token: Protect access to k8s service account token
Description
K8s mounts the service account token as part of every pod by default. The service account token is a credential that can be used as a bearer token to access k8s APIs and gain access to other k8s entities. Many times there are no processes in the pod that use the service account tokens which means in such cases the k8s service account token is an unused asset that can be leveraged by the attacker.
Attack Scenario
It's important to note that attackers often look for ways to gain access to other entities within Kubernetes clusters. One common method is to check for credential accesses, such as service account tokens, in order to perform lateral movements. For instance, in many Kubernetes attacks, once the attacker gains entry into a pod, they may attempt to use a service account token to access other entities.
Attack type Credential Access, Comand Injection
Actual Attack Hildegard, BlackT, BlackCat RaaS
Compliance
CIS_Kubernetes_Benchmark_v1.27, Control-Id-5.1.6
Policy
Service account token
Simulation
Expected Alert
References
FIM: File Integrity Monitoring/Protection
Description
Changes to system binary folders, configuration paths, and credentials paths need to be monitored for change. With KubeArmor, one can not only monitor for changes but also block any write attempts in such system folders. Compliance frameworks such as PCI-DSS, NIST, and CIS expect FIM to be in place.
Packaging tools: Deny execution of package management tools
Description
Pods/Containers might get shipped with binaries which should never used in the production environments. Some of those bins might be useful in dev/staging environments but the same container image is carried forward in most cases to the production environment too. For security reasons, the devsecops team might want to disable the use of these binaries in the production environment even though the bins exists in the container. As an example, most of the container images are shipped with package management tools such as apk, apt, yum, etc. If anyone ends up using these bins in the prod env, it will increase the attack surface of the container/pod.
Trusted certs bundle: Protect write access to the trusted root certificates bundle
Description
Adversaries may install a root certificate on a compromised system to avoid warnings when connecting to adversary-controlled web servers. Root certificates are used in public key cryptography to identify a root certificate authority (CA). When a root certificate is installed, the system or application will trust certificates in the root's chain of trust that have been signed by the root certificate. Installation of a root certificate on a compromised system would give an adversary a way to degrade the security of that system.
Database access: Protect read/write access to raw database tables from unknown processes.
Description
Applications use databases to store all the information such as posts, blogs, user information, etc. WordPress applications almost certainly use a MySQL database for storing their content, and those are usually stored elsewhere on the system, often /var/lib/mysql/some_db_name.
Config data: Protect access to configuration data containing plain text credentials.
Description
Adversaries may search local file systems and remote file shares for files containing insecurely stored credentials. These can be files created by users to store their own credentials, shared credential stores for a group of individuals, configuration files containing passwords for a system or service, or source code/binary files containing embedded passwords.
File Copy: Prevent file copy using standard utilities.
Description
Exfiltration consists of techniques that adversaries may use to steal data from your network. Once they’ve collected data, adversaries often package it to avoid detection while removing it. This can include compression and encryption. Techniques for getting data out of a target network typically include transferring it over their command and control channel or an alternate channel and may also include putting size limits on the transmission.
Network Access: Process based network access control
Description
Typically, within a pod/container, there are only specific processes that need to use network access. KubeArmor allows one to specify the set of binaries that are allowed to use network primitives such as TCP, UDP, and Raw sockets and deny everyone else.
/tmp/ noexec: Do not allow execution of binaries from /tmp/ folder.
Description
If provided the necessary privileges, users have the ability to install software in organizational information systems. To maintain control over the types of software installed, organizations identify permitted and prohibited actions regarding software installation. Prohibited software installations may include, for example, software with unknown or suspect pedigrees or software that organizations consider potentially malicious.
Admin tools: Do not allow execution of administrative/maintenance tools inside the pods.
Description
Adversaries may abuse a container administration service to execute commands within a container. A container administration service such as the Docker daemon, the Kubernetes API server, or the kubelet may allow remote management of containers within an environment.
Discovery tools: Do not allow discovery/search of tools/configuration.
Description
Adversaries may attempt to get a listing of services running on remote hosts and local network infrastructure devices, including those that may be vulnerable to remote software exploitation. Common methods to acquire this information include port and/or vulnerability scans using tools that are brought onto a system
Logs delete: Do not allow external tooling to delete logs/traces of critical components.
Description
Adversaries may delete or modify artifacts generated within systems to remove evidence of their presence or hinder defenses. Various artifacts may be created by an adversary or something that can be attributed to an adversary’s actions. Typically these artifacts are used as defensive indicators related to monitored events, such as strings from downloaded files, logs that are generated from user actions, and other data analyzed by defenders. Location, format, and type of artifact (such as command or login history) are often specific to each platform.
ICMP control: Do not allow scanning tools to use ICMP for scanning the network.
Description
The Internet Control Message Protocol (ICMP) allows Internet hosts to notify each other of errors and allows diagnostics and troubleshooting for system administrators. Because ICMP can also be used by a potential adversary to perform reconnaissance against a target network, and due to historical denial-of-service bugs in broken implementations of ICMP, some network administrators block all ICMP traffic as a network hardening measure
Restrict Capabilities: Do not allow capabilities that can be leveraged by the attacker.
Description
Containers run with a default set of capabilities as assigned by the Container Runtime. Capabilities are parts of the rights generally granted on a Linux system to the root user. In many cases applications running in containers do not require any capabilities to operate, so from the perspective of the principal of least privilege use of capabilities should be minimized.
Cluster Policy Spec for Containers
Cluster Policy Specification
Here is the specification of a Cluster security policy.
Note Please note that for system calls monitoring we only support audit action no matter what the value of action is
Policy Spec Description
Now, we will briefly explain how to define a cluster security policy.
Common
A cluster security policy starts with the base information such as apiVersion, kind, and metadata. The apiVersion would be the same in any security policies. In the case of metadata, you need to specify the names of a policy and a namespace where you want to apply the policy and kind would be KubeArmorClusterPolicy.
The severity part is somewhat important. You can specify the severity of a given policy from 1 to 10. This severity will appear in alerts when policy violations happen.
severity: [1-10]
Tags
The tags part is optional. You can define multiple tags (e.g., WARNING, SENSITIVE, MITRE, STIG, etc.) to categorize security policies.
tags: ["tag1", ..., "tagN"]
Message
The message part is optional. You can add an alert message, and then the message will be presented in alert logs.
message: [message]
Selector
In the selector section for cluster-based policies, we use matchExpressions to define the namespaces where the policy should be applied and labels to select/deselect the workloads in those namespaces. Currently, only namespaces and labels can be matched, so the key should be 'namespace' and 'label'. The operator will determine whether the policy should apply to the namespaces and its workloads specified in the values field or not. Both matchExpressions, namespace and label are an ANDed operation.
Operator: In
When the operator is set to In, the policy will be applied only to the namespaces listed and if label matchExpressions is defined, the policy will be applied only to the workloads that match the labels in the values field.
Operator: NotIn
When the operator is set to NotIn, the policy will be applied to all other namespaces except those listed in the values field and if label matchExpressions is defined, the policy will be applied to all the workloads except that match the labels in the values field.
TIP If the selector operator is omitted in the policy, it will be applied across all namespaces.
Process
In the process section, there are three types of matches: matchPaths, matchDirectories, and matchPatterns. You can define specific executables using matchPaths or all executables in specific directories using matchDirectories. In the case of matchPatterns, advanced operators may be able to determine particular patterns for executables by using regular expressions. However, the coverage of regular expressions is highly dependent on AppArmor (Policy Core Reference). Thus, we generally do not recommend using this match.
If this is enabled, the owners of the executable(s) defined with matchPaths and matchDirectories will be only allowed to execute.
recursive
If this is enabled, the coverage will extend to the subdirectories of the directory defined with matchDirectories.
fromSource
If a path is specified in fromSource, the executable at the path will be allowed/blocked to execute the executables defined with matchPaths or matchDirectories. For better understanding, let us say that an operator defines a policy as follows. Then, /bin/bash will be only allowed (blocked) to execute /bin/sleep. Otherwise, the execution of /bin/sleep will be blocked (allowed).
File
The file section is quite similar to the process section.
In the case of capabilities, there is currently one match type: matchCapabilities. You can define specific capability names to allow or block using matchCapabilities. You can check available capabilities in Capability List.
In the case of syscalls, there are two types of matches, matchSyscalls and matchPaths. matchPaths can be used to target system calls targeting specific binary path or anything under a specific directory, additionally you can slice based on syscalls generated by a binary or a group of binaries in a directory. You can use matchSyscall as a more general rule to match syscalls from all sources or from specific binaries.
If a path is specified in fromSource, kubearmor will match only syscalls generated by the defined source. For better undrestanding, lets take the example below. Only unlink system calls generated by /bin/bash will be matched.
If this is enabled, the coverage will extend to the subdirectories of the directory.
Action
The action could be Allow, Audit, or Block. Security policies would be handled in a blacklist manner or a whitelist manner according to the action. Thus, you need to define the action carefully. You can refer to for more details. In the case of the Audit action, we can use this action for policy verification before applying a security policy with the Block action.
For System calls monitoring, we only support audit mode no matter what the action is set to.
sudo tar --no-overwrite-dir -C / -xzf kubearmor_${VER}_linux-amd64.tar.gz
sudo systemctl daemon-reload
❯ karmor recommend -n dvwa
INFO[0000] pulling image image="cytopia/dvwa:php-8.1"
created policy out/dvwa-dvwa-web/cytopia-dvwa-php-8-1-maintenance-tool-access.yaml ...
created policy out/dvwa-dvwa-web/cytopia-dvwa-php-8-1-cert-access.yaml ...
created policy out/dvwa-dvwa-web/cytopia-dvwa-php-8-1-system-owner-discovery.yaml ...
created policy out/dvwa-dvwa-web/cytopia-dvwa-php-8-1-system-monitoring-deny-write-under-bin-directory.yaml ...
created policy out/dvwa-dvwa-web/cytopia-dvwa-php-8-1-system-monitoring-write-under-dev-directory.yaml ...
created policy out/dvwa-dvwa-web/cytopia-dvwa-php-8-1-system-monitoring-detect-access-to-cronjob-files.yaml ...
created policy out/dvwa-dvwa-web/cytopia-dvwa-php-8-1-least-functionality-execute-package-management-process-in-container.yaml ...
created policy out/dvwa-dvwa-web/cytopia-dvwa-php-8-1-deny-remote-file-copy.yaml ...
created policy out/dvwa-dvwa-web/cytopia-dvwa-php-8-1-deny-write-in-shm-folder.yaml ...
created policy out/dvwa-dvwa-web/cytopia-dvwa-php-8-1-deny-write-under-etc-directory.yaml ...
created policy out/dvwa-dvwa-web/cytopia-dvwa-php-8-1-deny-write-under-etc-directory.yaml ...
INFO[0000] pulling image image="mariadb:10.1"
created policy out/dvwa-dvwa-mysql/mariadb-10-1-maintenance-tool-access.yaml ...
created policy out/dvwa-dvwa-mysql/mariadb-10-1-cert-access.yaml ...
created policy out/dvwa-dvwa-mysql/mariadb-10-1-system-owner-discovery.yaml ...
created policy out/dvwa-dvwa-mysql/mariadb-10-1-system-monitoring-deny-write-under-bin-directory.yaml ...
created policy out/dvwa-dvwa-mysql/mariadb-10-1-system-monitoring-write-under-dev-directory.yaml ...
created policy out/dvwa-dvwa-mysql/mariadb-10-1-system-monitoring-detect-access-to-cronjob-files.yaml ...
created policy out/dvwa-dvwa-mysql/mariadb-10-1-least-functionality-execute-package-management-process-in-container.yaml ...
created policy out/dvwa-dvwa-mysql/mariadb-10-1-deny-remote-file-copy.yaml ...
created policy out/dvwa-dvwa-mysql/mariadb-10-1-deny-write-in-shm-folder.yaml ...
created policy out/dvwa-dvwa-mysql/mariadb-10-1-deny-write-under-etc-directory.yaml ...
created policy out/dvwa-dvwa-mysql/mariadb-10-1-deny-write-under-etc-directory.yaml ...
output report in out/report.txt ...
Deployment | dvwa/dvwa-web
Container | cytopia/dvwa:php-8.1
OS | linux
Arch |
Distro |
Output Directory | out/dvwa-dvwa-web
policy-template version | v0.1.6
+-------------------------------------+--------------------------------+----------+--------+---------------------------------------------------+
| POLICY | SHORT DESC | SEVERITY | ACTION | TAGS |
+-------------------------------------+--------------------------------+----------+--------+---------------------------------------------------+
| cytopia-dvwa-php-8-1-maintenance- | Restrict access to maintenance | 1 | Block | PCI_DSS |
| tool-access.yaml | tools (apk, mii-tool, ...) | | | MITRE |
+-------------------------------------+--------------------------------+----------+--------+---------------------------------------------------+
| cytopia-dvwa-php-8-1-cert- | Restrict access to trusted | 1 | Block | MITRE |
| access.yaml | certificated bundles in the OS | | | MITRE_T1552_unsecured_credentials |
| | image | | | |
+-------------------------------------+--------------------------------+----------+--------+---------------------------------------------------+
| cytopia-dvwa-php-8-1-system-owner- | System Information Discovery | 3 | Block | MITRE |
| discovery.yaml | - block system owner discovery | | | MITRE_T1082_system_information_discovery |
| | commands | | | |
+-------------------------------------+--------------------------------+----------+--------+---------------------------------------------------+
| cytopia-dvwa-php-8-1-system- | System and Information | 5 | Block | NIST NIST_800-53_AU-2 |
| monitoring-deny-write-under-bin- | Integrity - System Monitoring | | | NIST_800-53_SI-4 MITRE |
| directory.yaml | make directory under /bin/ | | | MITRE_T1036_masquerading |
+-------------------------------------+--------------------------------+----------+--------+---------------------------------------------------+
| cytopia-dvwa-php-8-1-system- | System and Information | 5 | Audit | NIST NIST_800-53_AU-2 |
| monitoring-write-under-dev- | Integrity - System Monitoring | | | NIST_800-53_SI-4 MITRE |
| directory.yaml | make files under /dev/ | | | MITRE_T1036_masquerading |
+-------------------------------------+--------------------------------+----------+--------+---------------------------------------------------+
| cytopia-dvwa-php-8-1-system- | System and Information | 5 | Audit | NIST SI-4 |
| monitoring-detect-access-to- | Integrity - System Monitoring | | | NIST_800-53_SI-4 |
| cronjob-files.yaml | Detect access to cronjob files | | | |
+-------------------------------------+--------------------------------+----------+--------+---------------------------------------------------+
| cytopia-dvwa-php-8-1-least- | System and Information | 5 | Block | NIST |
| functionality-execute-package- | Integrity - Least | | | NIST_800-53_CM-7(4) |
| management-process-in- | Functionality deny execution | | | SI-4 process |
| container.yaml | of package manager process in | | | NIST_800-53_SI-4 |
| | container | | | |
+-------------------------------------+--------------------------------+----------+--------+---------------------------------------------------+
| cytopia-dvwa-php-8-1-deny-remote- | The adversary is trying to | 5 | Block | MITRE |
| file-copy.yaml | steal data. | | | MITRE_TA0008_lateral_movement |
| | | | | MITRE_TA0010_exfiltration |
| | | | | MITRE_TA0006_credential_access |
| | | | | MITRE_T1552_unsecured_credentials |
| | | | | NIST_800-53_SI-4(18) NIST |
| | | | | NIST_800-53 NIST_800-53_SC-4 |
+-------------------------------------+--------------------------------+----------+--------+---------------------------------------------------+
| cytopia-dvwa-php-8-1-deny-write-in- | The adversary is trying to | 5 | Block | MITRE_execution |
| shm-folder.yaml | write under shm folder | | | MITRE |
+-------------------------------------+--------------------------------+----------+--------+---------------------------------------------------+
| cytopia-dvwa-php-8-1-deny-write- | The adversary is trying to | 5 | Block | NIST_800-53_SI-7 NIST |
| under-etc-directory.yaml | avoid being detected. | | | NIST_800-53_SI-4 NIST_800-53 |
| | | | | MITRE_T1562.001_disable_or_modify_tools |
| | | | | MITRE_T1036.005_match_legitimate_name_or_location |
| | | | | MITRE_TA0003_persistence |
| | | | | MITRE MITRE_T1036_masquerading |
| | | | | MITRE_TA0005_defense_evasion |
+-------------------------------------+--------------------------------+----------+--------+---------------------------------------------------+
| cytopia-dvwa-php-8-1-deny-write- | Adversaries may delete or | 5 | Block | NIST NIST_800-53 NIST_800-53_CM-5 |
| under-etc-directory.yaml | modify artifacts generated | | | NIST_800-53_AU-6(8) |
| | within systems to remove | | | MITRE_T1070_indicator_removal_on_host |
| | evidence. | | | MITRE MITRE_T1036_masquerading |
+-------------------------------------+--------------------------------+----------+--------+---------------------------------------------------+
Deployment | dvwa/dvwa-mysql
Container | mariadb:10.1
OS | linux
Arch |
Distro |
Output Directory | out/dvwa-dvwa-mysql
policy-template version | v0.1.6
+-------------------------------------+--------------------------------+----------+--------+---------------------------------------------------+
| POLICY | SHORT DESC | SEVERITY | ACTION | TAGS |
+-------------------------------------+--------------------------------+----------+--------+---------------------------------------------------+
| mariadb-10-1-maintenance-tool- | Restrict access to maintenance | 1 | Block | PCI_DSS |
| access.yaml | tools (apk, mii-tool, ...) | | | MITRE |
+-------------------------------------+--------------------------------+----------+--------+---------------------------------------------------+
| mariadb-10-1-cert-access.yaml | Restrict access to trusted | 1 | Block | MITRE |
| | certificated bundles in the OS | | | MITRE_T1552_unsecured_credentials |
| | image | | | |
+-------------------------------------+--------------------------------+----------+--------+---------------------------------------------------+
| mariadb-10-1-system-owner- | System Information Discovery | 3 | Block | MITRE |
| discovery.yaml | - block system owner discovery | | | MITRE_T1082_system_information_discovery |
| | commands | | | |
+-------------------------------------+--------------------------------+----------+--------+---------------------------------------------------+
| mariadb-10-1-system-monitoring- | System and Information | 5 | Block | NIST NIST_800-53_AU-2 |
| deny-write-under-bin-directory.yaml | Integrity - System Monitoring | | | NIST_800-53_SI-4 MITRE |
| | make directory under /bin/ | | | MITRE_T1036_masquerading |
+-------------------------------------+--------------------------------+----------+--------+---------------------------------------------------+
| mariadb-10-1-system-monitoring- | System and Information | 5 | Audit | NIST NIST_800-53_AU-2 |
| write-under-dev-directory.yaml | Integrity - System Monitoring | | | NIST_800-53_SI-4 MITRE |
| | make files under /dev/ | | | MITRE_T1036_masquerading |
+-------------------------------------+--------------------------------+----------+--------+---------------------------------------------------+
| mariadb-10-1-system-monitoring- | System and Information | 5 | Audit | NIST SI-4 |
| detect-access-to-cronjob-files.yaml | Integrity - System Monitoring | | | NIST_800-53_SI-4 |
| | Detect access to cronjob files | | | |
+-------------------------------------+--------------------------------+----------+--------+---------------------------------------------------+
| mariadb-10-1-least-functionality- | System and Information | 5 | Block | NIST |
| execute-package-management-process- | Integrity - Least | | | NIST_800-53_CM-7(4) |
| in-container.yaml | Functionality deny execution | | | SI-4 process |
| | of package manager process in | | | NIST_800-53_SI-4 |
| | container | | | |
+-------------------------------------+--------------------------------+----------+--------+---------------------------------------------------+
| mariadb-10-1-deny-remote-file- | The adversary is trying to | 5 | Block | MITRE |
| copy.yaml | steal data. | | | MITRE_TA0008_lateral_movement |
| | | | | MITRE_TA0010_exfiltration |
| | | | | MITRE_TA0006_credential_access |
| | | | | MITRE_T1552_unsecured_credentials |
| | | | | NIST_800-53_SI-4(18) NIST |
| | | | | NIST_800-53 NIST_800-53_SC-4 |
+-------------------------------------+--------------------------------+----------+--------+---------------------------------------------------+
| mariadb-10-1-deny-write-in-shm- | The adversary is trying to | 5 | Block | MITRE_execution |
| folder.yaml | write under shm folder | | | MITRE |
+-------------------------------------+--------------------------------+----------+--------+---------------------------------------------------+
| mariadb-10-1-deny-write-under-etc- | The adversary is trying to | 5 | Block | NIST_800-53_SI-7 NIST |
| directory.yaml | avoid being detected. | | | NIST_800-53_SI-4 NIST_800-53 |
| | | | | MITRE_T1562.001_disable_or_modify_tools |
| | | | | MITRE_T1036.005_match_legitimate_name_or_location |
| | | | | MITRE_TA0003_persistence |
| | | | | MITRE MITRE_T1036_masquerading |
| | | | | MITRE_TA0005_defense_evasion |
+-------------------------------------+--------------------------------+----------+--------+---------------------------------------------------+
| mariadb-10-1-deny-write-under-etc- | Adversaries may delete or | 5 | Block | NIST NIST_800-53 NIST_800-53_CM-5 |
| directory.yaml | modify artifacts generated | | | NIST_800-53_AU-6(8) |
| | within systems to remove | | | MITRE_T1070_indicator_removal_on_host |
| | evidence. | | | MITRE MITRE_T1036_masquerading |
+-------------------------------------+--------------------------------+----------+--------+---------------------------------------------------+
Attack Scenario
In a possible attack scenario, an attacker may try to update the configuration to disable security controls or access logs. This can allow them to gain further access to the system and carry out malicious activities undetected. It's crucial to be aware of such threats and take proactive measures to prevent such attacks from occurring.
Attack Type Data Manipulation, Integrity Threats
Actual Attack NetWalker, Conti, DarkSide RaaS
Compliance
CIS Distribution Independent Linuxv2.0, Control-Id:6.3.5
In an attack scenario, adversaries may use system tools such as fsck, ip, who, apt, and others for reconnaissance and to download additional tooling from remote servers. These tools can help them gain valuable information about the system and its vulnerabilities, allowing them to carry out further attacks. It's important to be vigilant about such activities and implement security measures to prevent such attacks from happening.
Attack Type Command Injection, Malware, Backdoor
Actual Attack AppleJeus, Codecov supply chain
By using this technique, attackers can successfully evade security warnings that alert users when compromised systems connect over HTTPS to adversary-controlled web servers. These servers often look like legitimate websites, and are designed to trick users into entering their login credentials, which can then be used by the attackers. It's important to be aware of this threat and take necessary precautions to prevent these attacks from happening.
Attack Type Man-In-The-Middle(MITM)
Actual Attack POODLE(Padding Oracle On Downgraded Legacy Encryption), BEAST (Browser Exploit Against SSL/TLS)
Adversaries have been known to use various techniques to steal information from databases. This information can include user credentials, posts, blogs, and more. By obtaining this information, adversaries can gain access to user accounts and potentially perform a full-account takeover, which can lead to further compromise of the target system. It's important to ensure that appropriate security measures are in place to protect against these types of attacks.
Attack Type SQL Injection, Credential Access, Account Takeover
Actual Attack Yahoo Voices Data Breach in 2012
In a possible attack scenario, an attacker may try to change the configurations to open websites to application security holes such as session hijacking and cross-site scripting attacks, which can lead to the disclosure of private data. Additionally, attackers can also leverage these changes to gather sensitive information. It's crucial to take proactive measures to prevent these attacks from occurring.
Attack Type Cross-Site Scripting(XSS), Data manipulation, Session hijacking
Actual Attack XSS attack on Fortnite 2019, Turla LightNeuron Attack
Compliance
CIS Distribution Independent Linuxv2.0
Control-Id: 6.16.14
Policy
Config data
Simulation
With a shell different than the user owning the file:
It's important to note that file copy tools can be leveraged by attackers for exfiltrating sensitive data and transferring malicious payloads into the workloads. Additionally, it can also assist in lateral movement within the system. It's crucial to take proactive measures to prevent these attacks from occurring.
Attack Type Credential Access, Lateral movements, Information Disclosure
Actual Attack DarkBeam Data Breach, Shields Health Care Group data breach
In a possible attack scenario, an attacker binary may attempt to send a beacon to its Command and Control (C&C) Server. Additionally, the binary may use network primitives to exfiltrate pod/container data and configuration. It's important to monitor network traffic and take proactive measures to prevent these attacks from occurring, such as implementing proper access controls and segmenting the network.
Attack Type Denial of Service(DoS), Distributed Denial of Service(DDoS)
Actual Attack DDoS attacks on websites of public institutions in Belgium, DDoS attack on the website of a city government in Germany
Compliance
Network Access
Policy
Network Access
Simulation
Set the default security posture to default-deny
Expected Alert
Attack Scenario
In an attack scenario, a hacker may attempt to inject malicious scripts into the /tmp folder through a web application exploit. Once the script is uploaded, the attacker may try to execute it on the server in order to take it down. By hardening the /tmp folder, the attacker will not be able to execute the script, preventing such attacks. It's essential to implement these security measures to protect against these types of attacks and ensure the safety of the system.
Attack Type System Failure, System Breach
Actual Attack Shields Health Care Group data breach, MOVEit Breach
It's important to note that attackers with permissions could potentially run 'kubectl exec' to execute malicious code and compromise resources within a cluster. It's crucial to monitor the activity within the cluster and take proactive measures to prevent these attacks from occurring.
Attack Type Command Injection, Lateral Movements, etc.
Actual Attack Target cyberattack, Supply Chain Attacks
Adversaries can potentially use information related to services, remote hosts, and local network infrastructure devices, including those that may be vulnerable to remote software exploitation to perform malicious attacks like exploiting open ports and injecting payloads to get remote shells. It's crucial to take proactive measures to prevent these attacks from occurring, such as implementing proper network segmentation and hardening network devices.
Attack Type Reconnaissance, Brute force, Command Injection
Actual Attack Microsoft exchange server attack 2021
It's important to note that removal of indicators related to intrusion activity may interfere with event collection, reporting, or other processes used to detect such activity. This can compromise the integrity of security solutions by causing notable events to go unreported. Additionally, this activity may impede forensic analysis and incident response, due to a lack of sufficient data to determine what occurred. It's crucial to ensure that all relevant indicators are properly monitored and reported to prevent such issues from occurring.
Attack Type Integrity Threats, Data Manipulation Actual Attack NetWalker, Conti, DarkSide RaaS
Adversaries may use scanning tools that utilize Internet Control Message Protocol (ICMP) to perform reconnaissance against a target network and identify potential loopholes. It's crucial to monitor network traffic and take proactive measures to prevent these attacks from occurring, such as implementing proper firewall rules and network segmentation. Additionally, it's important to stay up-to-date with the latest security patches to prevent known vulnerabilities from being exploited.
Attack Type Network Flood, DoS(Denial of Service)
Actual Attack Ping of Death(PoD)
Compliance
ICMP Control
Policy
ICMP Control
Simulation
Expected Alert
Attack Scenario
Kubernetes by default connects all the containers running in the same node (even if they belong to different namespaces) down to Layer 2 (ethernet). Every pod running in the same node is going to be able to communicate with any other pod in the same node (independently of the namespace) at ethernet level (layer 2). This allows a malicious containers to perform an ARP spoofing attack to the containers on the same node and capture their traffic.
Attack Type Reconnaissance, Spoofing
Actual Attack Recon through P.A.S. Webshell, NBTscan
Compliance
CIS Kubernetes
Control Id: 5.2.8 - Minimize the admission of containers with the NET_RAW capability
Control Id: 5.2.9 - Minimize the admission of containers with capabilities assigned
root@ubuntu-1-deployment-f987bd4d6-xzcb8:/# tcpdump
tcpdump: eth0: You don't have permission to capture on that device
(socket: Operation not permitted)
root@ubuntu-1-deployment-f987bd4d6-xzcb8:/#
Explanation: The purpose of this policy is to audit the outgoing DNS packets (UDP) to 8.8.8.8 in a host whose host name is 'kubearmor-dev'. For this, we define 'kubernetes.io/hostname: kubearmor-dev' in nodeSelector -> matchLabels and the specific address ('8.8.8.8') in egress -> to and port + protocol ('dns' and 'UDP') egress -> ports. Also, we put 'Block' as the action of this policy.
Verification: After applying this policy, please open a new terminal (or connect to the host with a new session) and run nc -uvz -w 2 8.8.8.8 53. You will see that it runs without an output and an alert is generated.
NOTE
The given policy works with almost every linux distribution. If it is not working in your case, check if nftables is enabled on your system.
Ingress alerting
Alert for incoming SSH connections
FAQs
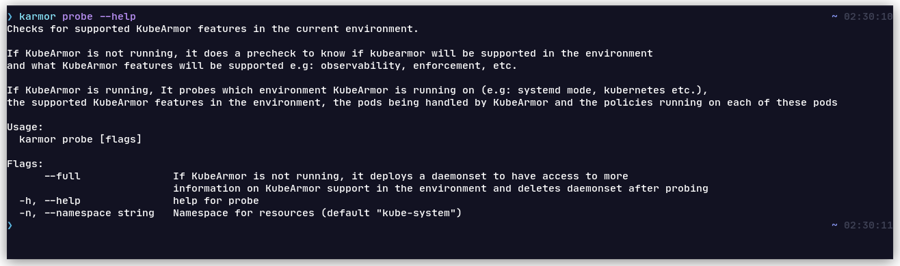
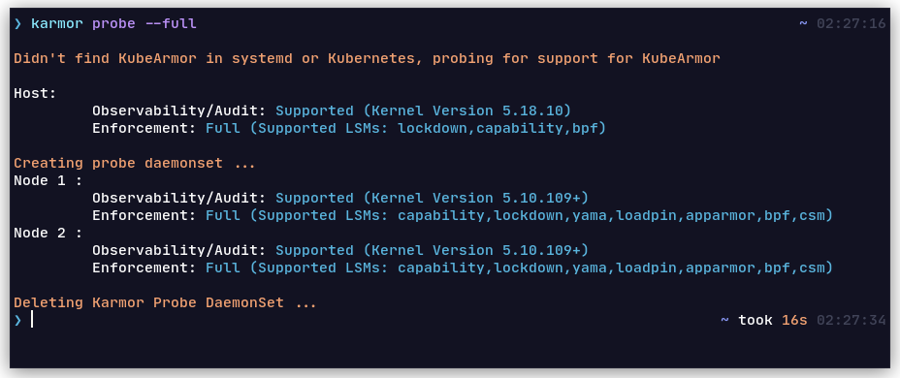
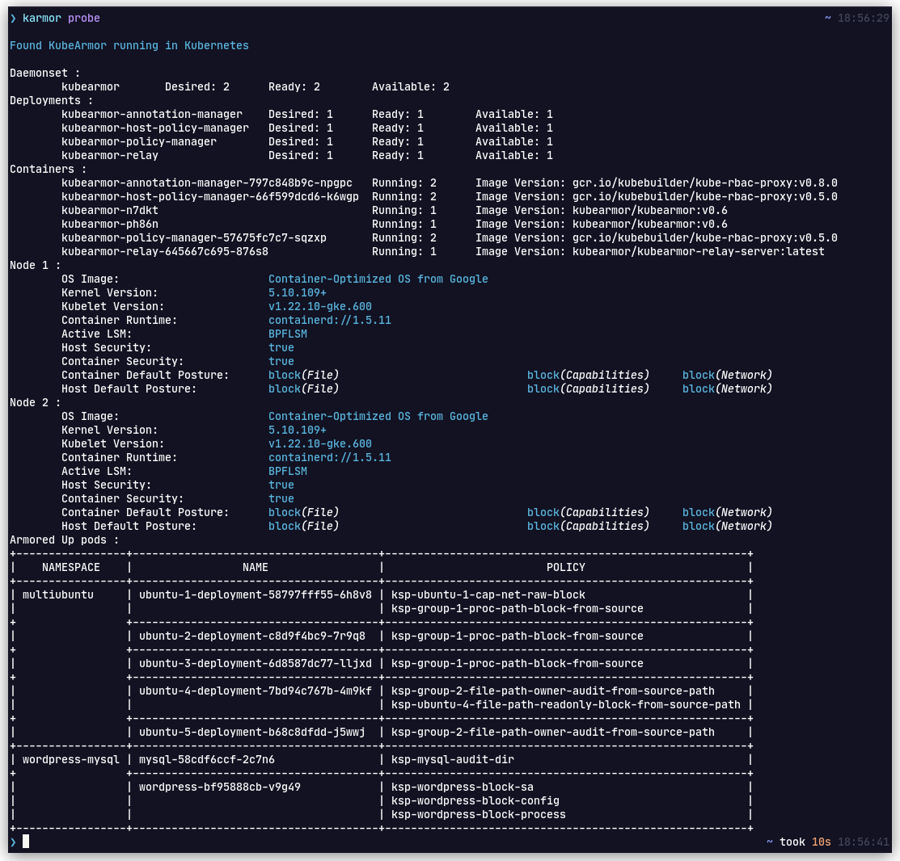
What platforms are supported by KubeArmor? How can I check whether my deployment will be supported?
Use karmor probe to check if the platform is supported.
I am applying a blocking policy but it is not blocking the action. What can I check?
Checkout Binary Path
If the path in your process rule is not an absolute path but a symlink, policy enforcement won't work. This is because KubeArmor sees the actual executable path in events received from kernel space and is not aware about symlinks.
How is KubeArmor different from PodSecurityPolicy/PodSecurityContext?
Native k8s supports specifying a security context for the pod or container. It requires one to specify native AppArmor, SELinux, seccomp policies. But there are a few problems with this approach:
All the OS distributions do not support the LSMs consistently. For e.g, supports AppArmor while supports SELinux and BPF-LSM.
What is visibility that I hear of in KubeArmor and how to get visibility information?
KubeArmor, apart from been a policy enforcement engine also emits pod/container visibility data. It uses an eBPF-based system monitor which keeps track of process life cycles in containers and even nodes, and converts system metadata to container/node identities. This information can then be used for observability use-cases.
Sample output karmor logs --json:
Here the log implies that the process /usr/bin/sleep execution by 'zsh' was denied on the Host using a block based host policy.
The logs are also exportable in .
How to visualize KubeArmor visibility logs?
There are a couple of community maintained dashboards available at .
If you don't find an existing dashboard particular to your needs, feel free to create an issue. It would be really great if you could also contribute one!
How to fix `karmor logs` timing out?
karmor logs internally uses Kubernetes' client's port-forward. Port forward is not meant for long running connection and it times out if left idle. Checkout this for more info.
If you want to stream logs reliably there are a couple of solutions you can try:
Modiy the kubearmor
How to get process events in the context of a specific pods?
Following command can be used to to get pod specific events:
karmor log --pod <pod_name>karmor log has following filter to provide more granularity:
How is KubeArmor different from admission controllers?
Kubernetes admission controllers are set of extensions that acts as a gatekeeper and help govern and control Kubernetes clusters. They intercept requests to the Kubernetes API server prior to the persistence of the object into etcd.
They can manage deployments requesting too many resources, enforce pod security policies, prevent vulnerable images from being deployed and check if the pod is running in privileged mode.
But all these checks are done before the pods are started. Admission controllers doesn't guarantee any protection once the vulnerability is inside the cluster.
KuberArmor protects the pods from within. It runs as a daemonset and restricts the behavior of containers at the system level. KubeArmor allows one to define security policies for the assets/resources (such as files, processes, volumes etc) within the pod/container, select those based on K8s metadata and simply apply these security policies at runtime.
What are the Policy Actions supported by KubeArmor?
KubeArmor defines 3 policy actions: Allow, Block and Audit.
Allow: A whitelist policy or a policy defined with Allow action allows only the operations defined in the policy, rest everything is blocked/audited. Block: Policy defined with Block action blocks all the operations defined in the policy.
Audit: An applied Audit policy doesn't block any action but instead provides alerts on policy violation. This type of policy can be used for "dry-run" before safely applying a security policy in production.
If Block policy is used and there are no supported enforcement mechanism on the platform then the policy enforcement wouldn't be observed. But we will still be able to see the observability data for the applied Block policy, which can help us in identifying any suspicious activity.
How to use KubeArmor on Oracle K8s engine?
KubeArmor supports enforcement on OKE leveraging the BPF-LSM. The default kernel for Oracle Linux 8.6 (OL 8.6) is UEK R6 kernel-uek-5.4.17-2136.307.3 which does not support BPF-LSM.
Unbreakable Enterprise Kernel Release 7 (UEK R7) is based on Linux kernel 5.15 LTS that supports BPF-LSM and it's available for Oracle Linux 8 Update 5 onwards.
Checking and Enabling support for BPF-LSM
Checking if BPF-LSM is supported in the Kernel
Note: KubeArmor now supports upgrading the nodes to BPF-LSM using . The following text is just an FYI but need not be used manually for k8s env.
ICMP block/audit does not work with AppArmor as the enforcer
There is some problem with AppArmor due to which ICMP rules don't work as expected.
The KubeArmor team has brought this to the attention of the on StackOverflow and await their response.
In the same environment we've found that ICMP rules with BPFLSM work as expected.
For more such differences checkout .
How to enable `KubeArmorHostPolicy` for k8s cluster?
By default the host policies and visibility is disabled for k8s hosts.
If you use following command, kubectl logs -n kubearmor <KUBEARMOR-POD> | grep "Started to protect"
you will see, 2023-08-21 12:58:34.641665 INFO Started to protect containers.
This indicates that only container/pod protection is enabled.
If you have hostpolicy enabled you should see something like this, 2023-08-22 18:07:43.335232 INFO Started to protect a host and containers
One can enable the host policy by patching the daemonset (
Using KubeArmor with Kind clusters
KubeArmor works out of the box with Kind clusters supporting BPF-LSM. However, with AppArmor only mode, Kind cluster needs additional provisional steps. You can check if BPF-LSM is supported/enabled on your host (on which the kind cluster is to be deployed) by using following:
If it has bpf in the list, then everything should work out of the box
KubeArmor enforcement is not enabled/working
KubeArmor enforcement mode requires support of LSMs on the hosts. Certain distributions might not enable it out of the box. There are two ways to check this:
During KubeArmor installation, it shows the following warning message:
KubeArmor with WSL2
It is possible to deploy k3s on WSL2 to have a local cluster on your Windows machine. However, the WSL2 environment does not mount securityfs by default and hence /sys/kernel/security is not available by default. KubeArmor would still install on such system but without enforcement logic.
Thus with k3s on WSL2, you would still be able to run kubearmor but the block-based policies won't work. Using karmor probe would show Active LSM as blank which signals that the block-based policies won't work.
v0.11
We're thrilled to introduce the latest release of KubeArmor, version v0.11! This significant update reinforces our commitment to providing top-tier container-level security for Kubernetes deployments. With an array of new features, integrations, and improvements, KubeArmor v0.11 empowers you to achieve even greater security and control over your containerized workloads. Let's delve into the key highlights of this release:
Operator support: Simplifying Management and Deployment
KubeArmor v0.11 comes with robust operator support, making the installation, configuration, and management of KubeArmor instances a breeze. The KubeArmor Operator streamlines the deployment process, enabling you to efficiently set up and maintain KubeArmor across your Kubernetes clusters. Embrace simplicity and consistency in managing your security policies.
Elements of KubeArmor Operator design:
Operator: Operator is the initial component that gets deployed as part of helm based installation. The job of the operator is to reconcile the current state of KubeArmor to its intended state.
Snitch: Snitch is a job deployed by operator to check what is the prevalent LSM (Linux Security Modules) and the container runtime on each of the node. Snitch then directs the KubeArmor daemonset to use these parameters to accordingly use the appropriate enforcer and container runtime primitives.
bpf-containerd: This is essentially the KubeArmor daemonset that does most of the work from observability to policy enforcement. Note that the name of the daemonset is dependent on the underlying enforcer (bpf, apparmor) that is used and the container runtime that is detected.
OpenTelemetry
The adapter converts KubeArmor telemetry data (logs, visibilty events, policy violations) to the openTelemetry format. This providing a vendor agnostic means of exporting KubeArmor's telemetry data to various observability backend such as , , and a bunch of other !
To enhance your observability capabilities, KubeArmor now seamlessly integrates with Open Telemetry. Gain unparalleled insights into container behavior and workload interactions through comprehensive telemetry data collection. With this integration, you'll be equipped to make informed decisions, swiftly identify anomalies, and proactively address potential security threats.
Credits: Amazing work by for handling KubeArmor's OpenTelemetry integration as part of LFX Mentorship. 🚀
Announcing k8tls (pronounced cattles): k8s service endpoints TLS best practices assessment
Security extends beyond containers. KubeArmor v0.11 introduces to bolster transport layer security within Kubernetes clusters. Safeguard your communications with enhanced encryption, safeguarding your data and ensuring the confidentiality of sensitive information.
is a k8s-native service endpoint scanning engine that verifies whether the endpoint is using secure communication and is using right security configuration. K8tls deploys itself as a k8s job that scans/fingerprints k8s service endpoints to identify if TLS best practices are followed. Primary features include:
🔒 Check if the server port is TLS enabled or not.
📃 Check TLS version, Ciphersuite, Hash, and Signature for the connection. Are these TLS parameters per the TLS best practices guide?
Certificate Verification
KubeArmor as Canonical Microk8s Addon
Microk8s is a full embedded Kubernetes platform that is lightweight yet robust and scalable and is a perfect fit for edge, embedded scenarios. KubeArmor support for Canonical MicroK8s as is merged making microk8s more secure. Microk8s with KubeArmor brings enterprise grade security to lightweight edge kubernetes environments.
Kind and Minikube Compatibility
With this release, KubeArmor extends its compatibility to Kind and Minikube clusters, enabling you to effortlessly apply KubeArmor's security policies to your local testing and development environments. Maintain consistency between testing and production while fortifying your workloads.
karmor profile
karmor logs tool provides raw telemetry out of the box. However, you may want to summarize the process, file, network, syscall events over a period of time. karmor profile introduces a way to handle the summarization. KubeArmor community followers might realize that the base profile feature was added in v0.8 release. v0.11 vastly improves the usability of the features, for e.g, by sorting the data based on process name, summarizing/aggregating well, adding syscall related event summarization etc.
EKS Addon published: Simplifing EKS deployment
Amazon EKS Anywhere allows installing and managing Kubernetes clusters on your own infrastructure, with optional support from AWS. EKS Anywhere supports full lifecycle management of multiple Kubernetes clusters that can operate completely independently of any AWS services. It provides open-source software that’s up to date and patched so you can have an on-premises Kubernetes environment that’s more reliable than a self-managed Kubernetes offering. EKS Anywhere is compatible with Bare Metal, CloudStack, and VMware vSphere as deployment targets.
Although EKS Anywhere can make cluster administration easier, the issue of protecting how Kubernetes namespaces, pods, workloads, and clusters interaction and access of shared resources remains an unsolved problem. It is imperative that workloads are protected at runtime since most of the attacks such as cryptomining, ransomware, data exfiltration, denial of service are manifest once the workloads are deployed in target k8s environment.
In line with the recommended safety guidelines for EKS, KubeArmor comprehensively fulfills these requirements. Getting up to speed on the Kubernetes threat environment proves to be difficult for security teams. New responsibilities for Kubernetes infrastructure and workloads lead to high overhead. Furthermore, ensuring that platform and application teams have consistency and complete visibility across environments for configurations and settings to fulfill can be difficult. KubeArmor helps you take care of most of these for you.
Streamlined Deployment: Updated Helm Chart
Deploying KubeArmor has never been smoother. The updated Helm chart simplifies the installation process, ensuring that you can effortlessly manage KubeArmor's security policies across your Kubernetes clusters. Spend less time configuring and more time securing. Use of KubeArmor Operator greatly simplifies the auto detection of cluster components and deploying the kubearmor accordingly. For example, no more mounting of unwanted host mount points to just detect the container runtime in use.
Staying in Sync with Infrastructure: Terraform Updates
For those who embrace infrastructure-as-code, KubeArmor v0.11 offers updated Terraform integration. Seamlessly incorporate KubeArmor into your Terraform workflows, ensuring consistent security provisioning throughout your infrastructure.
Open source helps provision KubeArmor deployments, policies, and configuration at scale using Hashicorp Terraform.
Pushing Boundaries: Scale Testing with KubeArmor-Relay
Scalability is of paramount importance. One of primary hurdle to observability/monitoring solutions is its impact on runtime performance. With v0.11, we tested logging/telemetry components such as KubeArmor-Relay for scale of 100s of nodes. Through rigorous testing under varying workloads, KubeArmor v0.11 ensures unwavering performance even in the most dynamic Kubernetes environments.
Flourishing Ecosystem: Adopters Update
Our continues to grow, and we're immensely grateful for your support. Join a vibrant community of users and contributors who are shaping the future of container security. Together, we're elevating Kubernetes security to new heights.
Thanks/Credits
We extend our gratitude to our dedicated community, whose feedback and contributions drive the evolution of KubeArmor. Dive into the cutting-edge security enhancements of KubeArmor v0.11 and fortify your Kubernetes environment with confidence.
To explore the latest features and embark on your journey with KubeArmor v0.11, visit our and .
Secure your containers, fortify your Kubernetes clusters — experience KubeArmor v0.11 today.
Support for ARM based cloud platforms such as , and are added in v0.9.
Check out full .
Performance Improvements
KubeArmor in-kernel event filtering changes were added in v0.9. The intention was to filter the events early in its cycle i.e., in the kernel space itself such that performance penalty of user space context switch is not incurred. Note that KubeArmor uses existing LSM (Linux Security Modules) hooks for policy enforcement. The LSM hooks are already enabled by default in all the Linux kernel images. Overall based on the taken on the docker sock-shop example, we found that the impact of KubeArmor is <3% on the overall requests per second performance of the sock-shop example.
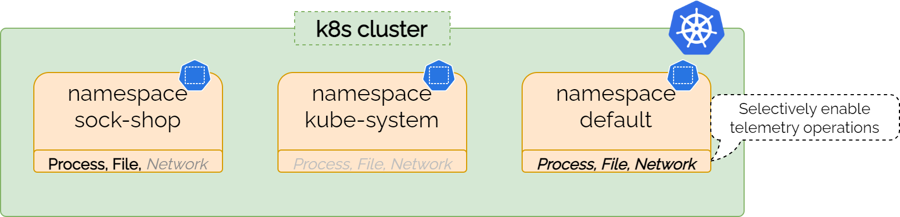
Visibility/Telemetry configuration per namespace
Before v0.9, KubeArmor enabled telemetry across all the namespaces, deployments within the cluster. This caused significant telemetry events generated across non-user workload namespaces (such as kube-system). With v0.9, one can selectively enable process, file, network related telemetry across different namespaces.
K8s Operator-based install for KubeArmor
KubeArmor supports multiple modes of deployment today, including using manifests files, helm, and using karmor cli tool.
However, operator-based installation was desired for KubeArmor for the following reasons:
To handle the scenario where the cluster contains multiple nodes supporting different LSM (Linux Security Modules). KubeArmor cannot set the AppArmor annotation in context to the workload deployed on the node not supporting AppArmor.
There are certain services such as Kubearmor relay whose resource utilization depends on the number of nodes operating within the cluster.
Operator-based installation and subsequent monitoring simplify the handling of such scenarios.
With this release, the karmor cli tool or the helm/manifests will install the operator and then the operator will install the relevant Daemonset and services needed.
Consolidation of controllers
KubeArmor installed different controllers each for KubearmorPolicy, KubearmorHostPolicy in different pods namely policy-controller and host-policy-controller respectively. The new release consolidates multiple controllers into a single pod reducing the overall number of kubearmor pods deployed in the cluster and that single pod will reconcile all the kubernetes resources managed by KubeArmor.
Support for Unbreakable Enterprise Linux (UEK) used in Oracle Kubernetes Engine (OKE)
KubeArmor BPFLSM enforcer is used to support OKE with UEK7 and above. KubeArmor BPFLSM didn't support containerd which was a prerequisite for OKE platform. v0.9 added support for containerd to be used with BPFLSM enforcer, thus making OKE work.
Support for AWS Amazon Linux 2
AWS Amazon Linux 2 kernel version >=5.8 supported BPFLSM, however, it was found that the bpf filesystem was not mounted by default in the worker nodes. KubeArmor added the logic to check if the bpf filesystem is mounted and if not, mount the bpf filesystem on a custom path within the KubeArmor pod itself.
Support for IBM Cloud Kubernetes Service
IBM Cloud Kubernetes Service by default using Ubuntu 18.04 and AppArmor was by default supported on that platform. Thus KubeArmor didn't had to make any changes to support IBM Cloud Kubernetes Service.
ARM Servers: Support for AWS Graviton
processors are designed by AWS to deliver the best price performance for the cloud workloads running in Amazon EC2. EKS also supports using EC2 instances running on AWS Graviton. AWS Graviton can use any Linux distributions. KubeArmor was tested on Ubuntu and Amazon Linux 2 distributions on AWS Graviton. KubeArmor now support AWS Graviton platform for application behavior analysis, network-segmentation, and audit based policies.
ARM Servers: Support for Oracle Ampere
The provides deterministic performance, linear scalability, and a secure architecture with the best price-performance in the market. Users can leverage the industry’s first 160-core Arm server at only $0.01 per core hour and flexible virtual machines with 1-80 cores and 1-64 GB of memory per core. KubeArmor now support Oracle Ampere platform for application behavior analysis, network-segmentation, and audit based policies.
Miscellaneous
Full Enforcement on BPF LSM with Path based hooks. BPF-LSM based enforcement lacked certain enforcement support previously wherein file open related events were handled but a simple inode creation events were not handled. This resulted in certain operations (such as touch) to succeed even if the path is marked as blocked.
Support for mount/umount system calls: To achieve CIS compliance 4.1.14 Ensure successful file system mounts are collected we need to audit the mount and umount events happening. Currently we are making use of mount and umount binaries for generating KubeArmor policies. This method will be not effective if the attacker is trying mount or unmount using system calls. KubeArmor now supports the mount/umount syscalls to make sure that issue mentioned is solved.
v0.7
KubeArmor Release Notes v0.7
ARM support for KubeArmor
KubeArmor is increasingly deployed in for enhanching security for IoT/Edge aspects. KubeArmor has added support to handle the characteristics of edge scenarios such as:
Support for heterogenous platforms (most of the edge is deployed on ARM, Intel). KubeArmor ensures that the same policy enforcement techniques are delivered across different linux kernel versions. It does this by abstracting the policy layer from the enforcement layer and the enforcement layer uses the techniques that are available in the context of the deployed worker node.
Edge devices are constrained in terms of CPU and memory availability. The overall resource usage on KubeArmor has been drastically reduced. This has not only helped edge scenarios but cloud based deployments as well.
KubeArmor supports the philosophy of "Do not assume always-on connectivity with the cloud platform".
Recently KubeArmor finished its . KubeArmor is also now listed on . LF Edge Open Horizon and Intel® Smart Edge are edge computing platforms for deploying edge networks and delivering multi-access edge computing (MEC) for applications, containers, k8s, and virtual machines.
Which ARM platforms were tested?
Raspberry Pi (RPi) - Both as a systemd service and on k8s
Azure ARM VM
Apple Macbook M1 laptops
Network Policy & Microsegmentation support using KubeArmor
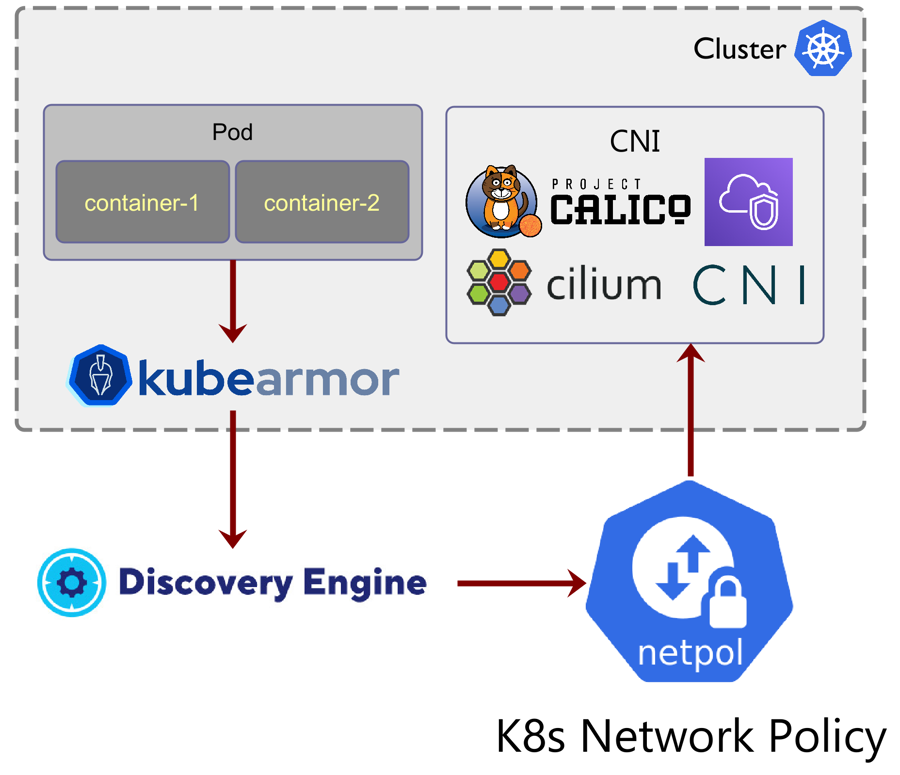
In Kubernetes, the is a set of network traffic rules that are applied to a group of pods in a Kubernetes cluster. The network policy specifies how a pod is allowed to communicate with others. Network policy controllers (running as pods in the Kubernetes cluster) convert the requirements and restrictions of the network policies that are retrieved from the Kubernetes API into the network infrastructure.
KubeArmor has visibility into the network connections made into or from the pods. It has visibility across socket(), bind(), connect(), accept() calls. KubeArmor along with the could now auto-generate which are enforceable using most of the k8s CNIs (Container Network Interface). Note that the discovered policies use k8s abstractions for identifying services, deployments, and pods such as k8s labels, namespaces.
This release allows kubearmor and discovery-engine to do automatic network microsegmentation by detecting the network connections and creating appropriate network policies based on it. These auto-generated network policies are enforceable using any CNI that supports k8s network policy namely, Cilium, Calico, AWS VPC CNI, Weave.
Container based policy support
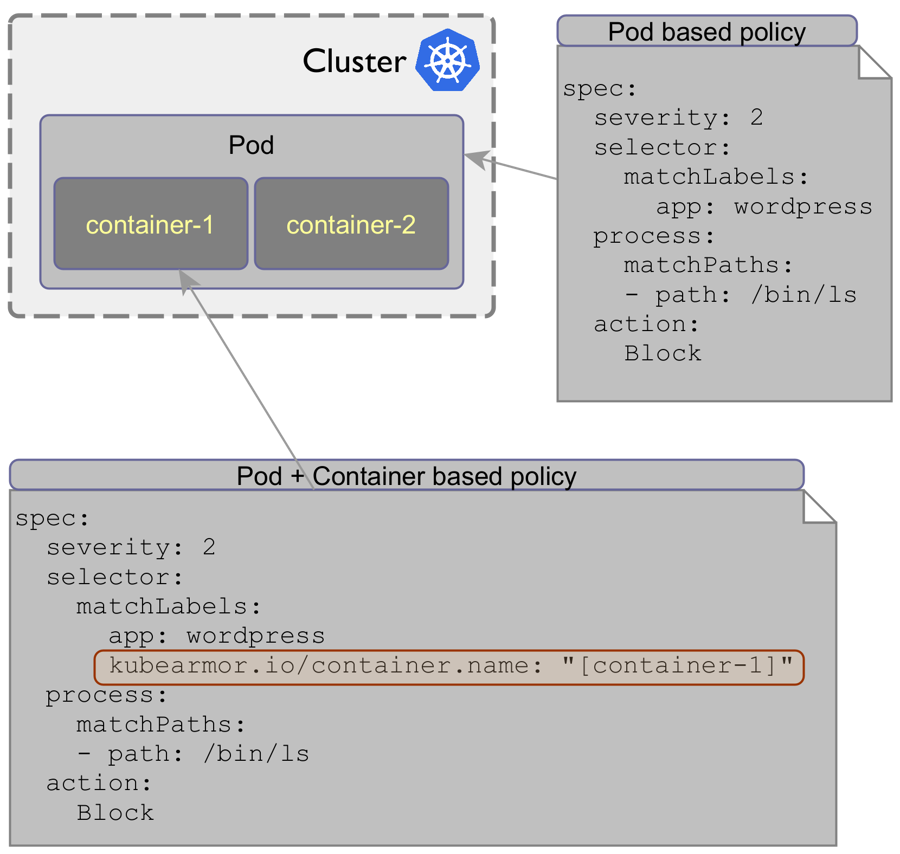
KubeArmor currently applies policy at the pod level i.e. in the KubeArmorPolicy you specify the selector labels which selects a set of pods across the cluster. However, a single pod may contain multiple containers and each container usually has a very different purpose and the set of binaries or file paths may vary across multiple containers within the pod.
This release adds support to apply the policies at specific container level by extending the selector label policy construct. Following is an instantiation of this construct:
Note the use of kubearmor.io/container.name: "[container-1]" construct as part of the selector labels that allows KubeArmor to select specific container(s) within the pod.
Need for this support
The file system paths and binaries present in different containers might be completely different. Without this feature, the block of a process operation in one container would also be blocked in other containers. The automatically discovers the security posture of the k8s application discovers what operations should be allowed. These operations are container specific and should be restricted to specific containers. Thus without the ability to specify container specific rules, there are chances that either the security posture is too generic (in the case of allow based policies) or too restrictive (in the case of block based policies).
Backward compatibility
Specifying container specific labels are optional i.e., if the container information is not specified then the previous way of applying the policies at pod level is retained.
Using un-privileged container for KubeArmor daemonset (as a part of LFX Mentorship)
KubeArmor is a security policy engine and it needs to be ensured that the engine itself follows all the right security practices. Privileged containers are usually frowned upon. Almost every static scanning engine will flag this as an issue. In lot of cases, organizations deploy admission controllers that would not allow containers to be installed in privileged mode.
This release achieves following in the context:
Removes the use of privilege: true flag in the context of kubearmor and associated accessory pods.
Enables individual capabilities in place of enabling all capabilities for the KubeArmor containers.
Allows KubeArmor to be installed in non-kube-system namespace.
Kudos to who achieved this as part .
Workload behavior summary with KubeArmor and Discovery Engine
KubeArmor can observe system events at different dimensions including, Process, File, and Network events. Discovery Engine connects to KubeArmor and does aggregation of this information over a time period to provide app behavior summary. The use-cases for this summary view are:
User can view what are the different process getting spawned in the given workload. Workload could be filtered based on namespace, labels etc.
User can view what file system paths are accessed. For e.g., user can check which processes within the workload are accessing service account token.
User can check what network connections are handled by the workload. Note that the ingress/egress connections are pinned down to the final process which handles it.
Policy Recommendations and Reports
KubeArmor already had a community driven curated list of System and Network policy templates at repository. With the templates, it was upto the user to change values like namespacelabels etc to make sure that the policies are actually enforcing on their cluster.
With the new karmor recommend it is made sure that the user doesn't have to change anything on the policy but rather simply apply them to get a secure environment for the Kubernetes deployments.
karmor recommend recommends policies based on container image, k8s manifest or the actual runtime environment itself.
Bug fixes and improvements
Ability to specific LSM order (). On certain platforms it is possible that multiple LSMs are available for enforcing a policy. For e.g., in case of Google COS (Container Optimized OS), both AppArmor and BPF-LSM are available. By default, KubeArmor chooses BPF-LSM if available, but with this change it is possible to specify the LSM order that could be used for policy enforcement.
Support for readOnly flag with BPF-LSM ()
Fix AppArmor policies behavior ()
v0.6
Support for non-orchestrated containers
KubeArmor already has support for K8s orchestrated and Bare-Metal/VM workloads. With the v0.6 stable release, KubeArmor will also support un-orchestrated containerized workloads. KubeArmor supports both observability and policy enforcement in this mode.
The need for supporting non-orchestrated containers?
KubeArmor recently did a POC with project. Open Horizon supports using containerized workloads on the edge such that multiple applications from different vendors could be deployed on the edge node as different containers. It is imperative that the security aspects of such a multi-tenant solution needs to be taken into consideration. It is required that the security gaps in one of the container should not lead to compromises in other containers or at the host level. Container isolation and hardening has to be ensured such that the blast radius and containment of security flaws is localized.
Path to Zero Trust Edge
Discovering and enforcing least-permissive policies...
For the enforcement, KubeArmor generates AppArmor profiles for individual containers based on the policy specified. The containers are required to start with the AppArmor profiles attached (using security-opt apparmor='profile-name'). These profiles can later be dynamically updated by KubeArmor to insert, modify or remove the AppArmor enforcement. Un-orchestrated workloads have a real use case in edge devices where orchestration is hard due to resource restrictions. KubeArmor can now help protect such environment.
Introducing a lenient way to whitelisting policies
Whitelisting is a security strategy where you predefine all the entities that are to be permitted to execute and access resources. It is a fairly extreme containment measure that, if properly implemented, can prevent many security issues. KubeArmor supports whitelisting by leveraging "Allow" Action in the . But as mentioned it's an extreme containment measure and is fairly hard to implement. What if we want to confine what processes a particular resource can be accessed by. With v0.6 release, KubeArmor has a way to confine what processes a particular resource can be accessed by.
Service Account Tokens are automounted to Pods, it helps provide better access to the Kubernetes API server. But this token becomes problematic if an attacker gains access to a container via some other exploit. We can set but for Pods where Service Account Tokens are needed, the token is still exposed to all the entities available inside the pod. The above KubeArmor Policy helps restrict the access to Service Account Token to some particular binaries (in this case /bin/cat).
kArmor Probe, get support/insights for KubeArmor
karmor probe checks for supported KubeArmor features in the current environment. This was worked upon by as part of .
If we run karmor probe when KubeArmor is not available. It does a precheck to know if KubeArmor will be supported in the environment and what KubeArmor features will be supported e.g: observability, enforcement, etc...
If KubeArmor is running in some form, karmor probe extracts insights from running KubeArmor like what all elements are being enforced and how is KubeArmor configured to run.
Performance improvements
In v0.6, we profiled KubeArmor using pprof and did some major performance improvements such as:
Optimizing container monitor
When Containerd is being used as the runtime, KubeAmor uses the containerd client for monitoring containers in the cluster. However, the container monitor was looking for new containers too frequently and calling a particular time consuming method. Reducing this frequency saved us a lot of CPU cycles.
Memory usage improvements due to migration to Cilium ebpf
With the migration to Cilium eBPF we decreased KubeArmor's memory usage. Checkout section for more details.
Increasing perf buffer size
In addition to CPU and memory optimizations we have increased our perf buffer size to prevent events loss due to high events rate.
Result
We were able to reduce KubeArmor resource consumption drastically from:
to this 🎉
To discover all the improvements that we implemented please checkout this wiki article
Ability to watch for system calls events
Starting from v0.6, KubeArmor introduced the ability to explicitly monitor for system calls and alert based on rules set by the user. The system calls rules matching engine offers multiple options for our users to slice and dice system calls to obtain useful information about their systems.
How can I leverage this new functionality ?
Our users can set policies to alerts for system call based on many criterion such as:
system call name
system call source (binary or directory)
system call target (binary or directory)
Real life example
In this example we want to watch for file deletions via the unlink system calls that impacts any directory under /home/.
KubeArmorPolicy:
Generated telemetry
For more information, Please checkout our policy specification documentation.
KubeArmor uses eBPF to trace various kernel events and gain visibility on what's happening. We have been leveraging the BCC ( ) Framework to interact with the kernel through eBPF. BCC is going to great lengths to simplify BPF developer’s life, but sometimes that extra convenience gets in the way and makes it actually harder to figure out what’s wrong and how to fix it.
BCC includes Clang and LLVM with it and executes compilation from the main program at runtime causing sudden heavy resource utilisation which sometimes result crashes in our container due resource limitations. Also there was an added dependency on Kernel Headers which needed to be manually installed on the Host and made available to KubeArmor for it's working.
In this release, we have migrated off from BCC to and , decoupled compilation of eBPF Object files from main KubeArmor container to an init container. Some benefits that come with this migration include:
No sudden outbursts of resource utilisation in the main container
Lower Resource Utilisation
No Dependency on Kernel Header if kernel supports BTF ( BPF Type Format ). BTF is generally available on kernel version > 5.2, for kernel's without BTF information we still require Kernel Headers.
Extend KubeArmor support on OpenShift and RKE
OpenShift
With the v0.5 release, KubeArmor already supports cri-o. With this release we have successfully tested KubeArmor on OpenShift on RHEL 8.4 (kernel 4.18) in observability/audit mode. RHEL 8.4 is shipped with SELinux as the LSM and KubeArmor supports SELinux only for host-based policy enforcement. This work was done by Vikas Verma as part of .
RKE
KubeArmor now supports Rancher in both observability and enforcement mode.
Note KubeArmor is currently not tested for .
Wiki
KubeArmor is a runtime security enforcement system for containers and nodes.
It uses security policies (defined as Kubernetes Custom Resources like KSP, HSP, and CSP)
to define allowed, audited, or blocked actions for workloads.
The system monitors system activity using kernel technologies such as eBPF
and enforces the defined policies by integrating with the underlying operating system's
security modules like AppArmor, SELinux, or BPF-LSM, sending security alerts
and telemetry through a log feeder.
Policy enforcement on symbolic links like /usr/bin/python doesn't work and one has to specify the path of the actual executable that they link to.
Checkout Platform Support
Check karmor probe output and check whether Container Security is false. If it is false, the KubeArmor enforcement is not supported on that platform. You should check the KubeArmor Support Matrix and if the platform is not listed there then raise a new issue or connect to kubearmor community of slack.
Checkout Default Posture
If you are applying an Allow-based policies and expecting unknown actions to be blocked, please make sure to check the default security posture. The default security posture is set to Audit by default since KubeArmor v0.7.
The Pod Security Context expect the security profile to be specified in its native language, for instance, AppArmor profile for AppArmor. SELinux profile if SELinux is to be used. The profile language is extremely complex and this complexity could backfire i.e, it could lead to security holes.
Security Profile updates are manual and difficult: When an app is updated, the security posture might change and it becomes difficult to manually update the native rules.
No alerting of LSM violation on managed cloud platforms: By default LSMs send logs to kernel auditd, which is not available on most managed cloud platforms.
KubeArmor solves all the above mentioned problems.
It maps YAML rules to LSMs (apparmor, bpf-lsm) rules so prior knowledge of different security context (native AppArmor, SELinux) is not required.
It's easy to deploy: KubeArmor is deployed as a daemonset. Even when the application is updated, the enforcement rules are automatically applied.
Consistent Alerting: KubeArmor handles kernel events and maps k8s metadata using ebpf.
KubeArmor also runs in systemd mode so can directly run and protect Virtual Machines or Bare-metal machines too.
Pod Security Context cannot leverage BPF-LSM at all today. BPF-LSM provides more programmatic control over the policy rules.
Pod Security Context do not manage abstractions. As an example, you might have two nodes with Ubuntu, two nodes with Bottlerocket. Ubuntu, by default has AppArmor and Bottlerocket has BPF-LSM and SELinux. KubeArmor internally picks the right primitives to use for enforcement and the user do not have to bother explicitly stating what to use.
This will create a direct, more reliable connection with the service, without any internal port-forward.
If you want to stream logs to external tools (fluentd/splunk/ELK etc) checkout Streaming KubeArmor events.
The community has created adapters and dashboards for some of these tools which can be used out of the box or as reference for creating new adapters. Checkout the previous question for more information.
It also detects any policy violations and generates audit logs with container identities. Apart from containers, KuberArmor also allows protecting the Host itself.
Installing UEK 7 on OL 8.6
UEK R7 can be installed on OL 8.6 by following the easy-to-follow instructions provided here in this Oracle Blog Post.
Note: After upgrading to the UEK R7 you may required to enable BPF-LSM if it's not enabled by default.
We check for BPF LSM Support in Kernel Config
Following flags need to exist and set to y
Note: These config could be in other places too like /boot/config, /usr/src/linux-headers-$(uname -r)/.config, /lib/modules/$(uname -r)/config, /proc/config.gz.
Checking if BPF-LSM is enabled
check if bpf is enabled by verifying if it is in the active lsms.
This will enable the KubeArmorHostPolicy and host based visibility for the k8s worker nodes.
If it has apparmor in the list, then follow the steps mentioned in this FAQ.
1. Create Kind cluster
2. Exec into kind node & install apparmor util
The above command will install the AppArmor utilities in the kind-control-plane, we can also use this command to install these in minikube as well as in all the other docker based Kubernetes environments.
It might be possible that apart from the dockerized kubenetes environment AppArmor might not be available on the master node itself in the Kubernetes cluster. To check for the same you can run the below command to check for the AppArmor support in kernel config:
Following flags need to exist and set to y
Run the command to install apparmor:
You need to restart your CRI in-order to make APPARMOR available as a kernel config security.
If not then we need to install AppArmor utils on the master node itself.
If the kubearmor-relay pod goes into CrashLoopBackOff, apply the following patch:
Another way to check it is using karmor probe. If the Active LSM shown is blank, then the enforcement won't work.
Following updater daemonset will enable the required LSM on the nodes (in the future if new nodes are dynamically added, those nodes will be auto enabled as well).
Note: Nodes who do not have necessary LSM will be restarted after the deployment of updater.
Once the nodes are restarted, karmor probe would then show Active LSM with appropriate value.
--container - Specify container name for container specific logs
--logFilter <system|policy|all> - Filter to either receive system logs or alerts on policy violation
--logType <ContainerLog|HostLog> - Source of logs - ContainerLog: logs from containers or HostLog: logs from the host
--namespace - Specify the namespace for the running pods
--operation <Process|File|Network> - Type of logs based on process, file or network
cat /sys/kernel/security/lsm
KubeArmor is running in Audit mode, only Observability will be available and Policy Enforcement won't be available.
Relay: KubeArmor Relay connects to each of the daemonset and collects the alerts/telemetry/log and makes it available at single GRPC endpoint. External services can connect to KubeArmor Relay to gets the alerts/telemetry from a single point. Relay is available as a k8s deployment/service.
Controller: KubeArmor controller reconciles the KubeArmor policies. One of the biggest advantage of KubeArmor is its use of k8s-native design for policy management. Users can enable disable policies at will by applying/deleting the policies at runtime. This enables a wide range of possibilities such as time-based policy activation.
💥 Is the certificate expired or revoked?
✍️ Is it a self-signed certificate?
⛓️ Is there a self-signed certificate in the full certificate chain?
App Behavior fixes: Bind port data is now showing meaningful data. Removed unnecessary netlink and unix domain sockets handling in the context.
Use of k8s configmap: KubeArmor configuration previously was kept as environment variables. The new release ensures that KubeArmor uses k8s native approach of handling configuration and the changes to the configuration can now be handled dynamically i.e., without restarting the KubeArmor.
❯ karmor summary -n wordpress-mysql -l app=wordpress --agg
local port to be used for port forwarding knoxautopolicy-8587dfd464-28dpq: 9089
Pod Name wordpress-bf95888cb-rkcwm
Namespace Name wordpress-mysql
Cluster Name default
Container Name wordpress
Labels app=wordpress
Process Data
+------------------------------------------------------------------------------------------------------------------------+-----------------------------------+-------+------------------------------+--------+
| SRC PROCESS | DESTINATION PROCESS PATH | COUNT | LAST UPDATED TIME | STATUS |
+------------------------------------------------------------------------------------------------------------------------+-----------------------------------+-------+------------------------------+--------+
| /bin/bash | /bin/mkdir | 1 | Mon Nov 14 03:49:44 UTC 2022 | Allow |
| /bin/bash | /bin/sed | 19 | Mon Nov 14 03:49:36 UTC 2022 | Allow |
| /bin/bash | /usr/bin/cut | 3 | Mon Nov 14 03:49:36 UTC 2022 | Allow |
| /bin/bash | /usr/bin/dirname | 4 | Mon Nov 14 03:49:44 UTC 2022 | Allow |
| /bin/bash | /usr/bin/head | 3 | Mon Nov 14 03:49:36 UTC 2022 | Allow |
| /bin/bash | /usr/bin/sha1sum | 3 | Mon Nov 14 03:49:36 UTC 2022 | Allow |
| /bin/bash | /usr/local/bin/php | 5 | Mon Nov 14 03:49:36 UTC 2022 | Allow |
| /var/lib/rancher/k3s/data/8307e9b398a0ee686ec38e18339d1464f75158a8b948b059b564246f4af3a0a6/bin/containerd-shim-runc-v2 | /usr/local/bin/apache2-foreground | 1 | Mon Nov 14 03:49:44 UTC 2022 | Allow |
| /var/lib/rancher/k3s/data/8307e9b398a0ee686ec38e18339d1464f75158a8b948b059b564246f4af3a0a6/bin/containerd-shim-runc-v2 | /usr/sbin/apache2 | 1 | Mon Nov 14 03:49:44 UTC 2022 | Allow |
+------------------------------------------------------------------------------------------------------------------------+-----------------------------------+-------+------------------------------+--------+
File Data
+-----------------------------------+--------------------------------------------------------------------+-------+------------------------------+--------+
| SRC PROCESS | DESTINATION FILE PATH | COUNT | LAST UPDATED TIME | STATUS |
+-----------------------------------+--------------------------------------------------------------------+-------+------------------------------+--------+
| /bin/mkdir | /etc/ | 1 | Mon Nov 14 03:49:44 UTC 2022 | Allow |
| /bin/mkdir | /lib/x86_64-linux-gnu/ | 4 | Mon Nov 14 03:49:44 UTC 2022 | Allow |
| /bin/rm | /lib/x86_64-linux-gnu/ | 1 | Mon Nov 14 03:49:44 UTC 2022 | Allow |
| /bin/sed | /etc/ | 10 | Mon Nov 14 03:49:36 UTC 2022 | Allow |
| /bin/sed | /lib/x86_64-linux-gnu/ | 25 | Mon Nov 14 03:49:35 UTC 2022 | Allow |
| /usr/bin/dirname | /etc/ | 2 | Mon Nov 14 03:49:44 UTC 2022 | Allow |
| /usr/bin/dirname | /lib/x86_64-linux-gnu/ | 2 | Mon Nov 14 03:49:44 UTC 2022 | Allow |
| /usr/bin/head | /dev/urandom | 1 | Mon Nov 14 03:49:34 UTC 2022 | Allow |
| /usr/bin/head | /etc/ | 1 | Mon Nov 14 03:49:35 UTC 2022 | Allow |
| /usr/bin/sha1sum | /etc/ | 2 | Mon Nov 14 03:49:34 UTC 2022 | Allow |
| /usr/bin/sha1sum | /lib/x86_64-linux-gnu/ | 1 | Mon Nov 14 03:49:36 UTC 2022 | Allow |
| /usr/local/bin/apache2-foreground | /dev/tty | 1 | Mon Nov 14 03:49:44 UTC 2022 | Allow |
| /usr/local/bin/apache2-foreground | /lib/x86_64-linux-gnu/ | 4 | Mon Nov 14 03:49:44 UTC 2022 | Allow |
| /usr/local/bin/php | /dev/urandom | 3 | Mon Nov 14 03:49:36 UTC 2022 | Allow |
| /usr/local/bin/php | /etc/ | 11 | Mon Nov 14 03:49:35 UTC 2022 | Allow |
| /usr/local/bin/php | /lib/x86_64-linux-gnu/ | 31 | Mon Nov 14 03:49:36 UTC 2022 | Allow |
| /usr/local/bin/php | /tmp/ | 4 | Mon Nov 14 03:49:35 UTC 2022 | Allow |
| /usr/local/bin/php | /usr/lib/ssl/openssl.cnf | 3 | Mon Nov 14 03:49:36 UTC 2022 | Allow |
| /usr/local/bin/php | /usr/lib/x86_64-linux-gnu/ | 29 | Mon Nov 14 03:49:36 UTC 2022 | Allow |
| /usr/local/bin/php | /usr/local/etc/php/conf.d | 2 | Mon Nov 14 03:49:34 UTC 2022 | Allow |
| /usr/local/bin/php | /usr/local/etc/php/conf.d/ | 10 | Mon Nov 14 03:49:36 UTC 2022 | Allow |
| /usr/local/bin/php | /usr/local/lib/php/extensions/no-debug-non-zts-20131226/gd.so | 2 | Mon Nov 14 03:49:35 UTC 2022 | Allow |
| /usr/local/bin/php | /usr/local/lib/php/extensions/no-debug-non-zts-20131226/mysqli.so | 3 | Mon Nov 14 03:49:35 UTC 2022 | Allow |
| /usr/local/bin/php | /usr/local/lib/php/extensions/no-debug-non-zts-20131226/opcache.so | 3 | Mon Nov 14 03:49:36 UTC 2022 | Allow |
| /usr/sbin/apache2 | /dev/urandom | 1 | Mon Nov 14 03:49:44 UTC 2022 | Allow |
| /usr/sbin/apache2 | /etc/ | 8 | Mon Nov 14 03:49:44 UTC 2022 | Allow |
| /usr/sbin/apache2 | /lib/x86_64-linux-gnu/ | 4 | Mon Nov 14 03:49:44 UTC 2022 | Allow |
| /usr/sbin/apache2 | /usr/lib/ssl/openssl.cnf | 1 | Mon Nov 14 03:49:44 UTC 2022 | Allow |
+-----------------------------------+--------------------------------------------------------------------+-------+------------------------------+--------+
Egress connections
+----------+--------------------+------------+------+-----------------+-----------+-------+------------------------------+
| PROTOCOL | COMMAND | POD/SVC/IP | PORT | NAMESPACE | LABELS | COUNT | LAST UPDATED TIME |
+----------+--------------------+------------+------+-----------------+-----------+-------+------------------------------+
| TCP | /usr/local/bin/php | svc/mysql | 3306 | wordpress-mysql | app=mysql | 1 | Mon Nov 14 03:49:44 UTC 2022 |
+----------+--------------------+------------+------+-----------------+-----------+-------+------------------------------+
$ karmor recommend --help
Recommend policies based on container image, k8s manifest or the actual runtime env
Usage:
karmor recommend [flags]
karmor recommend [command]
Available Commands:
update Updates policy-template cache
Flags:
-c, --config string absolute path to image registry configuration file
-h, --help help for recommend
-i, --image strings Container image list (comma separated)
-l, --labels strings User defined labels for policy (comma separated)
-n, --namespace string User defined namespace value for policies
-o, --outdir string output folder to write policies (default "out")
-r, --report string report file (default "report.txt")
-t, --tag strings tags (comma-separated) to apply. Eg. PCI-DSS, MITRE
Global Flags:
--context string Name of the kubeconfig context to use
--kubeconfig string Path to the kubeconfig file to use
Use "karmor recommend [command] --help" for more information about a command.
No CGO dependency in KubeArmor binary, making our systemd releases more portable and not dependent on certain glibc versions anymore.
Lighter KubeArmor binary with reduced attack surface, due to removal of the llvm toolchain and BCC from the kubearmor container.
file:
matchDirectories:
- dir: /run/secrets/kubernetes.io/serviceaccount/
recursive: true
action: Block # Block access to service account token to everyone
- dir: /
recursive: true
- dir: /run/secrets/kubernetes.io/serviceaccount/
recursive: true
fromSource:
- path: /bin/cat # Allow access to service account token to only cat
process:
matchDirectories:
- dir: /
recursive: true # Allow all other process execution in general
KubeArmor supports attack prevention, not just observability and monitoring.
More importantly, the prevention is handled inline: even before a process is spawned, a rule can deny execution of a process.
Most other systems typically employ "post-attack mitigation" that kills a process/pod after malicious intent is observed, allowing an attacker to execute code on the target environment.
Essentially KubeArmor uses inline mitigation to reduce the attack surface of a pod/container/VM.
KubeArmor leverages best of breed Linux Security Modules (LSMs) such as AppArmor, BPF-LSM, and SELinux (only for host protection) for inline mitigation.
LSMs have several advantages over other techniques:
KubeArmor does not change anything with the pod/container.
KubeArmor does not require any changes at the host level or at the CRI (Container Runtime Interface) level to enforce blocking rules. KubeArmor deploys as a non-privileged DaemonSet with certain capabilities that allows it to monitor other pods/containers and the host.
A given cluster can have multiple nodes utilizing different LSMs. KubeArmor abstracts away complexities of LSMs and provides an easy way to enforce policies. KubeArmor manages complexity of LSMs under-the-hood.
Post-Attack Mitigation and its flaws
Post-exploit Mitigation works by killing a suspicious process in response to an alert indicating malicious intent.
Attacker is allowed to execute a binary. Attacker could disable security controls, access logs, etc to circumvent attack detection.
By the time a malicious process is killed, sensitive contents could have already been deleted, encrypted, or transmitted.
Problems with k8s native Pod Security Context
allows one to specify or policies.
This approach has multiple problems:
It is often difficult to predict which LSM (AppArmor or SELinux) would be available on the target node.
BPF-LSM is not supported by Pod Security Context.
It is difficult to manually specify an AppArmor or SELinux policy. Changing default AppArmor or SELinux policies might result in more security holes since it is difficult to decipher the implications of the changes and can be counter-productive.
Problems with multi-cloud deployment
Different managed cloud providers use different default distributions.
Google GKE COS uses AppArmor by default, AWS Bottlerocket uses BPF-LSM and SELinux, and AWS Amazon Linux 2 uses only SELinux by default.
Thus it is challenging to use Pod Security Context in multi-cloud deployments.
Use of BPF-LSM
References:
Quoting Grsecurity, “post-exploitation detection/mitigation is at the mercy of an exploit writer putting little to no effort into avoiding tripping these detection mechanisms.”
# On RHEL like systems
sudo grub2-mkconfig -o /boot/grub2.cfg
sudo reboot
Profiling of Kubearmor Logs using karmor
karmor profile provides a real-time terminal UI that visualizes security-relevant activity observed by KubeArmor, including Process, File, and Network events. It fetches live data from the KubeArmor logs API, displays counters and key details for each event type, and supports easy navigation and filtering.
Profile
🔍 Filtering Logs with karmor profile
The karmor profile command allows you to filter logs or alerts using a set of useful flags. These filters help narrow down the output to specific Kubernetes objects like containers, pods, and namespaces.
🧰 Available Filters
Flag
Description
📌 Usage Examples
✅ Filter by Container Name
Outputs logs only from the container named nginx.
✅ Filter by Namespace
Outputs logs only from the namespace nginx1.
✅ Filter by Pod
Outputs logs only from the pod named nginx-pod-1.
🔗 Combine Multiple Filters
You can combine filters to narrow down the logs even further.
Outputs logs only from the nginx container in the nginx1 namespace.
💡 Tip
Use these filters during profiling sessions to quickly isolate behavior or security events related to a specific pod, container, or namespace.
KubeArmor
KubeArmor is a cloud-native runtime security enforcement system that restricts the behavior (such as process execution, file access, and networking operations) of pods, containers, and nodes (VMs) at the system level.
KubeArmor leverages such as , , or to enforce the user-specified policies. KubeArmor generates rich alerts/telemetry events with container/pod/namespace identities by leveraging eBPF.
💍
🚥 Process Whitelisting
🚥 Network Whitelisting
🎛️ Control access to sensitive assets
🔭
🧬 Process execs, File System accesses
🧭 Service binds, Ingress, Egress connections
🔬 Sensitive system call profiling
⛓️ Protect critical paths such as cert bundles
📋 MITRE, STIGs, CIS based rules
🛅 Restrict access to raw DB table
-c, --container
Filters logs by container name.
-n, --namespace
Filters logs by Kubernetes namespace.
--pod
Filters logs by pod name.
karmor profile -c nginx
karmor profile -n nginx1
karmor profile --pod nginx-pod-1
karmor profile -n nginx1 -c nginx
Least Permissive Access
KubeArmor helps organizations enforce a zero trust posture within their Kubernetes clusters. It allows users to define an allow-based policy that allows specific operations, and denies or audits all other operations. This helps to ensure that only authorized activities are allowed within the cluster, and that any deviations from the expected behavior are denied and flagged for further investigation.
By implementing a zero trust posture with KubeArmor, organizations can increase their security posture and reduce the risk of unauthorized access or activity within their Kubernetes clusters. This can help to protect sensitive data, prevent system breaches, and maintain the integrity of the cluster.
KubeArmor supports allow-based policies which results in specific actions to be allowed and denying/auditing everything else. For example, a specific pod/container might only invoke a set of binaries at runtime. As part of allow-based rules you can specify the set of processes that are allowed and everything else is either audited or denied based on the default security posture.
Allow execution of only specific processes within the pod
Install the nginx deployment using
kubectl create deployment nginx --image=nginx.
Set the default security posture to default-deny.
Observe that the policy contains Allow action. Once there is any KubeArmor policy having Allow action then the pods enter least permissive mode, allowing only explicitly allowed operations.
Note: Use kubectl port-forward $POD --address 0.0.0.0 8080:80 to access nginx and you can see that the nginx web access still works normally.
Lets try to execute some other processes:
This would be permission denied.
Challenges with maintaining Zero Trust Security Posture
Achieving Zero Trust Security Posture is difficult. However, the more difficult part is to maintain the Zero Trust posture across application updates. There is also a risk of application downtime if the security posture is not correctly identified. While KubeArmor provides a way to enforce Zero Trust Security Posture, identifying the policies/rules for achieving this is non-trivial and requires that you keep the policies in dry-run mode (or default audit mode) before using the default-deny mode.
KubeArmor provides framework so as to smoothen the journey to Zero Trust posture. For e.g., it is possible to set dry-run/audit mode at the namespace level by . Thus, you can have different namespaces in different default security posture modes (default-deny vs default-audit). Users can switch to default-deny mode once they are comfortable (i.e., they do not see any alerts) with the settings.
v1.6
We are excited to announce the release of KubeArmor v1.6, packed with powerful new features, significant enhancements, and critical bug fixes that make workload protection and observability even more robust for cloud-native environments.
This release reflects major advancements in policy enforcement, system monitoring, and ecosystem integrations while addressing important stability and performance improvements.
Introduced argument-based matching for processes in policies.
Allows precise control over command-line arguments, enabling granular process enforcement.
This feature is currently limited to BPFLSM.
➕ Add support for non-Kubernetes installation through the KubeArmor client
📡 DNS Visibility at Pod-Level
Added DNS query tracing on UDP to provide insights into domain lookups from workloads.
Helps detect malicious behaviors like DGA (Domain Generation Algorithms) or unauthorized C2 communications.
🛡️ New Policy Presets
ProtectProc: Blocks unauthorized access to the /proc directory by non-owner processes.
ProtectEnv: Prevents unauthorized access to sensitive environment variables in /proc/[pid]/environ.
ExecPreset: Enforces restrictions on external process executions (e.g., via kubectl exec
🔌 Container Runtime Enhancements
OCI Hooks Support:
Added support for containerd and CRI-O hooks, eliminating the need for exposing runtime UNIX sockets for container events.
📈 Improved Telemetry and Observability
Added TTY information in BPF-LSM generated telemetry.
Enhanced telemetry with network metadata using Kubernetes informers.
Extended alert resources to include full command arguments.
🌐 Ecosystem and Integrations
OpenSearch Support: Added OpenSearch as a datasource for process graphs in Grafana dashboards.
Integrated image vulnerability scanning workflows (via Trivy) in release pipelines.
🛠️ Bug Fixes and Stability Improvements
Resolved memory leaks in AppArmor DaemonSet (observed in AKS clusters).
Fixed policy deletion logic for recommended policies in the operator.
Addressed KubeArmorClusterPolicy enforcement issue for pods created post-policy application.
⚙️ Additional Improvements
Helm charts updated to handle tolerations properly.
Introduced conditional deployment of pod refresh controllers.
Updated CI pipelines to use Ubuntu 22.04 runners and separated network tests for newer kernels.
🚨 Breaking Changes
Preset API Specification Updated:
Action is now defined per-preset level:
Configuration changes via karmor.yaml will eventually replace existing ConfigMap fields.
📖 Documentation Updates
Revised hardening policies and presets documentation.
Updated multi-OS deployment instructions and CLI long descriptions.
Added ModelArmor use-cases and a better getting started guide
✅ Upgrade Notes
Users are advised to review preset configurations and update CRDs accordingly.
When upgrading from v1.5, ensure Helm charts are updated to leverage new toleration handling and configuration management features.
📌 Contributors
This release wouldn’t have been possible without the incredible contributions from the community. Special thanks to all contributors for feature development, bug fixes, and reviews. 🙌
🔗 Resources
📚
🛠️
📝
Testing Guide
Testing Guide
There are two ways to check the functionalities of KubeArmor: 1) testing KubeArmor manually and 2) using the testing framework.
0. Make sure Kubernetes cluster is running
Although there are many ways to run a Kubernetes cluster (like minikube or kind), it will not work with locally developed KubeArmor. KubeArmor needs to be on the same node as where the Kubernetes nodes exist. If you try to do this it will not identify your node since minikube and kind use virtualized nodes. You would either need to build your images and deploy them into these clusters or you can simply use k3s or kubeadm for development purposes. If you are new to these terms then the easiest way to do this is by following this guide:
0.1. Firstly Run 'kubectl proxy' in background
0.2. Now run KubeArmor
1. Test KubeArmor manually
1.1. Run 'kubectl proxy' in background
1.2. Compile KubeArmor
1.3. Run KubeArmor
1.4. Apply security policies into Kubernetes
Beforehand, check if the KubeArmorPolicy and KubeArmorHostPolicy CRDs are already applied.
If they are still not applied, do so.
Now you can apply specific policies.
You can refer to security policies defined for example microservices in .
1.5. Trigger policy violations to generate alerts
1.6. Check generated alerts
Watch alerts using cli tool
flags:
Note that you will see alerts and logs generated right after karmor runs logs; thus, we recommend to run the above command in other terminal to see logs live.
2. Test KubeArmor using the auto-testing framework
The case that KubeArmor is directly running in a host
Compile KubeArmor
Run the auto-testing framework
Check the test report
The case that KubeArmor is running as a daemonset in Kubernetes
v1.5
KubeArmor v1.5 delivers significant advancements in runtime security for Kubernetes environments. This release introduces enhanced policy enforcement, streamlined management, and improved observability, making it easier to secure workloads effectively.
This version expands platform support, optimizes performance, and introduces new features like network policy enforcement and host security hardening, along with integrations for a seamless security experience.
Runtime Protection for Kubernetes Clusters Secure clusters at runtime with fine-grained policies to prevent unauthorized access and block malicious activity.
Cluster-wide Security Policies Support for cluster-level policies enables security enforcement beyond namespaces for organization-wide protection. KubeArmor enforces Cluster Security Policies (CSPs) that allow you to define security controls across the entire cluster. CSPs provide a unified way to manage container workloads at scale, enabling global policy enforcement across namespaces.
📄 📝
🛠 Improvements
Cluster Name Detection Auto-fetch cluster names for easier multi-cluster management.
Docker ImagePull Secrets Improved management of Docker credentials for smoother deployments.
Fileless Execution Handling Added special presets to manage and prevent fileless attacks.
🐞 Bug Fixes
Fixed conditional mount issues for operator consistency.
Enhanced log handling for cases where process names were missing.
Improved build system by injecting version info into systemd packages.
Added
📖 Documentation Updates
Talos Support Updated FAQ and guides for Talos environments, ensuring all platforms are well-documented.
📄
KubeArmor continues to harden cloud-native environments, enforcing least-permissive access and monitoring critical paths for Kubernetes, containerized, and bare-metal workloads.
👉 Join the Community:
Getting Started
This guide assumes you have access to a . If you want to try non-k8s mode, for instance systemd mode to protect/audit containers or processes on VMs/bare-metal, check .
If you're deploying kubearmor on GKE autopilot follow the instructions provide with
Check the to verify if your platform is supported.
Install KubeArmor
Adversarial Attacks on Deep Learning Models
Adversarial attacks exploit vulnerabilities in AI systems by subtly altering input data to mislead the model into incorrect predictions or decisions. These perturbations are often imperceptible to humans but can significantly degrade the system's performance.
--gRPC string gRPC server information
--help help for log
--json Flag to print alerts and logs in the JSON format
--logFilter string What kinds of alerts and logs to receive, {policy|system|all} (default "policy")
--logPath string Output location for alerts and logs, {path|stdout|none} (default "stdout")
--msgPath string Output location for messages, {path|stdout|none} (default "none")
$ cd KubeArmor/KubeArmor
~/KubeArmor/KubeArmor$ make clean && make
$ cd KubeArmor/tests
~/KubeArmor/tests$ ./k8s_env/test-scenarios-local.sh
~/KubeArmor/tests$ cat /tmp/kubearmor.test
$ cd KubeArmor/tests
~/KubeArmor/tests$ ./k8s_env/test-scenarios-in-runtime.sh
~/KubeArmor/tests$ cat /tmp/kubearmor.test
Example policy:
).
Fixed panic errors with uninitialized Docker daemons.
Resolved tolerations propagation issues in Helm chart deployments.
Improved filtering logic in karmor profile commands to respect namespace, pod, and container filters.
Fixed PID/HostPID and PPID/HostPPID display anomalies (e-notation issues).
Deprecated legacy Config Watcher in favor of karmor.yaml configuration.
KubeArmor Presets Simplify security policy deployment with predefined policy templates for common use cases like:
Blocking fileless execution
Protecting environment variables
Auditing and blockingkubectl exec commands To use presets, specify the preset-rule field in your KubeArmorPolicy.
Minikube and Killercoda Playground Support Set up quick test environments for demos and PoCs effortlessly.
Support for SCTP and All Protocols Added the ability to handle SCTP protocol and all protocols with raw socket, including protocol: all network rule. (Contributed by @rksharma95 in #1892)
OpenSSF Scorecard Improvements Reduced attack surfaces and enhanced compliance by optimizing SecComp profiles and minimizing host exposure.
NRI Handler Support Implemented NRI (Network Resource Interface) handler to extend runtime integrations. (Contributed by @dqsully in #1674)
Containerd API Refactor Upgraded to v2 API for better performance and stability.
RBAC Enhancements Introduced flag-based RBAC rules and refined operator configurations.
Deprecation of kube-rbac-proxy Replaced with built-in controller authentication for streamlined security configuration.
Improved Controller Annotation Logic Enhanced handling of pod deletions in the KubeArmor controller for better reliability. (Contributed by @Aryan-sharma11 in #1952)
Optimized Memory Usage Reduced memory overhead in os.readlink operations to improve efficiency. (Contributed by @Aryan-sharma11 in #1996)
Exclude Labels in Endpoint Matching Added support for excluding labels in CSP and KSP endpoint matching for flexible policy scoping. (Contributed by @Prateeknandle in #1999)
go-get-tool
function to operator Makefile for more stable builds.
Fixed network event returned values for more accurate monitoring. (Contributed by @rksharma95 in #2042)
You can find more details about helm related values and configurations here.
Install kArmor CLI (Optional)
[!NOTE] kArmor CLI provides a Developer Friendly way to interact with KubeArmor Telemetry. You can stream KubeArmor telemetry independently of kArmor CLI tool and integrate it with your chosen SIEM (Security Information and Event Management) solutions. Here's a guide on how to achieve this integration. This guide assumes you have kArmor CLI to access KubeArmor Telemetry but you can view it on your SIEM tool once integrated.
Deploy test nginx app
[!NOTE] $POD is used to refer to the target nginx pod in many cases below.
Sample policies
Deny execution of package management tools (apt/apt-get)
Package management tools can be used in the runtime env to download new binaries that will increase the attack surface of the pods. Attackers use package management tools to download accessory tooling (such as masscan) to further their cause. It is better to block usage of package management tools in production environments.
K8s mounts the service account token by default in each pod even if there is no app using it. Attackers use these service account tokens to do lateral movements.
Now when anyone tries to access to service account token, it would be Permission Denied.
If you don't see Permission denied please refer to debug this issue.
Audit access to folders/paths
Access to certain folders/paths might have to be audited for compliance/reporting reasons.
File Visibility is disabled by default to minimize telemetry. Some file based policies will need that enabled. To enable file visibility on a namespace level:
Note: karmor logs -n default would show all the audit/block operations.
Zero Trust Least Permissive Policy: Allow only nginx to execute in the pod, deny rest
Least permissive policies require one to allow certain actions/operations and deny rest. With KubeArmor it is possible to specify as part of the policy as to what actions should be allowed and deny/audit the rest.
Security Posture defines what happens to the operations that are not in the allowed list. Should it be audited (allow but alert), or denied (block and alert)?
By default the security posture is set to audit. Lets change the security posture to default deny.
Observe that the policy contains Allow action. Once there is any KubeArmor policy having Allow action then the pods enter least permissive mode, allowing only explicitly allowed operations.
Note: Use kubectl port-forward $POD --address 0.0.0.0 8080:80 to access nginx and you can see that the nginx web access still works normally.
Lets try to execute some other processes:
Any binary other than bash and nginx would be permission denied.
If you don't see Permission denied please refer to debug this issue
curl -sfL http://get.kubearmor.io/ | sudo sh -s -- -b /usr/local/bin
# sudo access is needed to install it in /usr/local/bin directory. But, if you prefer not to use sudo, you can install it in a different directory which is in your PATH.
kubectl create deployment nginx --image=nginx
POD=$(kubectl get pod -l app=nginx -o name)
White-box Attacks: Complete knowledge of the model, including architecture and training data.
Black-box Attacks: No information about the model; the attacker probes responses to craft inputs.
By Target Objective:
Non-targeted Attacks: Push input to any incorrect class.
Targeted Attacks: Force input into a specific class.
Attack Phases
Training Phase Attacks:
Data Poisoning: Injects malicious data into the training set, altering model behavior.
Backdoor Attacks: Embeds triggers in training data that activate specific responses during inference.
Inference Phase Attacks:
Model Evasion: Gradually perturbs input to skew predictions (e.g., targeted misclassification).
Membership Inference: Exploits model outputs to infer sensitive training data (e.g., credit card numbers).
Observations on Model Robustness
Highly accurate models often exhibit reduced robustness against adversarial perturbations, creating a tradeoff between accuracy and security. For instance, Chen et al. found that better-performing models tend to be more sensitive to adversarial inputs.
Defense Strategies
Pre-analysis: Test models for prompt injection vulnerabilities using techniques like fuzzing.
Input Sanitation:
Validation: Enforce strict input rules (e.g., character and data type checks).
Filtering: Strip malicious scripts or fragments.
Encoding: Convert special characters to safe representations.
Secure Practices for Model Deployment:
Restrict model permissions.
Regularly update libraries to patch vulnerabilities.
Detect injection attempts with specialized tooling.
Case Study: Pickle Injection Vulnerability
Python's pickle module allows serialization and deserialization but lacks security checks. Attackers can exploit this to execute arbitrary code using crafted payloads. The module’s inherent insecurity makes it risky to use with untrusted inputs.
Mitigation:
Avoid using pickle with untrusted sources.
Use secure serialization libraries like json or protobuf.
KubeArmor has visibility into systems and application behavior. KubeArmor
summarizes/aggregates the information and provides a user-friendly view to
figure out the application behavior.
What application behavior is shown?
Process data:
What are the processes executing in the pods?
What processes are executing through which parent processes?
File data:
What are the file system accesses made by different processes?
Network Accesses:
What are the Ingress/Egress connections from the pod?
What server binds are done in the pod?
How to get the application behavior?
Get visibility into process executions in default namespace.
Network Policy Spec for Nodes/VMs
Policy Specification
The policy specification of KubeArmor Network Policy is similar to the specification of Kubernetes Network Policy with a few changes. Here is the specification of a network security policy.
Now, we will briefly explain how to define a host security policy.
Common
A security policy starts with the base information such as apiVersion, kind, and metadata. The apiVersion and kind would be the same in any security policies. In the case of metadata, you need to specify the name of a policy.
Make sure that you need to use KubeArmorNetworkPolicy.
Severity
You can specify the severity of a given policy from 1 to 10. This severity will appear in alerts when policy violations happen.
Contribution Guide
KubeArmor maintainers welcome individuals and organizations from across the cloud security landscape (creators and implementers alike) to make contributions to the project. We equally value the addition of technical contributions and enhancements of documentation that helps us grow the community and strengthen the value of KubeArmor. We invite members of the community to contribute to the project!
To make a contribution, please follow the steps below.
Fork this repository (KubeArmor)
First, fork this repository by clicking on the Fork button (top right).
fork button
Then, click your ID on the pop-up screen.
This will create a copy of KubeArmor in your account.
Clone the repository
Now clone Kubearmor locally into your dev environment.
This will clone a copy of Kubearmor installed in your dev environment.
Make changes
First, go into the repository directory and make some changes.
Please refer to to set up your environment for KubeArmor contribution.
Check the changes
If you have changed the core code of KubeArmor then please run tests before committing the changes
If you see any warnings or errors, please fix them first.
If some tests are failing, then fix them by following
If you have made changes in Operator or Controller, then follow
Commit changes
Please see your changes using "git status" and add them to the branch using "git add".
Then, commit the changes using the "git commit" command.
Please make sure that your changes are properly tested on your machine.
Push changes to your forked repository
Push your changes using the "git push" command.
Create a pull request with your changes with the following steps
First, go to your repository on GitHub.
Then, click "Pull request" button.
After checking your changes, click 'Create pull request'.
A pull request should contain the details of all commits as specific as possible, including "Fixes: #(issue number)".
DCO Signoffs
To ensure that contributors are only submitting work that they have rights to, we are requiring everyone to acknowledge this by signing their work. Any copyright notices in this repo should specify the authors as "KubeArmor authors".
To sign your work, just add a line like this at the end of your commit message:
This can easily be done with the -s or --signoff option to git commit.
Development Guide
Development
1. Vagrant Environment (Recommended)
Note Skip the steps for the vagrant setup if you're directly compiling KubeArmor on the Linux host.
Proceed to setup K8s on the same host by resolving any dependencies.
Requirements
Here is the list of requirements for a Vagrant environment
Clone the KubeArmor github repository in your system
Install Vagrant and VirtualBox in your environment, go to the vagrant path and run the setup.sh file
VM Setup using Vagrant
2. Self-managed Kubernetes
Requirements
Here is the list of minimum requirements for self-managed Kubernetes.
KubeArmor is designed for Kubernetes environment. If Kubernetes is not setup yet, please refer to .
KubeArmor leverages CRI (Container Runtime Interfaces) APIs and works with Docker or Containerd or CRIO based container runtimes. KubeArmor uses LSMs for policy enforcement; thus, please make sure that your environment supports LSMs (either AppArmor or bpf-lsm). Otherwise, KubeArmor will operate in Audit-Mode with no policy "enforcement" support.
Alternative Setup
You can try the following alternative if you face any difficulty in the above Kubernetes (kubeadm) setup.
3. Environment Check
Compilation
Check if KubeArmor can be compiled on your environment without any problems.
If you see any error messages, please let us know the issue with the full error messages through #kubearmor-development channel on CNCF slack.
Execution
In order to directly run KubeArmor in a host (not as a container), you need to run a local proxy in advance.
Code Directories
Here, we briefly give you an overview of KubeArmor's directories.
The Amazon Foundational Technical Review (FTR) is a framework that enables AWS Partners to detect and remediate issues in solutions and products. It focuses on quality, reliability, and safety and outlines the best practices to meet the set requirements.
KubeArmor applied for an AWS Foundational Technical Review and fulfilled all the set criteria. Changes had to be done in KubeArmor to fulfill the requirements, especially towards the security side of elements. FTR requires that the containers do not use privileged mode. KubeArmor had to be updated to fulfill this requirement.
One of the outcomes of this review was that KubeArmor is now listed as an official AWS Partner Solution.
Profiling KubeArmor logs using karmor
KubeArmor's CLI just received a new feature! karmor profile which in real-time shows a terminal user interface table of three different operations going on in KubeArmor: Process, File and Network. It maintains a counter of each operation that is happening within the cluster, along with other useful details. It directly fetches data from the karmor logs API and displays all the required information. The TUI includes simple navigation between operations and a user input based filter as well.
KubeArmor Image Signing using CoSign
Container Image provenance requires signing an image that provides cryptographic evidence indicating that the author is who they say they are. Software Supply Chain attacks are becoming increasingly common and the onus is on the developers and maintainers to ensure that the workload images are signed. The users of the images have the responsibility to verify the provenance of these images before deploying. Devs, maintainers, and users have to depend on a trusted entity for image provenance. One such framework is provided by the . Sigstore provides primitives to sign the images/blobs, ensure certificate transparency, and subsequently provides tools that can be used to verify the images and get the activities records.
This release of KubeArmor introduces a way for KubeArmor to sign the images it pushes to the docker registry using sigstore/cosign such that any external user can verify the authenticity of the image and check the associated transparency logs using sigstore/rekor.
How does KubeArmor use sigstore primitives?
An image signed using KubeArmor pipelines indicates that the image was indeed produced by the appropriate KubeArmor ecosystem.
As a user, how can I verify whether the image is signed by the trusted entity?
One can use cosign verify to check whether the image is signed.
As a user, one can check the transparency records from Rekor logs. Example Rekor logs for KubeArmor can be seen .
Get visibility into the use of server ports
karmor summary of bind/syscalls
##Learnings For this release, we tried to use kernel audit for observing policy violations. We faced some issues with it and thus have to revert the changes. Here is a summary of what was expected, what happened, and the learnings from this interesting experiment.
The expectations:
Kernel Audit for fetching policy violations
KubeArmor uses eBPF for two purposes:
Get visibility/observability events into the workloads.
To get alerts in the context of the policies
The operations involved in point 1 are straightforward i.e, KubeArmor gets an event, matches/annotate the events with the process, container, pod, and namespace information, and sends the event out to the clients waiting on the stream. The operations involved in point 2 are tricky. When KubeArmor gets an event, it needs to check whether the event parameters match any of the policy specifications/rules, and if it does, generate an alert accordingly. The challenge is that the matching operation is a non-trivial operation. Assume that the user has set the policy to block execution of /usr/bin/sleep binary. Now when the event is generated, the kretprobe of the sys_execve syscall is going to return "Permission Denied" since the LSM will block the event. Currently, KubeArmor matches the binary name and other contextual information with the policy rules that it has internally stored and checks whether the event was triggered due to a policy violation. This matching operation is non-trivial. Note that the access could be permission denied for reasons outside the scope of KubeArmor i.e, due to capability LSM or due to other access control settings. Thus it should not be inferred that a "Permission Denied" event will always be triggered due to KubeArmor-enforced policy rules only.
Performance implications
We also expected it to have a drastic (positive) impact on KubeArmor performance since there is no policy-matching code involved in every system call hook.
What was changed?
Traditional LSMs such as AppArmor, and SELinux, use the Kernel Audit mechanism to send the policy violation events. across most of the kernels. Note that this change does not depend on userspace components such as .
Issues:
First, we didn't see any noticeable change in the overall performance of KubeArmor, which we measured by looking at the number of alerts being dropped/lost.
Second and more important, we came up with an issue in AppArmor (or a feature if you want to call it). For Allow-based policies (default posture being Audit), we were getting alerts even in the case of resources that were allowed in the policy. For eg: We cannot create a profile that says, allow access to /root and audit every other access. AppArmor doesn't support this kind of action.
Learnings and future plan:
With the above experiment we realized that kernel-audit is not suitable for all our needs and eBPF mode of observability has the future. We plan on to improve the current performance issues with the eBPF mode of policy violation alerts.
Security Policies (KSP, HSP, CSP)
Welcome to the KubeArmor tutorial! In this first chapter, we'll dive into one of the most fundamental concepts in KubeArmor: Security Policies. Think of these policies as the instruction manuals or rulebooks you give to KubeArmor, telling it exactly how applications and system processes should behave.
What are Security Policies?
In any secure system, you need rules that define what is allowed and what isn't. In Kubernetes and Linux, these rules can get complicated, dealing with things like which files a program can access, which network connections it can make, or which powerful system features (capabilities) it's allowed to use.
KubeArmor simplifies this by letting you define these rules using clear, easy-to-understand
ModelArmor Overview
ModelArmor is a Zero Trust security solution purpose-built to protect AI/ML/LLM workloads from runtime threats. It safeguards against the unique risks of agentic AI systems and untrusted models by sandboxing deployments and enforcing granular runtime policies.
ModelArmor uses KubeArmor as a sandboxing engine to ensure that the untrusted models execution is constrained and within required checks. AI/ML Models are essentially processes and allowing untrusted models to execute in AI environments have significant risks such as possibility of cryptomining attacks leveraging GPUs, remote command injections, etc. KubeArmor's preemptive mitigation mechanism provides a suitable framework for constraining the execution environment of models.
ModelArmor can be used to enforce security policies on the model execution environment.
Cluster Policy Examples for Containers
Here, we demonstrate how to define a cluster security policies.
Process Execution Restriction
Block a specific executable - In operator ()
v1.3
v1.3.0 release includes new improvements to enhance the security, usability, and performance of KubeArmor along with some bug fixes. We list major changes below.
The tags part is optional. You can define multiple tags (e.g., WARNING, SENSITIVE, MITRE, STIG, etc.) to categorize security policies.
Message
The message part is optional. You can add an alert message, and then the message will be presented in alert logs.
NodeSelector
The node selector part is relatively straightforward. Similar to other Kubernetes configurations, you can specify (a group of) nodes based on labels.
If you do not have any custom labels, you can use system labels as well.
Ingress
In the Ingress section, there are three types of matches: from, iface and ports. You can define source IP address ranges (IPv4 and IPv6) using the from. A list of network interfaces can be defined using iface. Destination port and protocol can be defined using ports. Port (string) can be defined using name or number, protocol using name and an optional endPort can be defined to specify a port range (from port to endPort).
Egress
Similarly in the Egress section, there are three types of matches: to, iface and ports. You can define destination IP address ranges (IPv4 and IPv6) using the to. A list of network interfaces can be defined using iface. Destination port and protocol can be defined using ports. Port (string) can be defined using name or number, protocol using name and an optional endPort can be defined to specify a port range (from port to endPort).
Action
The action could be Audit, Allow or Block.
Finally, click the "Create pull request" button.
The changes would be merged post a review by the respective module owners. Once the changes are merged, you will get a notification, and the corresponding issue will be closed.
By doing this, you state that the source code being submitted originated from you (see https://developercertificate.org).
Explanation: The purpose of this policy is to block the execution of '/usr/bin/apt' in the containers present in the namespace nginx1. For this, we define the 'nginx1' value and operator as 'In' in selector -> matchExpressions and the specific path ('/usr/bin/apt') in process -> matchPaths. Also, we put 'Block' as the action of this policy.
Verification: After applying this policy, please get into one of the containers in the namespace 'nginx1' (using "kubectl -n nginx1 exec -it nginx-X-... -- bash") and run '/usr/bin/apt'. You will see that /usr/bin/apt is blocked.
Explanation: The purpose of this policy is to block the execution of '/usr/bin/apt' in all containers present in the cluster except that are in the namespace nginx1. For this, we define the 'nginx1' value and operator as 'NotIn' in selector -> matchExpressions and the specific path ('/usr/bin/apt') in process -> matchPaths. Also, we put 'Block' as the action of this policy.
Verification: After applying this policy, please get into one of the containers in the namespace 'nginx1' (using "kubectl -n nginx1 exec -it nginx-X-... -- bash") and run '/usr/bin/apt'. You will see that /usr/bin/apt is not blocked. Now try running same command in container inside 'nginx2' namespace and it should not be blocked.
Explanation: The purpose of this policy is to block the execution of '/usr/bin/apt' in the workloads who match the labels app=nginx OR app=nginx-dev present in the namespace nginx1 . For this, we define the 'nginx1' as value and operator as 'In' for key namespace AND app=nginx & app=nginx-dev value and operator as 'In' for key label in selector -> matchExpressions and the specific path ('/usr/bin/apt') in process -> matchPaths. Also, we put 'Block' as the action of this policy.
Verification: After applying this policy, please get into one of the containers in the namespace 'nginx1' (using "kubectl -n nginx1 exec -it nginx-X-... -- bash") and run '/usr/bin/apt'. You will see that /usr/bin/apt is blocked. apt won't be blocked in a workload that doesn't have labels app=nginx OR app=nginx-dev in namespace nginx1 and all the workloads across other namespaces.
Explanation: The purpose of this policy is to block the execution of '/usr/bin/apt' in all the workloads who doesn't match the labels app=nginx AND not present in the namespace nginx2 . For this, we define the 'nginx2' as value and operator as 'NotIn' for key namespace AND app=nginx value and operator as 'NotIn' for key label in selector -> matchExpressions and the specific path ('/usr/bin/apt') in process -> matchPaths. Also, we put 'Block' as the action of this policy.
Verification: After applying this policy, please exec into any container within the namespace 'nginx2' and run '/usr/bin/apt'. You can see the operation is blocked. Then try to do same in other workloads present in different namespace and if they don't have label app=nginx, the operation will be blocked, in case container have label app=nginx, operation won't be blocked.
Explanation: The purpose of this policy is to block read access for '/etc/host.conf' in all the containers except the namespace 'bginx2'.
Verification: After applying this policy, please get into the container within the namespace 'nginx2' and run 'cat /etc/host.conf'. You can see the operation is not blocked and can see the content of the file. Now try to run 'cat /etc/host.conf' in container of 'nginx1' namespace, this operation should be blocked.
Note Other operations like Network, Capabilities, Syscalls also behave in same way as in security policy. The difference only lies in how we match the cluster policy with the namespaces.
To use the recent Linux kernel v5.13 for dev env, you can run make with the NETNEXT flag set to 1 for the respective make option.
You can also make the setting static by changing NETNEXT=0 to NETNEXT=1 in the Makefile.
Note Please make sure to set up the alternative k8s environment on the same host where the KubeArmor development environment is running.
K3s
You can also develop and test KubeArmor on K3s instead of the self-managed Kubernetes.
Please follow the instructions in K3s installation guide.
MicroK8s
You can also develop and test KubeArmor on MicroK8s instead of the self-managed Kubernetes.
Please follow the instructions in MicroK8s installation guide.
No Support - Docker Desktops
KubeArmor does not work with Docker Desktops on Windows and macOS because KubeArmor integrates with Linux-kernel native primitives (including LSMs).
Development Setup
In order to install all dependencies, please run the following command.
Now, you are ready to develop any code for KubeArmor. Enjoy your journey with KubeArmor.
Then, run KubeArmor on your environment.
Note If you have followed all the above steps and still getting the warning The node information is not available, then this could be due to the case-sensitivity discrepancy in the actual hostname (obtained by running hostname) and the hostname used by Kubernetes (under kubectl get nodes -o wide).
K8s converts the hostname to lowercase, which results in a mismatch with the actual hostname.
To resolve this, change the hostname to lowercase using the command hostnamectl set-hostname <lowercase-hostname>.
KubeArmor Controller
Starting from KubeArmor v0.11 - annotations, container policies, and host policies are handled via kubearmor controller, the controller code can be found under pkg/KubeArmorController.
To install the controller from KubeArmor docker repository run
To install the controller (local version) to your cluster run
if you need to setup a local registry to push you image, use docker-registry.sh script under ~/KubeArmor/contribution/local-registry directory
$ cd KubeArmor/contribution/vagrant
~/KubeArmor/contribution/vagrant$ ./setup.sh
~/KubeArmor/contribution/vagrant$ sudo reboot
OS - Ubuntu 18.04
Kubernetes - v1.19
Docker - 18.09 or Containerd - 1.3.7
Linux Kernel - v4.15
LSM - AppArmor
$ cd KubeArmor/KubeArmor
~/KubeArmor/KubeArmor$ make
$ kubectl proxy &
KubeArmor/
BPF - eBPF code for system monitor
common - Libraries internally used
config - Configuration loader
core - The main body (start point) of KubeArmor
enforcer - Runtime policy enforcer (enforcing security policies into LSMs)
feeder - gRPC-based feeder (sending audit/system logs to a log server)
kvmAgent - KubeArmor VM agent
log - Message logger (stdout)
monitor - eBPF-based system monitor (mapping process IDs to container IDs)
policy - gRPC service to manage Host Policies for VM environments
types - Type definitions
protobuf/ - Protocol buffer
pkg/KubeArmorController/ - KubeArmorController generated by Kube-Builder for KubeArmor Annotations, KubeArmorPolicy and KubeArmorHostPolicy
deployments/
<cloud-platform-name> - Deployments specific to respective cloud platform (deprecated - use karmor install or helm)
controller - Deployments for installing KubeArmorController alongwith cert-manager
CRD - KubeArmorPollicy and KubeArmorHostPolicy CRDs
get - Stores source code for deploygen, a tool used for specifying kubearmor deployments
helm/
KubeArmor - KubeArmor's Helm chart
KubeArmorOperator - KubeArmorOperator's Helm chart
~/KubeArmor/KubeArmor$ make vagrant-up
~/KubeArmor/KubeArmor$ make vagrant-ssh
~/KubeArmor/KubeArmor$ make vagrant-destroy
$ cd KubeArmor/KubeArmor
~/KubeArmor/KubeArmor$ make run
examples/ - Example microservices for testing
tests/ - Automated test framework for KubeArmor
Security Policies
. You write these policies in a standard format that Kubernetes understands (YAML files, using something called Custom Resource Definitions or CRDs), and KubeArmor takes care of translating them into the low-level security configurations needed by the underlying system.
These policies are powerful because they allow you to specify security rules for different parts of your system:
KubeArmorPolicy (KSP): For individual Containers or Pods running in your Kubernetes cluster.
KubeArmorHostPolicy (HSP): For the Nodes (the underlying Linux servers) where your containers are running. This is useful for protecting the host system itself, or even applications running directly on the node outside of Kubernetes.
KubeArmorClusterPolicy (CSP): For applying policies across multiple Containers/Pods based on namespaces or labels cluster-wide.
Why Do We Need Security Policies?
Imagine you have a web server application running in a container. This application should only serve web pages and access its configuration files. It shouldn't be trying to access sensitive system files like /etc/shadow or connecting to unusual network addresses.
Without security policies, if your web server container gets compromised, an attacker might use it to access or modify sensitive data, or even try to attack other parts of your cluster or network.
KubeArmor policies help prevent this by enforcing the principle of least privilege. This means you only grant your applications and host processes the minimum permissions they need to function correctly.
Use Case Example: Let's say you have a simple application container that should never be allowed to read the /etc/passwd file inside the container. We can use a KubeArmor Policy (KSP) to enforce this rule.
Anatomy of a KubeArmor Policy
KubeArmor policies are defined as YAML files that follow a specific structure. This structure includes:
Metadata: Basic information about the policy, like its name. For KSPs, you also specify the namespace it belongs to. HSPs and CSPs are cluster-scoped, meaning they don't belong to a specific namespace.
Selector: This is how you tell KubeArmor which containers, pods, or nodes the policy should apply to. You typically use Kubernetes labels for this.
Spec (Specification): This is the core of the policy where you define the actual security rules (what actions are restricted) and the desired outcome (Allow, Audit, or Block).
Let's look at a simplified structure:
Explanation:
apiVersion and kind: Identify this document as a KubeArmor Policy object.
metadata: Gives the policy a name (block-etc-passwd-read) and specifies the namespace (default) it lives in (for KSP).
spec: Contains the security rules.
selector: Uses matchLabels to say "apply this policy to any Pod in the default namespace that has the label app: my-web-app".
file: This section defines rules related to file access.
matchPaths: We want to match a specific file path.
- path: /etc/passwd: The specific file we are interested in.
action: Block: If any process inside the selected containers tries to access /etc/passwd, the action should be to Block that attempt.
This simple policy directly addresses our use case: preventing the web server (app: my-web-app) from reading /etc/passwd.
Policy Types in Detail
Let's break down the three types:
Policy Type
Abbreviation
Scope
Selector Type(s)
KubeArmorPolicy
KSP
Containers / Pods (Scoped by Namespace)
matchLabels, matchExpressions
KubeArmorHostPolicy
HSP
KubeArmorPolicy (KSP)
Applies to pods within a specific Kubernetes namespace.
Uses selector.matchLabels or selector.matchExpressions to pick which pods the policy applies to, based on their labels.
Example: Block /bin/bash execution in all pods within the dev namespace labeled role=frontend.
KubeArmorHostPolicy (HSP)
Applies to the host operating system of the nodes in your cluster.
Uses nodeSelector.matchLabels to pick which nodes the policy applies to, based on node labels.
Example: Prevent the /usr/bin/ssh process on nodes labeled node-role.kubernetes.io/worker from accessing /etc/shadow.
KubeArmorClusterPolicy (CSP)
Applies to pods across multiple namespaces or even the entire cluster.
Uses selector.matchExpressions which can target namespaces (key: namespace) or labels (key: label) cluster-wide.
Example: Audit all network connections made by pods in the default or staging namespaces. Or, block /usr/bin/curl execution in all pods across the cluster except those labeled app=allowed-tools.
These policies become Kubernetes Custom Resources when KubeArmor is installed. You can see their definitions in the KubeArmor source code under the deployments/CRD directory:
And their corresponding Go type definitions are in types/types.go. You don't need to understand Go or CRD internals right now, just know that these files formally define the structure and rules for creating KubeArmor policies that Kubernetes understands.
How KubeArmor Uses Policies (Under the Hood)
You've written a policy YAML file. What happens when you apply it to your Kubernetes cluster using kubectl apply -f your-policy.yaml?
Policy Creation: You create the policy object in the Kubernetes API Server.
KubeArmor Watches: The KubeArmor DaemonSet (a component running on each node) is constantly watching the Kubernetes API Server for KubeArmor policy objects (KSP, HSP, CSP).
Policy Discovery: KubeArmor finds your new policy.
Target Identification: KubeArmor evaluates the policy's selector (or nodeSelector) to figure out exactly which pods/containers or nodes this policy applies to.
Translation: For each targeted container or node, KubeArmor translates the high-level rules defined in the policy's spec (like "Block access to /etc/passwd") into configurations for the underlying security enforcer (which could be AppArmor, SELinux, or BPF, depending on your setup and KubeArmor's configuration - we'll talk more about these later).
Enforcement: The security enforcer on that specific node is updated with the new low-level rules. Now, if a targeted process tries to do something forbidden by the policy, the enforcer steps in to Allow, Audit, or Block the action as specified.
Here's a simplified sequence:
This flow shows how KubeArmor acts as the bridge between your easy-to-write YAML policies and the complex, low-level security mechanisms of the operating system.
Policy Actions: Allow, Audit, Block
Every rule in a KubeArmor policy (within the spec section) specifies an action. This tells KubeArmor what to do if the rule's condition is met.
Allow: Explicitly permits the action. This is useful for creating "whitelist" policies where you only allow specific behaviors and implicitly block everything else.
Audit: Does not prevent the action but generates a security alert or log message when it happens. This is great for testing policies before enforcing them or for monitoring potentially suspicious activity without disrupting applications.
Block: Prevents the action from happening and generates a security alert. This is for enforcing strict "blacklist" rules where you explicitly forbid certain dangerous behaviors.
Remember the "Note" mentioned in the provided policy specifications: For system call monitoring (syscalls), KubeArmor currently only supports the Audit action, regardless of what is specified in the policy YAML.
Conclusion
In this chapter, you learned that KubeArmor Security Policies (KSP, HSP, CSP) are your rulebooks for defining security posture in your Kubernetes environment. You saw how they use Kubernetes concepts like labels and namespaces to target specific containers, pods, or nodes. You also got a peek at the basic structure of these policies, including the selector for targeting and the spec for defining rules and actions.
Understanding policies is the first step to using KubeArmor effectively to protect your workloads and infrastructure. In the next chapter, we'll explore how KubeArmor identifies the containers and nodes it is protecting, which is crucial for the policy engine to work correctly.
apiVersion: security.kubearmor.com/v1
kind: KubeArmorPolicy # or KubeArmorHostPolicy, KubeArmorClusterPolicy
metadata:
name: block-etc-passwd-read
namespace: default # Only for KSP
spec:
selector:
# How to select the targets (pods for KSP, nodes for HSP, namespaces/labels for CSP)
matchLabels:
app: my-web-app # Apply this policy to pods with label app=my-web-app
file: # Or 'process', 'network', 'capabilities', 'syscalls'
matchPaths:
- path: /etc/passwd
action: Block # What to do if the rule is violated
Why ModelArmor?
ModelArmor enables secure deployment of agentic AI applications and ML models, addressing critical security gaps that traditional guardrails and static scanning cannot solve.
It is designed for:
Agentic AI workloads using autonomous, tool-using agents.
ML pipelines importing untrusted models from public repositories.
Environments where guardrails alone are not sufficient.
ModelArmor protects the entire AI lifecycle, from development to deployment, using sandboxing and policy enforcement to neutralize malicious behavior at runtime.
The Problem: Security Risks in Agentic AI
1. Arbitrary Code Execution
Agentic AI systems can execute arbitrary system commands due to their autonomy and access to tools.
Prompt engineering can bypass LLM guardrails.
Attackers can instruct agents to run harmful commands, download malware, or scan networks.
2. Model Supply Chain Attacks
Malicious models uploaded to public repositories (e.g., Hugging Face) can contain embedded payloads.
Loading such models allows hidden code execution, leading to system compromise and C&C communication.
Code Execution Cannot Be Governed Traditionally
3. Prompt Injection Attacks
Crafted prompts can manipulate the agent into performing unauthorized actions:
Installing tools (apk add nmap) or scanning networks.
Fetching and executing external scripts.
Traditional container security cannot detect these because they exploit application behavior, not the container itself.
Guardrails are not enough against sophisticated prompt engineering
The Solution
Sandboxing Agentic AI
ModelArmor isolates agentic AI apps and ML workloads at runtime, blocking unauthorized actions even if guardrails or code reviews are bypassed.
Zero Trust Policy Enforcement
Zero Trust Policy Enforcement
Define fine-grained security policies to:
Restrict file system access (e.g., block /root/.aws/credentials).
Control process execution (allow only trusted binaries).
Limit network activity (disable raw sockets, ICMP, or outbound traffic).
Automated Red Teaming
Simulate adversarial scenarios like malicious model imports and prompt injections to identify vulnerabilities pre-deployment.
Protection Across the Stack
ModelArmor works across frameworks and environments:
Supports any language runtime or AI framework.
Requires no code changes to your application.
Lightweight and cost-efficient, avoiding the overhead of MicroVMs or full isolation environments.
Granular Policy Enforcement for Process, Network, Volumes and AI flows
TensorFlow Based Use Cases
FGSM Adversarial Input Attack
An FGSM attack manipulates input data by adding imperceptible noise, creating adversarial examples that force the TensorFlow model to misclassify (e.g., predicting “5” for an image of “2”).
Traditional container security fails here because the model and container remain unchanged; the attack happens through crafted input.
ModelArmor Protection:
Proactively simulates adversarial attacks using Automated Red Teaming.
Secures model behavior with input validation and anomaly detection, akin to an LLM Prompt Firewall for ML workloads.
Protects against sophisticated input-level manipulations.
KubeArmor Operator is now the default installation method for KubeArmor, providing a more streamlined installation process.
New features include support for capabilities enforcement using BPF LSM, execname matching in policies, and additional columns in KubeArmor Security Policies (KSPs) and Host Security Policies (HSPs).
Security enhancements include securing KubeArmor itself with Seccomp profiles and implementing mutual TLS (mTLS) for secure gRPC communication
Support for Alibaba Cloud deployments has been added.
Performance improvements include filtering watched nodes and pods server-side to reduce overhead in large clusters.
KubeArmor Operator as the Default Installation Method
Earlier we used to install KubeArmor through plain Kubernetes manfiests. In kubearmor-client a.k.a karmor, we had a heurisitics based mechanism for detecting the target environment and create KubeArmor manifests accordingly. In recent releases we've developed the KubeArmor Operator - a Kubernetes operator which gets the granular per-node configuration of target environments and accordingly creates KubeArmor manifests. We have been pushing on operator based installation, make it more stable and slowly migrating our docs and references to point towards it instead of the old method. Finally, with this release - we now have karmor using the operator based installation too.
In Kubernetes environments, certain workloads may require specific Linux capabilities to function correctly. However, granting unnecessary capabilities can introduce security risks. Previously, KubeArmor had the ability to enforce policies on Linux capabiliites only when using the AppArmor enforcer, recently we've introduced the same in our distinguishing BPF LSM enforcer as well. This improves the feature parity between AppArmor and BPF-LSM and allows you to define policies that restrict or allow specific capabilities for your workloads, enhancing the overall security posture of your Kubernetes cluster.
Identifying and blocking malicious or unauthorized applications running in your Kubernetes cluster can be a challenging task, especially when dealing with dynamic or obfuscated binaries. Previously, KubeArmor relied solely on file paths or other attributes to define policies, limiting its ability to detect and prevent the execution of specific binaries. To address this limitation, KubeArmor now supports matching executable names in its policies. This new feature enables you to create rules based on the name of the executable binary, allowing for more granular control over the applications running in your Kubernetes cluster. For example, you can now block or allow specific crypto-mining binaries like xmrig by matching their executable names. By introducing execname matching, KubeArmor provides an additional layer of security and control, enabling you to proactively detect and prevent the execution of known malicious or unauthorized binaries within your Kubernetes environment.
As a security project, it's crucial for KubeArmor itself to adhere to security best practices and minimize its attack surface. For this, we've been constantly making improvements through past releases. In this release
Seccomp
KubeArmor will now ship with a default seccomp profile of it's own to restrict the system calls it can make. The profile won't be activated by default as of now but in future releases we'll make it enabled by default.
Secure gRPC Communication with Mutual TLS
In previous versions of KubeArmor, communication between the KubeArmor server and clients (e.g., kubearmor-relay, kubearmor-client) was unencrypted, potentially exposing sensitive information or allowing unauthorized access to the communication channel. To address this security concern, KubeArmor now supports secure gRPC communication between the KubeArmor server and clients using mutual TLS (mTLS). This enhancement ensures that all communication between KubeArmor components is encrypted and only trusted parties can connect with KubeArmor.
Vulnerabilities
Many critical vulnerabilities across KubeArmor images have been addressed, ensuring the overall security of the KubeArmor deployment and protecting against potential exploits or vulnerabilities.
Previously, when listing KubeArmor Security Policies (KSPs) and Host Security Policies (HSPs) using kubectl get, users only had access to limited information about each policy, making it challenging to quickly assess the purpose and impact of each policy. To improve visibility and usability, policy status now includes additional columns. These columns display the action (Allow/Audit/Block) and severity level for each policy. This enhancement allows users to quickly identify the intended behavior and potential impact of each policy, facilitating easier policy management and enabling more informed decision-making when deploying or updating security policies within their Kubernetes environment.
As Kubernetes adoption continues to grow, organizations are increasingly leveraging various cloud providers to host their deployments. Previously, KubeArmor lacked official support for Alibaba Cloud deployments, which could pose challenges for users seeking to secure their Kubernetes workloads running on Alibaba Cloud's infrastructure. To address this gap, KubeArmor now officially supports Alibaba Cloud deployments, including Alibaba Cloud Kubernetes (ACK) and Elastic Compute Services (Virtual Machines). This support ensures that KubeArmor can be seamlessly deployed and integrated with Alibaba Cloud environments, providing robust security for your Kubernetes workloads running on Alibaba Cloud. With this addition, KubeArmor expands its reach and enables organizations leveraging Alibaba Cloud to benefit from its advanced security capabilities, ensuring consistent protection across various cloud platforms. The latest image of Alibaba Cloud Linux 3 contains BPF-LSM enabled by default as part of the kernel config but not enabled by default as part of the boot parameter. Thus the user has to enable BPF-LSM boot for all the nodes for which they desire to secure with KubeArmor. Checkout the FAQ for Checking And Enabling Support For BPF LSM.
Performance Improvements
In large-scale Kubernetes deployments with numerous nodes and pods, the overhead associated with listing and watching all resources can significantly impact performance and scalability. Previously, each KubeArmor DaemonSet pod listed and watched every node and pod in the cluster, leading to potential performance bottlenecks and resource constraints as the cluster grew larger. To address this performance concern, KubeArmor now filters watched nodes and pods server-side, reducing overhead significantly in large clusters. Instead of each KubeArmor DaemonSet pod listing and watching every node and pod in the cluster, KubeArmor now specifies the nodes and pods of interest for each DaemonSet. This optimization enhances the overall performance and scalability of KubeArmor in large-scale Kubernetes deployments, ensuring efficient resource utilization and enabling smoother operations in resource-constrained environments. Special thanks to dqsully for recognizing and fixing this!
Welcome back to the KubeArmor tutorial! In the previous chapter, we learned about KubeArmor's Security Policies (KSP, HSP, CSP) and how they define rules for what applications and processes are allowed or forbidden to do. We saw that these policies use selectors (like labels and namespaces) to tell KubeArmor which containers, pods, or nodes they should apply to.
But how does KubeArmor know which policy to apply when something actually happens, like a process trying to access a file? When an event occurs deep within the operating system (like a process accessing /etc/shadow), the system doesn't just say "a pod with label app=my-web-app did this". It provides low-level details like Process IDs (PID), Parent Process IDs (PPID), and Namespace IDs (like PID Namespace and Mount Namespace).
This is where the concept of Container/Node Identity comes in.
Security Posture
KubeArmor supports configurable default security posture. The security posture could be allow/audit/deny. Default Posture is used when there's atleast one Allow policy for the given deployment i.e. KubeArmor is handling policies in whitelisting manner (more about this in ).
There are two default mode of operations available block and audit. block mode blocks all the operations that are not allowed in the policy. audit generates telemetry events for operations that would have been blocked otherwise.
KubeArmor has 4 types of resources: Process, File, Network and Capabilities. Default Posture is configurable for each of the resources separately except Process. Process based operations are treated under File resource only.
Policy Examples for Nodes/VMs
Here, we demonstrate how to define host security policies.
Process Execution Restriction
Block a specific executable ()
v0.10
Security update! Announcing the release of KubeArmor v0.10, packed with exciting new features, enhancements, and fixes. This release brings improved default visibility settings, enriched telemetry, and alert data, support for new platforms, and various installation fixes. The community has collaboratively worked to deliver a solid new release. Let’s get into the details of what's new in KubeArmor v0.10:
Enrichment of Telemetry and Alerts Data
For better visibility, alerts, and telemetry, KubeArmor now includes Deployment Name, Pod Name, Namespace, and Cluster Name. This strategy improves analysis and monitoring, allowing for comprehensive deployments and effective troubleshooting. Added support for deployment scenarios (replicasets, statefulsets, daemonset). This makes it easier for you to base decisions on accurate metadata. You can now expect even more detailed and insightful information, empowering you to monitor and analyze your workloads with greater precision.
v0.3
KubeArmor adds a number of new capabilities in this 0.3 release, including:
Default Security Posture (@daemon1024)
One of the tenets of achieving Zero Trust stature requires one to set the workloads in "least-permissive mode". Setting up least-permissive mode can be fraught with challenges and it is important that the tooling supports gradual upgrade to the least-permissive mode. One of the important tool is setting audit or dry-run mode for the policies before one can use the block/deny mode.
KubeArmor supports deny-by-default mode wherein one can specify what actions are allowed and everything else get denied. However, this mode can be a fatal for security ops folks since it has the possibility to bring down the application. While KubeArmor always supported an audit mode, version 0.3 release
Nodes / Host OS
nodeSelector (matchLabels)
KubeArmorClusterPolicy
CSP
Containers / Pods (Cluster-wide)
selector (matchExpressions on namespace or label)
Configuring Default Posture
Global Default Posture
Note By default, KubeArmor set the Global default posture to audit
Global default posture is configured using configuration options passed to KubeArmor using configuration file
Or using command line flags with the KubeArmor binary
Namespace Default Posture
We use namespace annotations to configure default posture per namespace. Supported annotations keys are kubearmor-file-posture,kubearmor-network-posture and kubearmor-capabilities-posture with values block or audit. If a namespace is annotated with a supported key and an invalid value ( like kubearmor-file-posture=invalid), KubeArmor will update the value with the global default posture ( i.e. to kubearmor-file-posture=block).
Example
Let's start KubeArmor with configuring default network posture to audit in the following YAML.
Contents of kubearmor.yaml
Here's a sample policy to allow tcp connections from curl binary.
Note: This example is in the multiubuntu environment.
Inside the ubuntu-5-deployment, if we try to access tcp using curl. It works as expected with no telemetry generated.
If we try to access udp using curl, a bunch of telemetry is generated for the udp access.
curl google.com requires UDP for DNS resolution.
Generated alert has Policy Name DefaultPosture and Action as Audit
Now let's update the default network posture to block for multiubuntu namespace.
Now if we try to access udp using curl, the action is blocked and related alerts are generated.
Here curl couldn't resolve google.com due to blocked access to UDP.
Generated alert has Policy Name DefaultPosture and Action as Block
Let's try to set the annotation value to something invalid.
We can see that, annotation value was automatically updated to audit since that was global mode of operation for network in the KubeArmor configuration.
Explanation: The purpose of this policy is to block the execution of '/usr/bin/diff' in a host whose host name is 'kubearmor-dev'. For this, we define 'kubernetes.io/hostname: kubearmor-dev' in nodeSelector -> matchLabels and the specific path ('/usr/bin/diff') in process -> matchPaths. Also, we put 'Block' as the action of this policy.
Verification: After applying this policy, please open a new terminal (or connect to the host with a new session) and run '/usr/bin/diff'. You will see that /usr/bin/diff is blocked.
NOTE
The given policy works with almost every linux distribution. If it is not working in your case, check the process location. The following location shows location of sleep binary in different ubuntu distributions:
Explanation: The purpose of this policy is to audit any accesses to a critical file (i.e., '/etc/passwd'). Since we want to audit one critical file, we use matchPaths to specify the path of '/etc/passwd'.
Verification: After applying this policy, please open a new terminal (or connect to the host with a new session) and run 'sudo cat /etc/passwd'. Then, check the alert logs of KubeArmor.
System calls alerting
Alert for all unlink syscalls
Generated telemetry
Alert on all rmdir syscalls targeting anything in /home/ directory and sub-directories
brings in a more streamlined approach for handling this mode.
It is now possible to set the global mode for default posture separartely for file/process, capabilities and network operations.
Further, it is now possible to set the default posture at namespace level for file/process, capabilities and network operations.
An example of setting the default network posture to audit mode for namespace=multiubuntu.
ProcessName, ParentProcessName fields in all telemetry events (@nam-jaehyun)
KubeArmor PR#632 now generates an appropriate processName and parentProcessName in the context of every event. Earlier Kubearmor had several issues especially in cases where the binaries could be symbolic links, relative paths used to invoke the binary. With version 0.3 kubearmor now leverages LSM hook kprobe security_bprm_check to get an absolute binary path for the executable.
Note the ProcessName and ParentProcessName fields in the json fields.
Support for Virtual Machines (@seswarrajan)
KubeArmor now supports policy enforcement directly on the workloads installed on the hosts (either in virtual machine or on bare-metals). There were several fixes (#658, #631) to Kubearmor especially to handle restart conditions.
Branching and Release Strategy (@Ankurk99, @nyrahul)
KubeArmor is maturing both in terms of feature set and in terms of managing release procedures. With version 0.3 #590 we are now following a streamlined branching and release strategy. Some key highlights are:
Have main as our bleeding edge branch where things might be unstable.
Release kubearmor every month or two with a new release version and release logs ... the versioning will be v0.2, v0.3 and so on ... If there are any backports, those will be handled as part of release-candidates version .. for e.g. v0.2-rc1, v0.2-rc2 and so on
Every version (including release candidates) will have a tag created.
Every version (not including release candidates) will have a branch name corresponding to the version name (for e.g., v0.2).
KubeArmor dockerhub image will have following: a. kubearmor/kubearmor:latest pointing to main branch image b. kubearmor/kubearmor:v0.2 ... version specific image ... release candidates will update this image itself for the corresponding version c. kubearmor/kubearmor:stable ... a version will be upgraded to stable version only after enough due diligence (what this due diligence is would be considered in the future) .. for e.g., we might have v0.2, v0.3 as existing versions but stable might point to v0.2
karmor cli tool and helm charts will ensure that the right accessory tooling (for e.g., kubearmor-relay-server) is made use of for the appropriate kubearmor version.
Support for KubeArmor on GKE Rapid Release, Regular & Stable channels
Google's GKE supports multiple release channels and KubeArmor has now been tested across the latest release across all these release channels. Earlier, we found (issue#579) that GKE has further constrained access to the system folder on images of Rapid/Regular release channels. Fixed through PR#648.
Think of Container/Node Identity as KubeArmor's way of answering the question: "Who is doing this?".
When a system event happens on a node – maybe a process starts, a file is opened, or a network connection is attempted – KubeArmor intercepts this event. The event data includes technical details about the process that triggered it. KubeArmor needs to take these technical details and figure out if the process belongs to:
A specific Container (which might be part of a Kubernetes Pod or a standalone Docker container).
Or, the Node itself (the underlying Linux operating system, potentially running processes outside of containers).
Once KubeArmor knows who is performing the action (the specific container or node), it can then look up the relevant security policies that apply to that identity and decide whether to allow, audit, or block the action.
Why is Identity Important? A Simple Use Case
Imagine you have a KubeArmorPolicy (KSP) that says: "Block any attempt by containers with the label app: sensitive-data to read the file /sensitive/config.":
Now, suppose a process inside one of your containers tries to open /sensitive/config.
Without Identity: KubeArmor might see an event like "Process with PID 1234 and Mount Namespace ID 5678 tried to read /sensitive/config". Without knowing which container PID 1234 and MNT NS 5678 belong to, KubeArmor can't tell if this process is running in a container labeled app: sensitive-data. It wouldn't know which policy applies!
With Identity: KubeArmor sees the event, looks up PID 1234 and MNT NS 5678 in its internal identity map, and discovers "Ah, that PID and Namespace belong to Container ID abc123def456... which is part of Pod my-sensitive-pod-xyz in namespace default, and that pod has the label app: sensitive-data." Now it knows this event originated from a workload targeted by the block-sensitive-file-read policy. It can then apply the Block action.
So, identifying the workload responsible for a system event is fundamental to enforcing policies correctly.
How KubeArmor Identifies Workloads
KubeArmor runs as a DaemonSet on each node in your Kubernetes cluster (or directly on a standalone Linux server). This daemon is responsible for monitoring system activity on that specific node. To connect these low-level events to higher-level workload identities (like Pods or Nodes), KubeArmor does a few things:
Watching Kubernetes (for K8s environments): The KubeArmor daemon watches the Kubernetes API Server for events related to Pods and Nodes. When a new Pod starts, KubeArmor gets its details:
Pod Name
Namespace Name
Labels (this is key for policy selectors!)
Container details (Container IDs, Image names)
Node Name where the Pod is scheduled.
KubeArmor stores this information.
Interacting with Container Runtimes: KubeArmor talks to the container runtime (like Docker or containerd) running on the node. It uses the Container ID (obtained from Kubernetes or by watching runtime events) to get more low-level details:
Container PID (the process ID of the main process inside the container as seen from the host OS).
Container Namespace IDs (specifically the PID Namespace ID and Mount Namespace ID). These IDs are crucial because system events are often reported with these namespace identifiers.
Monitoring Host Processes: KubeArmor also monitors processes running directly on the host node (outside of containers).
KubeArmor builds and maintains an internal map that links these low-level identifiers (like PID Namespace ID + Mount Namespace ID) to the corresponding higher-level identities (Container ID, Pod Name, Namespace, Node Name, Labels).
Let's visualize how this identity mapping happens and is used:
This diagram shows the two main phases:
Identity Discovery: KubeArmor actively gathers information from Kubernetes and the container runtime to build its understanding of which system identifiers belong to which workloads.
Event Correlation: When a system event occurs, KubeArmor uses the identifiers from the event (like Namespace IDs) to quickly look up the corresponding workload identity in its map.
Looking at the Code (Simplified)
The KubeArmor code interacts with Kubernetes and Docker/containerd to get this identity information.
For Kubernetes environments, KubeArmor's k8sHandler watches for Pod and Node events:
This snippet shows that KubeArmor isn't passively waiting; it actively watches the Kubernetes API for changes using standard Kubernetes watch mechanisms. When a Pod is added, updated, or deleted, KubeArmor receives an event and updates its internal state.
For Docker (and similar logic exists for containerd), KubeArmor's dockerHandler can inspect running containers to get detailed information:
This function is critical. It takes a containerID and retrieves its associated Namespace IDs (PidNS, MntNS) by reading special files in the /proc filesystem on the host, which link the host PID to the namespaces it belongs to. It also retrieves labels and other useful information directly from the container runtime's inspection data.
This collected identity information is stored internally. For example, the SystemMonitor component maintains a map (NsMap) to quickly look up a workload based on Namespace IDs:
These functions from processTree.go show how KubeArmor builds and uses the core identity mapping: it stores the relationship between Namespace IDs (found in system events) and the Container ID, allowing it to quickly identify which container generated an event.
Identity Types Summary
KubeArmor primarily identifies workloads using the following:
Workload Type
Key Identifiers Monitored/Used
Source of Information
Container
Container ID, PID Namespace ID, Mount Namespace ID, Pod Name, Namespace, Labels
Kubernetes API, Container Runtime
Node
Node Name, Node Labels, Operating System Info
Kubernetes API, Host OS APIs
This allows KubeArmor to apply the correct security policies, whether they are KSPs (targeting Containers/Pods based on labels/namespaces) or HSPs (targeting Nodes based on node labels).
Conclusion
Understanding Container/Node Identity is key to grasping how KubeArmor works. It's the crucial step where KubeArmor translates low-level system events into the context of your application workloads (containers in pods) or your infrastructure (nodes). By maintaining a map of system identifiers to workload identities, KubeArmor can accurately determine which policies apply to a given event and enforce your desired security posture.
In the next chapter, we'll look at the component that takes this identified event and the relevant policy and makes the decision to allow, audit, or block the action.
# simplified KSP
apiVersion: security.kubearmor.com/v1
kind: KubeArmorPolicy
metadata:
name: block-sensitive-file-read
namespace: default
spec:
selector:
matchLabels:
app: sensitive-data # Policy applies to containers/pods with this label
file:
matchPaths:
- path: /sensitive/config # Specific file to protect
readOnly: true # Protect against writes too, but let's focus on read
action: Block # If read is attempted, block it
// KubeArmor/core/k8sHandler.go (Simplified)
// WatchK8sPods Function
func (kh *K8sHandler) WatchK8sPods(nodeName string) *http.Response {
// ... code to build API request URL ...
// The URL includes '?watch=true' to get a stream of events
URL := "https://" + kh.K8sHost + ":" + kh.K8sPort + "/api/v1/pods?watch=true"
// ... code to make HTTP request to K8s API server ...
// Returns a response stream where KubeArmor reads events
resp, err := kh.WatchClient.Do(req)
if err != nil {
return nil // Handle error
}
return resp
}
// ... similar functions exist to watch Nodes and Policies ...
// KubeArmor/core/dockerHandler.go (Simplified)
// GetContainerInfo Function
func (dh *DockerHandler) GetContainerInfo(containerID string, OwnerInfo map[string]tp.PodOwner) (tp.Container, error) {
if dh.DockerClient == nil {
return tp.Container{}, errors.New("no docker client")
}
// Ask the Docker daemon for details about a specific container ID
inspect, err := dh.DockerClient.ContainerInspect(context.Background(), containerID)
if err != nil {
return tp.Container{}, err // Handle error
}
container := tp.Container{}
container.ContainerID = inspect.ID
container.ContainerName = strings.TrimLeft(inspect.Name, "/")
// Get Kubernetes specific labels if available (e.g., for Pod name, namespace)
containerLabels := inspect.Config.Labels
if val, ok := containerLabels["io.kubernetes.pod.namespace"]; ok {
container.NamespaceName = val
}
if val, ok := containerLabels["io.kubernetes.pod.name"]; ok {
container.EndPointName = val // In KubeArmor types, EndPoint often refers to a Pod or standalone Container
}
// ... get other details like image, apparmor profile, privileged status ...
// Get the *host* PID of the container's main process
pid := strconv.Itoa(inspect.State.Pid)
// Read /proc/<host-pid>/ns/pid and /proc/<host-pid>/ns/mnt to get Namespace IDs
if data, err := os.Readlink(filepath.Join(cfg.GlobalCfg.ProcFsMount, pid, "/ns/pid")); err == nil {
fmt.Sscanf(data, "pid:[%d]\n", &container.PidNS)
}
if data, err := os.Readlink(filepath.Join(cfg.GlobalCfg.ProcFsMount, pid, "/ns/mnt")); err == nil {
fmt.Sscanf(data, "mnt:[%d]\n", &container.MntNS)
}
// ... store labels, etc. ...
return container, nil
}
// KubeArmor/monitor/processTree.go (Simplified)
// NsKey Structure (used as map key)
type NsKey struct {
PidNS uint32
MntNS uint32
}
// LookupContainerID Function
// This function is used when an event comes in with PidNS and MntNS
func (mon *SystemMonitor) LookupContainerID(pidns, mntns uint32) string {
key := NsKey{PidNS: pidns, MntNS: mntns}
mon.NsMapLock.RLock() // Use read lock for looking up
defer mon.NsMapLock.RUnlock()
if val, ok := mon.NsMap[key]; ok {
// If the key (Namespace IDs) is in the map, return the ContainerID
return val
}
// Return empty string if not found (might be a host process)
return ""
}
// AddContainerIDToNsMap Function
// This function is called when KubeArmor discovers a new container
func (mon *SystemMonitor) AddContainerIDToNsMap(containerID string, namespace string, pidns, mntns uint32) {
key := NsKey{PidNS: pidns, MntNS: mntns}
mon.NsMapLock.Lock() // Use write lock for modifying the map
defer mon.NsMapLock.Unlock()
// Store the mapping: Namespace IDs -> Container ID
mon.NsMap[key] = containerID
// ... also updates other maps related to namespaces and policies ...
}
Note the availability of owner nested json in the above telemetry event that provides details about the owner references that generated this telemetry event.
Support for BPF-LSM in Non-Orchestrated Containerized Workloads
In the previous versions, enforcement in containerized workloads was limited to AppArmor. We are delighted to introduce support for BPF-LSM (Linux Security Modules) in non-orchestrated containerized workloads. This new capability allows you to leverage the benefits of BPF-based security policies even outside of orchestrated environments. You can now avail the benefits of BPF LSM for enhanced security and fine-grained control over containerized workloads.
By incorporating BPF LSM enforcement, KubeArmor enables users to define and enforce security policies at the kernel level, providing an additional layer of protection for their containerized environments. Advanced capabilities offered by BPF LSM, including powerful eBPF (extended Berkeley Packet Filter) programs and flexible security rules, are now unlocked!
image
Helm Installation Fixes
For smoother deployments using Helm, we have addressed several issues and made necessary fixes. To benefit from these improvements, please refer to our updated Helm installation guide. If you are still facing any issues, please put it up in the discussions.
image
Auto-Updating Dependencies
To ensure you always have the latest dependencies, KubeArmor now utilizes Renovate, an automated dependency update tool. With Renovate, you can expect a seamless experience, as KubeArmor keeps your dependencies up to date automatically. Everything synced!
image
Support for New Platforms
With this release, we have expanded our platform support to include:
This means you can now confidently run KubeArmor on these platforms, benefiting from enhanced security and protection.
Default Visibility Changes
In previous versions, KubeArmor enabled full telemetry by default for all workloads. With v0.10, we have made a significant change. By default, telemetry for workloads is now disabled, offering more flexibility in managing telemetry settings. If you want to enable telemetry for specific workloads or namespaces, you can easily do so using annotations.
Miscellaneous
We are grateful to our dedicated community for their continuous support and valuable contributions that have made this release possible. Your feedback and suggestions drive us to improve KubeArmor with every release.
To explore the complete list of changes, bug fixes, and enhancements in KubeArmor v0.10, please refer to our release notes.
Upgrade to KubeArmor v0.10 today and experience the latest features and fixes firsthand. We look forward to hearing your thoughts and helping you strengthen the security of your Kubernetes deployments.
Got any questions? Check out the FAQ page or join the KubeArmor Slack for support.
Stay tuned for more updates and exciting features on our roadmap. Together, let's build a more secure and resilient Kubernetes ecosystem!
KubeArmor currently supports enabling visibility for containers and hosts.
Visibility for hosts is not enabled by default, however it is enabled by default for containers .
The karmor tool provides access to both using karmor logs.
Available visibility options:
KubeArmor provides visibility on the following behavior of containers
Process
Files
Networks
Prerequisites
If you don't have access to a K8s cluster, please follow to set one up.
karmor CLI tool:
Example: wordpress-mysql
To deploy app follow
Now we need to deploy some sample policies
This sample policy blocks execution of the apt and apt-get commands in wordpress pods with label selector app: wordpress.
Getting Container Visibility
Checking default visibility
Container visibility is enabled by default. We can check it using kubectl describe and grep kubearmor-visibility
Getting Host Visibility
Host Visibility is not enabled by default . To enable Host Visibility we need to annotate the node using kubectl annotate node
To confirm it use kubectl describe and grep kubearmor-visibility
Now we can get general telemetry events in the context of the host using karmor logs .The logs related to Host Visibility will have type Type: HostLogand Operation: File | Process | Network
Click to expand
The logs can also be generated in JSON format using karmor logs --logFilter=all --json
Updating Namespace Visibility
KubeArmor has the ability to let the user select what kind of events have to be traced by changing the annotation kubearmor-visibility at the namespace.
Checking Namespace visibility
Namespace visibility can be checked using kubectl describe.
To update the visibility of namespace : Now let's update Kubearmor visibility using
KubeArmor Daemon
Welcome back to the KubeArmor tutorial! In our journey so far, we've explored the key components that make KubeArmor work:
Security Policies: Your rulebooks for security.
Container/Node Identity: How KubeArmor knows who is doing something.
Runtime Enforcer: The component that translates policies into kernel rules and blocks forbidden actions.
System Monitor: KubeArmor's eyes and ears, observing system events.
BPF (eBPF): The powerful kernel technology powering much of the monitoring and enforcement.
In this chapter, we'll look at the KubeArmor Daemon. If the other components are like specialized tools or senses, the KubeArmor Daemon is the central brain and orchestrator that lives on each node. It brings all these pieces together, allowing KubeArmor to function as a unified security system.
What is the KubeArmor Daemon?
The KubeArmor Daemon is the main program that runs on every node (Linux server) where you want KubeArmor to provide security. When you install KubeArmor, you typically deploy it as a DaemonSet in Kubernetes, ensuring one KubeArmor Daemon pod runs on each of your worker nodes. If you're using KubeArmor outside of Kubernetes (on a standalone Linux server or VM), the daemon runs directly as a system service.
Think of the KubeArmor Daemon as the manager for that specific node. Its responsibilities include:
Starting and stopping all the other KubeArmor components (System Monitor, Runtime Enforcer, Log Feeder).
Communicating with external systems like the Kubernetes API server or the container runtime (Docker, containerd, CRI-O) to get information about running workloads and policies.
Building and maintaining the internal mapping for Container/Node Identity.
Without the Daemon, the individual components couldn't work together effectively to provide end-to-end security.
Why is the Daemon Needed? A Coordinated Use Case
Let's trace the journey of a security policy and a system event, highlighting the Daemon's role.
Imagine you want to protect a specific container, say a database pod with label app: my-database, by blocking it from executing the /bin/bash command. You create a KubeArmor Policy (KSP) like this:
And let's say later, a process inside that database container actually attempts to run /bin/bash.
Here's how the KubeArmor Daemon on the node hosting that database pod orchestrates the process:
Policy Discovery: The KubeArmor Daemon, which is watching the Kubernetes API server, detects your new block-bash-in-db policy.
Identify Targets: The Daemon processes the policy's selector (app: my-database). It checks its internal state (built by talking to the Kubernetes API and container runtime) to find which running containers/pods on its node match this label. It identifies the specific database container.
This diagram illustrates how the Daemon acts as the central point, integrating information flow and control between external systems (K8s, CRI), the low-level kernel components (Monitor, Enforcer), and the logging/alerting system.
The Daemon Structure
Let's look at the core structure representing the KubeArmor Daemon in the code. It holds references to all the components it manages and the data it needs.
Referencing KubeArmor/core/kubeArmor.go:
Explanation:
The KubeArmorDaemon struct contains fields like Node (details about the node it runs on), K8sEnabled (whether it's in a K8s cluster), and maps/slices to store information about K8sPods, Containers, EndPoints, and parsed SecurityPolicies. Locks (*sync.RWMutex) are used to safely access this shared data from multiple parts of the Daemon's logic.
Daemon Lifecycle: Initialization and Management
When KubeArmor starts on a node, the KubeArmor() function in KubeArmor/main.go (which calls into KubeArmor/core/kubeArmor.go) initializes and runs the Daemon.
Here's a simplified look at the initialization steps within the KubeArmor() function:
Explanation:
NewKubeArmorDaemon is like the constructor; it creates the Daemon object and initializes its basic fields and locks. Pointers to components like Logger, SystemMonitor, RuntimeEnforcer are initially zeroed.
The main KubeArmor() function then calls dedicated Init...
This demonstrates the Daemon's role in the lifecycle: it's the entity that brings the other parts to life, wires them together by passing references, starts their operations, and orchestrates their shutdown.
Daemon as the Information Hub
The Daemon isn't just starting components; it's managing the flow of information:
Policies In: The Daemon actively watches the Kubernetes API (or receives updates in non-K8s mode) for changes to KubeArmor policies. When it gets a policy, it stores it in its SecurityPolicies or HostSecurityPolicies lists and notifies the Runtime Enforcer to update the kernel rules for affected workloads.
Identity Management: The Daemon watches Pod/Container/Node events from Kubernetes and the container runtime. It populates internal structures (like the Containers map) which are then used by the System Monitor to correlate raw kernel events with workload identity (Container/Node Identity). While the NsMap itself might live in the Monitor (as seen in Chapter 4 context), the Daemon is responsible for gathering the initial K8s/CRI data needed to
The Daemon acts as the central switchboard, ensuring that policies are delivered to the enforcement layer, that kernel events are enriched with workload context, and that meaningful security logs and alerts are generated and sent out.
Daemon Responsibilities Summary
Responsibility
What it Does
Interacts With
This table reinforces that the Daemon is the crucial integration layer on each node.
Conclusion
In this chapter, you learned that the KubeArmor Daemon is the core process running on each node, serving as the central orchestrator for all other KubeArmor components. It's responsible for initializing, managing, and coordinating the System Monitor (eyes/ears), Runtime Enforcer (security guard), and Log Feeder (reporter). You saw how it interacts with Kubernetes and container runtimes to understand Container/Node Identity and fetch Security Policies, bringing all the pieces together to enforce your security posture and report violations.
Understanding the Daemon's central role is key to seeing how KubeArmor operates as a cohesive system on each node. In the final chapter, we'll focus on where all the security events observed by the Daemon and its components end up
v1.1
KubeArmor on RedHat Ecosystem #1294 ✅
list the applied policies for unorchestrated workloads #1311 ✅
Use Enforcer as a source of Alerts #1277 ✅
v0.5
KubeArmor v0.5 Release Notes
KubeArmor adds a number of new capabilities in this 0.5 release, including:
support for BPF-LSM policy enforcement,
Fetching and processing Security Policies (KSP, HSP, CSP) that apply to the workloads on its node.
Instructing the Runtime Enforcer on which policies to load and enforce for specific containers and the host.
Receiving security events and raw data from the System Monitor.
Adding context (like identity) to raw events received from the monitor.
Forwarding processed logs and alerts to the Log Feeder for external consumption.
Handling configuration changes and responding to shutdown signals.
Prepare Enforcement: The Daemon takes the policy rule (Block /bin/bash) and tells its Runtime Enforcer component to load this rule specifically for the identified database container. The Enforcer translates this into the format needed by the underlying OS security module (AppArmor, SELinux, or BPF-LSM) and loads it into the kernel.
System Event: A process inside the database container tries to execute /bin/bash.
Event Detection & Enforcement: The OS kernel intercepts this action. If using BPF-LSM, the Runtime Enforcer's BPF program checks the loaded policy rules (which the Daemon put there). It sees the rule to Block/bin/bash for this container's identity. The action is immediately blocked by the kernel.
Event Monitoring & Context: Simultaneously, the System Monitor's BPF programs also detect the exec attempt on /bin/bash. It collects details like the process ID, the attempted command, and the process's Namespace IDs. It sends this raw data to the Daemon (via a BPF ring buffer).
Event Processing: The Daemon receives the raw event from the Monitor. It uses the Namespace IDs to look up the Container/Node Identity in its internal map, identifying that this event came from the database container (app: my-database). It sees the event includes an error code indicating it was blocked by the security module.
Log Generation: The Daemon formats a detailed log/alert message containing all the information: the event type (process execution), the command (/bin/bash), the outcome (Blocked), and the workload identity (container ID, Pod Name, Namespace, Labels).
Log Forwarding: The Daemon sends this formatted log message to its Log Feeder component, which then forwards it to your configured logging/monitoring system.
Crucially, it has pointers to the other main components: Logger, SystemMonitor, and RuntimeEnforcer. This shows that the Daemon owns and interacts with instances of these components.
WgDaemon is a sync.WaitGroup used to track background processes (goroutines) started by the Daemon, allowing for a clean shutdown.
methods on the
dm
object (like
dm.InitLogger()
,
dm.InitSystemMonitor()
,
dm.InitRuntimeEnforcer()
).
These Init... methods are responsible for creating the actual instances of the other components using their respective New... functions (e.g., mon.NewSystemMonitor()) and assigning the returned object to the Daemon's pointer field (dm.SystemMonitor = ...). They pass necessary configuration and references (like the Logger) to the components they initialize.
After initializing components, the Daemon starts goroutines (using go dm.SomeFunction()) for tasks that need to run continuously in the background, like serving logs, monitoring system events, or watching external APIs.
The main flow then typically waits for a shutdown signal (<-sigChan).
When a signal is received, dm.DestroyKubeArmorDaemon() is called, which in turn calls Close... methods on the components to shut them down gracefully.
populate
that map.
Events Up: The System Monitor constantly reads raw event data from the kernel (via BPF ring buffer). It performs the initial lookup using the Namespace IDs and passes the enriched events (likely via Go channels, as hinted in Chapter 4 code) back to the Daemon or a component managed by the Daemon (like the logging pipeline within the Feeder).
Logs Out: The Daemon (or its logging pipeline) takes these enriched events and passes them to the Log Feeder component. The Log Feeder is then responsible for sending these logs/alerts to the configured output destinations.
Gathers data (Labels, Namespaces, Container IDs, PIDs, NS IDs) to map low-level events to workloads.
Kubernetes API Server, Container Runtimes, OS Kernel (/proc)
Policy Processing
Fetches policies, identifies targeted workloads on its node.
Kubernetes API Server, Internal state (Identity)
Enforcement Orchest.
Tells the Runtime Enforcer which policies to load for which workload.
Runtime Enforcer, Internal state (Identity, Policies)
Event Reception
Receives raw or partially processed events from the Monitor.
System Monitor (via channels/buffers)
Event Enrichment
Adds full workload identity and policy context to incoming events.
System Monitor, Internal state (Identity, Policies)
Logging/Alerting
Formats events into structured logs/alerts and passes them to the Log Feeder.
Starts, stops, and manages the lifecycle of Monitor, Enforcer, Logger.
System Monitor, Runtime Enforcer, Log Feeder
External Comm.
Watches K8s API for policies & workload info; interacts with CRI.
Kubernetes API Server, Container Runtimes (Docker, containerd, CRI-O)
Identity Building
For pre-existing workloads : Enable visibility using kubectl annotate. Currently KubeArmor supports process, file, network, capabilities
Open up a terminal, and watch logs using the karmor cli
In another terminal, simulate a policy violation . Try sleep inside a pod
In the terminal running karmor logs, the policy violation along with container visibility is shown, in this case for example
The logs can also be generated in JSON format using karmor logs --json
kubectl annotate
. Currently KubeArmor supports
process
,
file
,
network
,
capabilities
.
Lets try to update visibility for the namespace
wordpress-mysql
Note: To turn off the visibility across all aspects, use kubearmor-visibility=none. Note that any policy violations or events that results in non-success returns would still be reported in the logs.
Open up a terminal, and watch logs using the karmor cli
In another terminal, let's exec into the pod and run some process commands . Try ls inside the pod
Now, we can notice that no logs have been generated for the above command and logs with only Operation: Network are shown.
Note If telemetry is disabled, the user wont get audit event even if there is an audit rule.
Note Only the logs are affected by changing the visibility, we still get all the alerts that are generated.
Let's simulate a sample policy violation, and see whether we still get alerts or not.
Policy violation :
Here, note that the alert with Operation: Process is reported.
// KubeArmorDaemon Structure (Simplified)
type KubeArmorDaemon struct {
// node information
Node tp.Node
NodeLock *sync.RWMutex
// flag
K8sEnabled bool
// K8s pods, containers, endpoints, owner info
// These map identity details collected from K8s/CRI
K8sPods []tp.K8sPod
K8sPodsLock *sync.RWMutex
Containers map[string]tp.Container
ContainersLock *sync.RWMutex
EndPoints []tp.EndPoint
EndPointsLock *sync.RWMutex
OwnerInfo map[string]tp.PodOwner
// Security policies watched from K8s API
SecurityPolicies []tp.SecurityPolicy
SecurityPoliciesLock *sync.RWMutex
HostSecurityPolicies []tp.HostSecurityPolicy
HostSecurityPoliciesLock *sync.RWMutex
// logger component
Logger *fd.Feeder
// system monitor component
SystemMonitor *mon.SystemMonitor
// runtime enforcer component
RuntimeEnforcer *efc.RuntimeEnforcer
// Used for managing background goroutines
WgDaemon sync.WaitGroup
// ... other fields for health checks, state agent, etc. ...
}
// KubeArmor Function (Simplified)
func KubeArmor() {
// create a daemon instance
dm := NewKubeArmorDaemon()
// dm is our KubeArmorDaemon object on this node
// ... Node info setup (whether in K8s or standalone) ...
// initialize log feeder component
if !dm.InitLogger() {
// handle error and destroy daemon
return
}
dm.Logger.Print("Initialized KubeArmor Logger")
// Start logger's background process to serve feeds
go dm.ServeLogFeeds()
// ... StateAgent, Health Server initialization ...
// initialize system monitor component
if cfg.GlobalCfg.Policy || cfg.GlobalCfg.HostPolicy { // Only if policy/hostpolicy is enabled
if !dm.InitSystemMonitor() {
// handle error and destroy daemon
return
}
dm.Logger.Print("Initialized KubeArmor Monitor")
// Start system monitor's background processes to trace events
go dm.MonitorSystemEvents()
// initialize runtime enforcer component
// It receives the SystemMonitor instance because the BPF enforcer
// might need info from the monitor (like pin paths)
if !dm.InitRuntimeEnforcer(dm.SystemMonitor.PinPath) {
dm.Logger.Print("Disabled KubeArmor Enforcer since No LSM is enabled")
} else {
dm.Logger.Print("Initialized KubeArmor Enforcer")
}
// ... Presets initialization ...
}
// ... K8s/CRI specific watching for Pods/Containers/Policies ...
// wait for a while (initialization sync)
// ... Policy and Pod watching (K8s specific) ...
// listen for interrupt signals to trigger shutdown
sigChan := GetOSSigChannel()
<-sigChan // This line blocks until a signal is received
// destroy the daemon (calls Close methods on components)
dm.DestroyKubeArmorDaemon()
}
// NewKubeArmorDaemon Function (Simplified)
func NewKubeArmorDaemon() *KubeArmorDaemon {
dm := new(KubeArmorDaemon)
// Initialize maps, slices, locks, and component pointers to nil/empty
dm.NodeLock = new(sync.RWMutex)
dm.K8sPodsLock = new(sync.RWMutex)
dm.ContainersLock = new(sync.RWMutex)
dm.EndPointsLock = new(sync.RWMutex)
dm.SecurityPoliciesLock = new(sync.RWMutex)
dm.HostSecurityPoliciesLock = new(sync.RWMutex)
dm.DefaultPosturesLock = new(sync.Mutex)
dm.ActivePidMapLock = new(sync.RWMutex)
dm.MonitorLock = new(sync.RWMutex)
dm.Containers = map[string]tp.Container{}
dm.EndPoints = []tp.EndPoint{}
dm.OwnerInfo = map[string]tp.PodOwner{}
dm.DefaultPostures = map[string]tp.DefaultPosture{}
dm.ActiveHostPidMap = map[string]tp.PidMap{}
// Pointers to components (Logger, Monitor, Enforcer) are initially nil
return dm
}
// InitSystemMonitor Function (Called by Daemon)
func (dm *KubeArmorDaemon) InitSystemMonitor() bool {
// Create a new SystemMonitor instance, passing it data it needs
dm.SystemMonitor = mon.NewSystemMonitor(
&dm.Node, &dm.NodeLock, // Node info
dm.Logger, // Reference to the logger
&dm.Containers, &dm.ContainersLock, // Container identity info
&dm.ActiveHostPidMap, &dm.ActivePidMapLock, // Host process identity info
&dm.MonitorLock, // Monitor's own lock
)
if dm.SystemMonitor == nil {
return false
}
// Initialize BPF inside the monitor
if err := dm.SystemMonitor.InitBPF(); err != nil {
return false
}
return true
}
// InitRuntimeEnforcer Function (Called by Daemon)
func (dm *KubeArmorDaemon) InitRuntimeEnforcer(pinpath string) bool {
// Create a new RuntimeEnforcer instance, passing it data/references
dm.RuntimeEnforcer = efc.NewRuntimeEnforcer(
dm.Node, // Node info
pinpath, // BPF pin path from the monitor
dm.Logger, // Reference to the logger
dm.SystemMonitor, // Reference to the monitor (for BPF integration needs)
)
return dm.RuntimeEnforcer != nil
}
Create PolicyReports for security events to use with Policy Reporter #1337 ✅ #1328
CEF format support #1371 ✅ #1328
handle policy addition and deletion in systemd mode. #1312 ✅
kubearmor packer provisioner #3 ✅
K0s Support for KubeArmor #1318 ✅
Install KubeArmor in the "kubearmor" namespace by default #1167 ✅
adding cwd in alerts/telemetry #1453 ✅
Nephio Integration
MicroShift Support #1325
Prebuilt 5G Security controls from MITRE FiGHT and ENISA
Modify Sidekick to export KubeArmor events #1328 ✅
Performance Improvement
Boost Confidence with Red Hat OpenShift Certified KubeArmor Operator @rksharma95
Boost Confidence
Ensuring compatibility, security, and trustworthiness is crucial in today's containerised world. That's where Red Hat OpenShift Product Certification for the KubeArmor Operator comes in. This certification provides approval, signifying that KubeArmor is rigorously tested and verified to work seamlessly with OpenShift in production environments.
Improved support for Kubearmor-client in Systemd Mode @Aryan-sharma11
Applying policies via kubearmor-client
Improved Policy Handling in Systemd
In systemd mode, karmor is getting an upgrade to handle policy addition and deletion better. The current behaviour can be confusing, as it always returns a "SUCCESS" message, even when adding a policy already applied or deleting a policy that doesn't exist.
Policy Addition: If you try to apply a policy already in effect, karmor will tell you, "Policy is already applied."
Policy Deletion: If you attempt to delete a policy that doesn't exist, the response will indicate that the "Policy doesn't exist."
These enhancements include a new check to ensure that policies are received by the gRPC client and successfully applied by the ParseAndUpdate functions. This makes karmor more reliable and user-friendly when managing policies in systemd mode. In the containerization landscape, orchestrated workloads receive much attention, but unorchestrated workloads are equally important. Often running in Systemd mode, unmanaged containers can benefit from a policy management approach. One effective tool is the Karmor Probe, which helps ensure security and compliance.
Managing Policies
Karmor Probe for Unorchestrated Workloads
Using a gRPC Endpoint
Set up a gRPC endpoint within your unorchestrated environment to query and list policies applied to workloads.
This allows you to integrate Karmor Probe seamlessly and maintain the same standards for unorchestrated and orchestrated workloads.
Systemd Mode Workloads
Unorchestrated workloads in Systemd mode can be managed by leveraging Systemd commands and unit files.
Use Systemd-specific tools to inspect policies and maintain clear documentation for each service.
In conclusion, maintaining policies for unorchestrated workloads is essential for a comprehensive container environment. Karmor Probe and a strategic approach help ensure security and compliance for all your containers, regardless of orchestration.
Streamlining Kubernetes Security with KubeArmor Enforcer Alerts @daemon1024 @Aryan-sharma11
KubeArmor's latest feature request aims to reduce confusion by using alerts sent by the KubeArmor enforcer, rather than triggering Default Posture alerts when no permissions are denied. This enhancement simplifies Kubernetes security and provides more accurate information to users.
Streamlining Kubernetes Sec (Medium)
In the world of Kubernetes security, minimizing confusion is a priority. KubeArmor's proposed solution involves setting up a Ring Buffer Infrastructure in the BPF LSM Enforcer to manage alerts more effectively. Here's how it works:
The Solution:
Ring Buffer Infrastructure: KubeArmor creates a ring buffer in the kernel space to store and manage alerts.
Alert Handling: Alerts are generated when permissions are denied, containing crucial information about the denial.
User-Friendly Alerts: Only genuine security alerts are triggered, reducing unnecessary Default Posture alerts.
Benefits:
Reduced Confusion: Users won't be bombarded with false alarms.
Enhanced Usability: Security monitoring becomes more straightforward.
Improved Resource Utilization: Fewer alerts mean more efficient resource usage.
Conclusion: KubeArmor's feature request promises a simpler and more user-friendly Kubernetes security experience by focusing on real security events and minimizing noise. This development contributes to a robust and effective Kubernetes security solution.
Enhanced Security with Disabled File-Based Telemetry by Default @Ankurk99
KubeArmor has significantly updated by disabling file-based telemetry by default. This modification substantially decreases telemetry data generated by file events, lowering overall resource consumption. Users have the flexibility to configure these changes and can effortlessly enable visibility as needed.
Enhancing KubeArmor on Flatcar OS @daemon1024
KubeArmor recently underwent testing on Flatcar OS, leading to valuable feedback and feature requests. Key details include a missing /usr/src directory on Flatcar OS, which prompted the suggestion to make its location optional. Additionally, enabling BPF-LSM was found to be crucial and is now clarified in the documentation.
KubeArmor has responded with enhancements, including the KubeArmor Operator for smoother deployments and a new FAQ section on enabling BPF-LSM. These updates reflect the project's commitment to improving container security and user experience.
Improved Policy Handling in Systemd Mode @Aryan-sharma11
Simplify Kubernetes Security with KubeArmor Packer Provisioner @Prateeknandle
Simplify Kubernetes Security with KubeArmor Packer
In the world of Kubernetes security, KubeArmor is a game-changer. But installing it can be complex. That's where the Kubearmor Packer Provisioner comes in. It offers:
Ansible Playbook: An automated way to install KubeArmor, Karmor, and dependencies, ensuring consistency.
Packer Integration: Seamlessly integrates with Packer for image creation, so your Kubernetes cluster comes pre-configured with Kubearmor and Karmor.
With this provisioner, you can fortify your Kubernetes security effortlessly and efficiently, saving time and reducing the risk of misconfigurations.
KubeArmor Adds Support for K0s: Boosting Kubernetes Security @anurag-rajawat
K0s is known for its simplicity and efficiency, making it a preferred choice for some Kubernetes users. With KubeArmor's support, K0s users can now benefit from advanced security features while keeping their clusters lightweight.
KubeArmor Adds Support for K0s
Key Benefits:
Enhanced Security: K0s users can apply fine-grained security policies to container workloads, improving protection against threats.
Increased Flexibility: Integrating K0s support expands choices for securing Kubernetes environments.
Growing Ecosystem: It contributes to the diversity and adaptability of the Kubernetes ecosystem.
KubeArmor's support for K0s is a valuable addition that enhances Kubernetes security options. Whether you're already using K0s or considering it, explore the benefits of KubeArmor's security solutions for your containerized workloads.
Enhancing Container Security with BPF LSM and KubeArmor @daemon1024
Enhancing Container Security with BPF LSM and KubeArmor
Containerization and Kubernetes have transformed application deployment, but security remains a concern. KubeArmor, an open-source project, leverages BPF LSM (Linux Security Modules) to enforce host policies for stronger Kubernetes security.
Containers share the host kernel, making them vulnerable. KubeArmor addresses this by enforcing fine-grained host policies that boost security.
BPF LSM combines BPF's power with LSM's security framework to make real-time policy decisions and enforcement possible—enhanced Security with KubeArmor. KubeArmor delivers real-time policy enforcement, host-level policies, fine-grained control, auditing, and seamless Kubernetes integration. KubeArmor's innovative use of BPF LSM enhances security in Kubernetes environments, protecting containerized applications and ensuring compliance.
Installing KubeArmor in the "kubearmor" Namespace @Ankurk99
The kube-system namespace is used for objects created by the Kubernetes system. It is reserved for system-level resources and components critical to the cluster's functioning. Installing any external deployments with the system's essential resources is not recommended. In this release, we have modified the default namespace for KubeArmor to utilize kubearmor.
Streamlining Kubearmor Event Export with Sidekick Integration @Shreyas220
Exporting Kubearmor security events to various outputs is essential for effective Kubernetes security management. Discover how integrating Falcosidekick can simplify this process. It's a vital tool for securing Kubernetes clusters, but handling the export of security events can be challenging. We have integrated Falcosidekick to seamlessly export Kubearmor events to multiple outputs like email, Slack, Redis, RabbitMQ, Kafka, and more. Falcosidekick acts as a bridge, receiving events from Kubearmor and forwarding them to your chosen destinations. This integration allows you to customize event routing, receive real-time alerts, and ensure scalability and reliability.
The Kubearmor and Falcosidekick integration simplifies exporting security events, enhancing your ability to manage and respond to Kubernetes security incidents effectively.
Leveraging eBPF for Current Working Directory (CWD) in Alerts @Prateeknandle
Introduction
In this blog, we'll explore using eBPF to capture a process's Current Working Directory (CWD) and include this information in your system alerts and telemetry. CWD is valuable for debugging, troubleshooting, security, and compliance.
Why CWD Matters
Debugging: Helps identify file access, permissions, and dependencies issues.
Troubleshooting: Contextual information for efficient issue diagnosis.
Security: Detects suspicious activities related to directory access.
Compliance: Provides context for auditing and compliance requirements.
Adding CWD to Alerts and Telemetry
Write an eBPF program to capture CWD.
Extract CWD information from process data structures.
Send CWD data to your logging or alerting system.
Correlate CWD data with other observability metrics.
image
Benefits
Faster Issue Resolution: Speed up troubleshooting.
Improved Resource Utilization: Optimize system resources.
Incorporating CWD data through eBPF empowers better system observability and performance analysis.
integration with the Kubernetes admission controller, and
support for the CRI-O container runtime engine.
We’ve expanded platform support to include AWS Bottlerocket and Linux 2 and Microsoft AKS. We’ve also added support for network rules in SELinux, made improvements to the CLI, along with other enhancements and fixes.
Support for BPF-LSM for policy enforcement
KubeArmor today leverages LSMs such as AppArmor, SELinux for policy enforcement. With v0.5, Kubearmor now integrates with BPF-LSM for pod/container based policy enforcement as well. BPF-LSM is a new LSM (Linux Security Modules) that is introduced in the newer kernels (version > 5.7). BPF-LSM allows Kubearmor to attach bpf-bytecode at LSM hooks. This changes everything, since now with bpf-bytecode kubearmor has access to much richer information/kernel context and it does not have to work within the constraints of SELinux and AppArmor policy language.
What happens if the OS image supports both AppArmor and BPF-LSM? What will be used for policy enforcement?
If BPF-LSM is available, that takes priority by default. Note that BPF-LSM is a stackable LSM (unlike AppArmor, SELinux) which means it can be enabled with existing non-stackable LSMs such as AppArmor/SELinux. Thus if for some reason the bpf-lsm enforcer fails, the AppArmor enforcer will be automatically used underneath the hood.
Is their any change in the KubeArmorPolicy construct for BPF-LSM?
No. The existing constructs work as it is. This means for the user, there is no change in the way policies have to be specified.
Support for AWS Bottlerocket 🚀 and Amazon Linux 2 (latest image)
kubearmor-bottlerocket
What security does Bottlerocket offer?
Bottlerocket is a security focussed Linux based Open Source OS from Amazon that is purpose built for container based workloads. The intention with Bottlerocket is to avoid installation of maintenance packages directly as part of host OS and install only bare-minimum host packages that are required to run the containers. Maintenance tools could in turn be installed as containers if necessary.
How Kubearmor improves on Bottlerocket security?
Bottlerocket uses SELinux to lock down the host and provides some limited inter-container isolation.
KubeArmor provides enhanced security by using BPF-LSM to protect Bottlerocket containers from within by limiting system behavior with respect to processes, files, etc. For e.g., a k8s security access token that is mounted within the pod is accessible by default across all the containers. KubeArmor can restrict access to such tokens only for certain processes. Similarly KubeArmor can be used to protect other sensitive information e.g., k8s secrets, x509 certs, within the container. Moreover, KubeArmor can restrict execution of certain binaries within the containers.
KubeArmor now uses k8s admission controller to inject security annotations
KubeArmor depends upon AppArmor, SELinux and the underlying LSMs for security policy enforcement. In the context of k8s, such policies need to be specified as annotations. Before v0.5, Kubearmor used to apply deployment patch to inject such annotations. This resulted in the deployment to be restarted. Furthermore, one cannot apply annotations to pods that are not started as part of deployments.
In v0.5, Kubearmor has started making use of k8s admission controller feature to inject annotations in the pod. This resolves the deployment restart issue as well as the annotations can now be applied to pods as well.
KubeArmor directly interfaces with container runtimes to get metadata like container’s namespaces, image and so on. This metadata is then used for generating rich telemetry data and policy enforcement.
In the past, KubeArmor has supported Containerd and Docker and now with v0.5, KubeArmor will also support the CRI-O runtime. This has been made possible by leveraging the CRI-API. Also, if you have multiple container runtimes, you can now use the CRI_SOCKET environment var or the -criSocket flag with kubearmor for specifying one to use.
Kubearmor process-bound network rules allows one to limit network communication to only certain processes. It is possible to enable/disable TCP/UDP/ICMP communication for certain processes only.
The above policy prevents /usr/bin/curl from initiating tcp connection.
SELinux support was added as part of v0.4.4 but could not handle the [network based rules]. v0.5 adds support for network based rules.
Improvements to kubearmor cli tool
Kubearmor client tool can be used to install, uninstall, watch alerts/telemetry, observe and discover kubearmor security policies. The client tool automatically identifies the underlying k8s/container platform and appropriates handles the deployment. The same client tool can be used across any deployment mode (viz, k8s, pure-containerized and VM/Bare-metal).
Kubearmor client tool was extended to support different filtering options based on process name, resource type, namespace, labels etc. This filtering implementation was handled by a LFX mentee and is documented here.
K8s orchestrated: Workloads deployed as k8s orchestrated containers. In this case, Kubearmor is deployed as a k8s daemonset. Note, KubeArmor supports policy enforcement on both k8s-pods (KubeArmorPolicy) as well as k8s-nodes (KubeArmorHostPolicy).
Containerized: Workloads that are containerized but not k8s orchestrated are supported. KubeArmor installed in systemd mode can be used to protect such workloads.
VM/Bare-Metals: Workloads deployed on Virtual Machines or Bare Metal i.e. workloads directly operating as host/system processes. In this case, Kubearmor is deployed in .
Kubernetes Support Matrix
Supported Linux Distributions
Following distributions are tested for VM/Bare-metal based installations:
Provider
Distro
VM / Bare-metal
Kubernetes
Note
Full: Supports both enforcement and observability
Partial: Supports only observability
Platform I am interested is not listed here! What can I do?
Please approach the Kubearmor community on or a GitHub issue to express interest in adding the support.
It would be very much appreciated if you can test kubearmor on a platform not listed above and if you have access to. Once tested you can update this document and raise a PR.
Runtime Enforcer
Welcome back! In the previous chapter, we learned how KubeArmor figures out who is performing an action on your system by understanding Container/Node Identity. We saw how it maps low-level system details like Namespace IDs to higher-level concepts like Pods, containers, and nodes, using information from the Kubernetes API and the container runtime.
Now that KubeArmor knows who is doing something, it needs to decide if that action is allowed. This is the job of the Runtime Enforcer.
What is the Runtime Enforcer?
Think of the Runtime Enforcer as the actual security guard positioned at the gates and doors of your system. It receives the security rules you defined in your Security Policies (KSP, HSP, CSP). But applications and the operating system don't directly understand KubeArmor policy YAML!
The Runtime Enforcer's main task is to translate these high-level KubeArmor rules into instructions that the underlying operating system's built-in security features can understand and enforce. These OS security features are powerful mechanisms within the Linux kernel designed to control what processes can and cannot do. Common examples include:
AppArmor: Used by distributions like Ubuntu, Debian, and SLES. It uses security profiles that define access controls for individual programs (processes).
SELinux: Used by distributions like Fedora, CentOS/RHEL, and Alpine Linux. It uses a system of labels and rules to control interactions between processes and system resources.
BPF-LSM: A newer mechanism using eBPF programs attached to Linux Security Module (LSM) hooks to enforce security policies directly within the kernel.
When an application or process on your node or inside a container attempts to do something (like open a file, start a new process, or make a network connection), the Runtime Enforcer (via the configured OS security feature) steps in. It checks the translated rules that apply to the identified workload and tells the operating system whether to Allow, Audit, or Block the action.
Why Do We Need a Runtime Enforcer? A Use Case Revisited
Let's go back to our example: preventing a web server container (with label app: my-web-app) from reading /etc/passwd.
In Chapter 1, we wrote a KubeArmor Policy for this:
In Chapter 2, we saw how KubeArmor's Container/Node Identity component identifies that a specific process trying to read /etc/passwd belongs to a container running a Pod with the label app: my-web-app.
Now, the Runtime Enforcer takes over:
It knows the action is "read file /etc/passwd".
It knows the actor is the container identified as having the label app: my-web-app.
It looks up the applicable policies for this actor and action.
It finds the block-etc-passwd-read policy, which says action: Block for /etc/passwd.
The Runtime Enforcer, using the underlying OS security module, tells the Linux kernel to Block the read attempt.
The application trying to read the file will receive a "Permission denied" error, and the attempt will be stopped before it can succeed.
How KubeArmor Selects and Uses an Enforcer
KubeArmor is designed to be flexible and work on different Linux systems. It doesn't assume a specific OS security module is available. When KubeArmor starts on a node, it checks which security modules are enabled and supported on that particular system.
You can configure KubeArmor to prefer one enforcer over another using the lsm.lsmOrder configuration option. KubeArmor will try to initialize the enforcers in the specified order (bpf, selinux, apparmor) and use the first one that is available and successfully initialized. If none of the preferred ones are available, it falls back to any other supported, available LSM. If no supported enforcer can be initialized, KubeArmor will run in a limited capacity (primarily for monitoring, not enforcement).
You can see KubeArmor selecting the LSM in the NewRuntimeEnforcer function (from KubeArmor/enforcer/runtimeEnforcer.go):
This snippet shows that KubeArmor checks for available LSMs (lsms) and attempts to initialize its corresponding enforcer module (be.NewBPFEnforcer, NewAppArmorEnforcer, NewSELinuxEnforcer) based on configuration and availability. The first one that succeeds becomes the active EnforcerType.
Once an enforcer is selected and initialized, the KubeArmor Daemon on the node loads the relevant policies for the workloads it is protecting and translates them into the specific rules required by the chosen enforcer.
The Enforcement Process: Under the Hood
When KubeArmor needs to enforce a policy on a specific container or node, here's a simplified flow:
Policy Change/Discovery: A KubeArmor Policy (KSP, HSP, or CSP) is applied or changed via the Kubernetes API. The KubeArmor Daemon on the relevant node detects this.
Identify Affected Workloads: The daemon determines which specific containers or the host node are targeted by this policy change using the selectors and its internal Container/Node Identity mapping.
Translate Rules: For each affected workload, the daemon takes the high-level policy rules (e.g., Block access to /etc/passwd) and translates them into the low-level format required by the active Runtime Enforcer (AppArmor, SELinux, or BPF-LSM).
Load Rules into OS: The daemon interacts with the operating system to load or update these translated rules. This might involve writing files, calling system utilities (apparmor_parser, chcon), or interacting with BPF system calls and maps.
OS Enforcer Takes Over: The OS kernel's security module (now configured by KubeArmor) is now active.
Action Attempt: A process within the protected workload attempts a specific action (e.g., opening /etc/passwd).
Interception: The OS kernel intercepts this action using hooks provided by its security module.
Decision: The security module checks the rules previously loaded by KubeArmor that apply to the process and resource involved. Based on the action (Allow, Audit, Block) defined in the KubeArmor policy (and translated into the module's format), the security module makes a decision.
Enforcement:
If Block, the OS prevents the action and returns an error to the process.
If Allow, the OS permits the action.
Event Notification (for Audit/Block): (As we'll see in the next chapter), the OS kernel generates an event notification for blocked or audited actions, which KubeArmor then collects for logging and alerting.
Here's a simplified sequence diagram for the enforcement path after policies are loaded:
This diagram shows that the actual enforcement decision happens deep within the OS kernel, powered by the rules that KubeArmor translated and loaded. KubeArmor isn't in the critical path for every action attempt; it pre-configures the kernel's security features to handle the enforcement directly.
Looking at the Code: Translating and Loading
Let's see how KubeArmor interacts with the different OS enforcers.
AppArmor Enforcer:
AppArmor uses text-based profile files stored typically in /etc/apparmor.d/. KubeArmor translates its policies into rules written in AppArmor's profile language, saves them to a file, and then uses the apparmor_parser command-line tool to load or update these profiles in the kernel.
This snippet shows the key steps: generating the profile content, writing it to a file path based on the container/profile name, and then executing the apparmor_parser command with the -r (reload) and -W (wait) flags to apply the profile to the kernel.
SELinux Enforcer:
SELinux policy management is complex, often involving compiling policy modules and managing file contexts. KubeArmor's SELinux enforcer focuses primarily on basic host policy enforcement (in standalone mode, not typically in Kubernetes clusters using the default SELinux integration). It interacts with tools like chcon to set file security contexts based on policies.
This snippet shows KubeArmor executing the chcon command to modify the SELinux security context (label) of files, which is a key way SELinux enforces access control.
BPF-LSM Enforcer:
The BPF-LSM enforcer works differently. Instead of writing text files and using external tools, it loads eBPF programs directly into the kernel and populates eBPF maps with rule data. When an event occurs, the eBPF program attached to the relevant LSM hook checks the rules stored in the map to make the enforcement decision.
This heavily simplified snippet shows how the BPF enforcer loads BPF programs and attaches them to kernel LSM hooks. It also hints at how container identity (Container/Node Identity) is used (via pidns, mntns) as a key to organize rules within BPF maps (BPFContainerMap), allowing the kernel's BPF program to quickly look up the relevant policy when an event occurs. The AddContainerIDToMap function, although simplified, demonstrates how KubeArmor populates these maps.
Each enforcer type requires specific logic within KubeArmor to translate policies and interact with the OS. The Runtime Enforcer component provides this abstraction layer, allowing KubeArmor policies to be enforced regardless of the underlying Linux security module, as long as it's supported.
Policy Actions and the Enforcer
The action specified in your KubeArmor policy (Security Policies) directly maps to how the Runtime Enforcer instructs the OS:
Allow: The translated rule explicitly permits the action. The OS security module will let the action proceed.
Audit: The translated rule allows the action but is configured to generate a log event. The OS security module lets the action proceed and notifies the kernel's logging system.
Block: The translated rule denies the action. The OS security module intercepts the action and prevents it from completing, typically returning an error to the application.
This allows you to use KubeArmor policies not just for strict enforcement but also for visibility and testing (Audit).
Conclusion
The Runtime Enforcer is the critical piece that translates your human-readable KubeArmor policies into the low-level language understood by the operating system's security features (AppArmor, SELinux, BPF-LSM). It's responsible for loading these translated rules into the kernel, enabling the OS to intercept and enforce your desired security posture for containers and host processes based on their identity.
By selecting the appropriate enforcer for your system and dynamically updating its rules, KubeArmor ensures that your security policies are actively enforced at runtime. In the next chapter, we'll look at the other side of runtime security: observing system events, including those that were audited or blocked by the Runtime Enforcer.
# simplified KSP
apiVersion: security.kubearmor.com/v1
kind: KubeArmorPolicy
metadata:
name: block-etc-passwd-read
namespace: default
spec:
selector:
matchLabels:
app: my-web-app # Policy applies to containers/pods with this label
file:
matchPaths:
- path: /etc/passwd # Specific file to protect
# No readOnly specified means all access types are subject to 'action'
action: Block # What to do if the rule is violated
// KubeArmor/enforcer/runtimeEnforcer.go (Simplified)
func NewRuntimeEnforcer(node tp.Node, pinpath string, logger *fd.Feeder, monitor *mon.SystemMonitor) *RuntimeEnforcer {
// ... code to check available LSMs on the system ...
// This selectLsm function tries to find and initialize the best available enforcer
return selectLsm(re, cfg.GlobalCfg.LsmOrder, availablelsms, lsms, node, pinpath, logger, monitor)
}
// selectLsm Function (Simplified logic)
func selectLsm(re *RuntimeEnforcer, lsmOrder, availablelsms, supportedlsm []string, node tp.Node, pinpath string, logger *fd.Feeder, monitor *mon.SystemMonitor) *RuntimeEnforcer {
// Try LSMs in preferred order first
// If preferred fails or is not available, try others
if kl.ContainsElement(supportedlsm, "bpf") && kl.ContainsElement(availablelsms, "bpf") {
// Attempt to initialize BPFEnforcer
re.bpfEnforcer, err = be.NewBPFEnforcer(...)
if re.bpfEnforcer != nil {
re.EnforcerType = "BPFLSM"
// Success, return BPF enforcer
return re
}
// BPF failed, try next...
}
if kl.ContainsElement(supportedlsm, "apparmor") && kl.ContainsElement(availablelsms, "apparmor") {
// Attempt to initialize AppArmorEnforcer
re.appArmorEnforcer = NewAppArmorEnforcer(...)
if re.appArmorEnforcer != nil {
re.EnforcerType = "AppArmor"
// Success, return AppArmor enforcer
return re
}
// AppArmor failed, try next...
}
if !kl.IsInK8sCluster() && kl.ContainsElement(supportedlsm, "selinux") && kl.ContainsElement(availablelsms, "selinux") {
// Attempt to initialize SELinuxEnforcer (only for host policies outside K8s)
re.seLinuxEnforcer = NewSELinuxEnforcer(...)
if re.seLinuxEnforcer != nil {
re.EnforcerType = "SELinux"
// Success, return SELinux enforcer
return re
}
// SELinux failed, try next...
}
// No supported/available enforcer found
return nil
}
// KubeArmor/enforcer/appArmorEnforcer.go (Simplified)
// UpdateAppArmorProfile Function
func (ae *AppArmorEnforcer) UpdateAppArmorProfile(endPoint tp.EndPoint, appArmorProfile string, securityPolicies []tp.SecurityPolicy) {
// ... code to generate the AppArmor profile string based on KubeArmor policies ...
// This involves iterating through securityPolicies and converting them to AppArmor rules
newProfileContent := "## == Managed by KubeArmor == ##\n...\n" // generated content
// Write the generated profile to a file
newfile, err := os.Create(filepath.Clean("/etc/apparmor.d/" + appArmorProfile))
// ... error handling ...
_, err = newfile.WriteString(newProfileContent)
// ... error handling and file closing ...
// Load/reload the profile into the kernel using apparmor_parser
if err := kl.RunCommandAndWaitWithErr("apparmor_parser", []string{"-r", "-W", "/etc/apparmor.d/" + appArmorProfile}); err != nil {
// Log error if loading fails
ae.Logger.Warnf("Unable to update ... (%s)", err.Error())
return
}
ae.Logger.Printf("Updated security rule(s) to %s/%s", endPoint.EndPointName, appArmorProfile)
}
// KubeArmor/enforcer/SELinuxEnforcer.go (Simplified)
// UpdateSELinuxLabels Function
func (se *SELinuxEnforcer) UpdateSELinuxLabels(profilePath string) bool {
// ... code to read translated policy rules from a file ...
// The file contains rules like "SubjectLabel SubjectPath ObjectLabel ObjectPath ..."
res := true
// Iterate through rules from the profile file
for line := range strings.SplitSeq(string(profile), "\n") {
words := strings.Fields(line)
if len(words) != 7 { continue }
subjectLabel := words[0]
subjectPath := words[1]
objectLabel := words[2]
objectPath := words[3]
// Example: Change the label of a file/directory using chcon
if subjectLabel == "-" { // Rule doesn't specify subject path label
if err := kl.RunCommandAndWaitWithErr("chcon", []string{"-t", objectLabel, objectPath}); err != nil {
// Log error if chcon fails
se.Logger.Warnf("Unable to update the SELinux label (%s) of %s (%s)", objectLabel, objectPath, err.Error())
res = false
}
} else { // Rule specifies both subject and object path labels
if err := kl.RunCommandAndWaitWithErr("chcon", []string{"-t", subjectLabel, subjectPath}); err != nil {
se.Logger.Warnf("Unable to update the SELinux label (%s) of %s (%s)", subjectLabel, subjectPath, err.Error())
res = false
}
if err := kl.RunCommandAndWaitWithErr("chcon", []string{"-t", objectLabel, objectPath}); err != nil {
se.Logger.Warnf("Unable to update the SELinux label (%s) of %s (%s)", objectLabel, objectPath, err.Error())
res = false
}
}
// ... handles directory and recursive options ...
}
return res
}
// KubeArmor/enforcer/bpflsm/enforcer.go (Simplified)
// NewBPFEnforcer instantiates a objects for setting up BPF LSM Enforcement
func NewBPFEnforcer(node tp.Node, pinpath string, logger *fd.Feeder, monitor *mon.SystemMonitor) (*BPFEnforcer, error) {
// ... code to remove memory lock limits for BPF programs ...
// Load the BPF programs and maps compiled from the C code
if err := loadEnforcerObjects(&be.obj, &ebpf.CollectionOptions{
Maps: ebpf.MapOptions{PinPath: pinpath},
}); err != nil {
// Handle loading errors
be.Logger.Errf("error loading BPF LSM objects: %v", err)
return be, err
}
// Attach BPF programs to LSM hooks
// Example: Attach the 'EnforceProc' program to the 'security_bprm_check' LSM hook
be.Probes[be.obj.EnforceProc.String()], err = link.AttachLSM(link.LSMOptions{Program: be.obj.EnforceProc})
if err != nil {
// Handle attachment errors
be.Logger.Errf("opening lsm %s: %s", be.obj.EnforceProc.String(), err)
return be, err
}
// ... similarly attach other BPF programs for file, network, capabilities, etc. ...
// Get references to BPF maps (like the map storing rules per container)
be.BPFContainerMap = be.obj.KubearmorContainers // Renamed from be.obj.Maps.KubearmorContainers
// ... setup ring buffer for events (discussed in next chapter) ...
return be, nil
}
// AddContainerIDToMap Function (Example of populating a map with rules)
func (be *BPFEnforcer) AddContainerIDToMap(containerID string, pidns, mntns uint32) {
// ... code to get/generate rules for this container ...
// rulesData := generateBPFRules(containerID, policies)
// Look up or create the inner map for this container's rules
containerMapKey := NsKey{PidNS: pidns, MntNS: mntns} // Uses namespace IDs as the key for the outer map
// Update the BPF map with the container's rules or identity
// This would typically involve creating/getting a reference to an inner map
// and then populating that inner map with specific path -> rule mappings.
// For simplification, let's assume a direct mapping for identity:
containerMapValue := uint32(1) // Simplified: A value indicating the container is active
if err := be.BPFContainerMap.Update(containerMapKey, containerMapValue, cle.UpdateAny); err != nil {
be.Logger.Warnf("Error updating BPF map for container %s: %v", containerID, err)
}
// ... More complex logic would add rules to an inner map associated with this containerMapKey
}
If Audit, the OS permits the action but generates a log event.
Policy Spec Description
Now, we will briefly explain how to define a host security policy.
Common
A security policy starts with the base information such as apiVersion, kind, and metadata. The apiVersion and kind would be the same in any security policies. In the case of metadata, you need to specify the name of a policy.
Make sure that you need to use KubeArmorHostPolicy, not KubeArmorPolicy.
Severity
You can specify the severity of a given policy from 1 to 10. This severity will appear in alerts when policy violations happen.
Tags
The tags part is optional. You can define multiple tags (e.g., WARNING, SENSITIVE, MITRE, STIG, etc.) to categorize security policies.
Message
The message part is optional. You can add an alert message, and then the message will be presented in alert logs.
NodeSelector
The node selector part is relatively straightforward. Similar to other Kubernetes configurations, you can specify (a group of) nodes based on labels.
If you do not have any custom labels, you can use system labels as well.
Process
In the process section, there are three types of matches: matchPaths, matchDirectories, and matchPatterns. You can define specific executables using matchPaths or all executables in specific directories using matchDirectories. In the case of matchPatterns, advanced operators may be able to determine particular patterns for executables by using regular expressions. However, we generally do not recommend using this match.
The file section is quite similar to the process section.
The only difference between 'process' and 'file' is the readOnly option.
readOnly (static action: allow to read only; otherwise block all)
If this is enabled, the read operation will be only allowed, and any other operations (e.g., write) will be blocked.
Network
In the case of network, there is currently one match type: matchProtocols. You can define specific protocols among TCP, UDP, and ICMP.
Device
In the case of device, there is currently one match type: matchDevice. You can define specific USB device classes by class name or decimal/hex code, their corresponding sub classes, protocol and level of attachment. You can use ALL in class to match all USB device classes. A list of supported device class names is defined in , along with policy examples for some commonly used devices like keyboard, etc. Level matches the number of USB hub ancestors, for example 1 means attached directly to host, 2 means behind a hub and so on.
Capabilities
In the case of capabilities, there is currently one match type: matchCapabilities. You can define specific capability names to allow or block using matchCapabilities. You can check available capabilities in .
Syscalls
In the case of syscalls, there are two types of matches, matchSyscalls and matchPaths. matchPaths can be used to target system calls targeting specific binary path or anything under a specific directory, additionally you can slice based on syscalls generated by a binary or a group of binaries in a directory. You can use matchSyscall as a more general rule to match syscalls from all sources or from specific binaries.
There is one options in each match.
fromSource If a path is specified in fromSource, kubearmor will match only syscalls generated by the defined source. For better undrestanding, lets take the example below. Only unlink system calls generated by /bin/bash will be matched.
If this is enabled, the coverage will extend to the subdirectories of the directory.
Action
The action could be Audit or Block in general. In order to use the Allow action, you should define 'fromSource'; otherwise, all Allow actions will be ignored by default.
If 'fromSource' is defined, we can use all actions for specific rules.
For System calls monitoring, we only support audit mode no matter what the action is set to.
Now, we will briefly explain how to define a security policy.
Common
A security policy starts with the base information such as apiVersion, kind, and metadata. The apiVersion and kind would be the same in any security policies. In the case of metadata, you need to specify the names of a policy and a namespace where you want to apply the policy.
Severity
The severity part is somewhat important. You can specify the severity of a given policy from 1 to 10. This severity will appear in alerts when policy violations happen.
Tags
The tags part is optional. You can define multiple tags (e.g., WARNING, SENSITIVE, MITRE, STIG, etc.) to categorize security policies.
Message
The message part is optional. You can add an alert message, and then the message will be presented in alert logs.
Selector
MatchLabels
The selector part is relatively straightforward. Similar to other Kubernetes configurations, you can specify (a group of) pods based on labels.
MatchExpressions
Further in selector we can use matchExpressions to define labels to select/deselect the workloads. Currently, only labels can be matched, so the key should be 'label'. The operator will determine whether the policy should apply to the workloads specified in the values field or not.
Operator: In
When the operator is set to In, the policy will be applied only to the workloads that match the labels in the values field.
Operator: NotIn
When the operator is set to NotIn, the policy will be applied to all the workloads except that match the labels in the values field.
NOTE Both matchExpressions and matchLabel are an ANDed operation.
Process
In the process section, there are three types of matches: matchPaths, matchDirectories, and matchPatterns. You can define specific executables using matchPaths or all executables in specific directories using matchDirectories. In the case of matchPatterns, advanced operators may be able to determine particular patterns for executables by using regular expressions. However, the coverage of regular expressions is highly dependent on AppArmor (). Thus, we generally do not recommend using this match.
If this is enabled, the owners of the executable(s) defined with matchPaths and matchDirectories will be only allowed to execute.
recursive
If this is enabled, the coverage will extend to the subdirectories of the directory defined with matchDirectories.
File
The file section is quite similar to the process section.
The only difference between 'process' and 'file' is the readOnly option.
readOnly (static action: allow to read only; otherwise block all)
If this is enabled, the read operation will be only allowed, and any other operations (e.g., write) will be blocked.
Network
In the case of network, there is currently one match type: matchProtocols. You can define specific protocols among TCP, UDP, and ICMP.
Capabilities
In the case of capabilities, there is currently one match type: matchCapabilities. You can define specific capability names to allow or block using matchCapabilities. You can check available capabilities in .
Syscalls
In the case of syscalls, there are two types of matches, matchSyscalls and matchPaths. matchPaths can be used to target system calls targeting specific binary path or anything under a specific directory, additionally you can slice based on syscalls generated by a binary or a group of binaries in a directory. You can use matchSyscall as a more general rule to match syscalls from all sources or from specific binaries.
There is one options in each match.
fromSource
If a path is specified in fromSource, kubearmor will match only syscalls generated by the defined source. For better undrestanding, lets take the example below. Only unlink system calls generated by /bin/bash will be matched.
recursive
If this is enabled, the coverage will extend to the subdirectories of the directory.
Log Feeder
Welcome back to the KubeArmor tutorial! In the previous chapters, we've learned how KubeArmor defines security rules using Security Policies, identifies workloads using Container/Node Identity, enforces policies with the Runtime Enforcer, and observes system activity with the System Monitor, all powered by the underlying BPF (eBPF) technology and orchestrated by the KubeArmor Daemon on each node.
We've discussed how KubeArmor can audit or block actions based on policies. But where do you actually see the results of this monitoring and enforcement? How do you know when a policy was violated or when suspicious activity was detected?
This is where the Log Feeder comes in.
What is the Log Feeder?
If this is enabled, the owners of the executable(s) defined with matchPaths and matchDirectories will be only allowed to execute.
recursive
If this is enabled, the coverage will extend to the subdirectories of the directory defined with matchDirectories.
fromSource
If a path is specified in fromSource, the executable at the path will be allowed/blocked to execute the executables defined with matchPaths or matchDirectories. For better understanding, let us say that an operator defines a policy as follows. Then, /bin/bash will be only allowed (blocked) to execute /bin/sleep. Otherwise, the execution of /bin/sleep will be blocked (allowed).
If a path is specified in fromSource, the executable at the path will be allowed/blocked to execute the executables defined with matchPaths or matchDirectories. For better understanding, let us say that an operator defines a policy as follows. Then, /bin/bash will be only allowed (blocked) to execute /bin/sleep. Otherwise, the execution of /bin/sleep will be blocked (allowed).
Action
The action could be Allow, Audit, or Block. Security policies would be handled in a blacklist manner or a whitelist manner according to the action. Thus, you need to define the action carefully. You can refer to Consideration in Policy Action for more details. In the case of the Audit action, we can use this action for policy verification before applying a security policy with the Block action.
For System calls monitoring, we only support audit mode no matter what the action is set to.
Think of the Log Feeder as KubeArmor's reporting and alerting system. Its primary job is to collect all the security-relevant events and telemetry that KubeArmor detects and make them available to you and other systems.
It receives structured information, including:
Security Alerts: Notifications about actions that were audited or blocked because they violated a Security Policy.
System Logs: Telemetry about system activities that KubeArmor is monitoring, even if no specific policy applies (e.g., process executions, file accesses, network connections, depending on visibility settings).
KubeArmor Messages: Internal messages from the KubeArmor Daemon itself (useful for debugging and monitoring KubeArmor's status).
The Log Feeder formats this information into standardized messages (using Protobuf, a language-neutral, platform-neutral, extensible mechanism for serializing structured data) and sends it out over a gRPC interface. gRPC is a high-performance framework for inter-process communication.
This gRPC interface allows various clients to connect to the KubeArmor Daemon on each node and subscribe to streams of these security events in real-time. Tools like karmor log (part of the KubeArmor client tools) connect to this feeder to display events. External systems like Security Information and Event Management (SIEM) platforms can also integrate by writing clients that understand the KubeArmor gRPC format.
Why is Log Feeding Important? Your Window into Security
You've deployed KubeArmor and applied policies. Now you need to answer questions like:
Was that attempt to read /etc/passwd from the web server container actually blocked?
Is any process on my host nodes trying to access sensitive files like /root/.ssh?
Are my applications spawning unexpected shell processes, even if they aren't explicitly blocked by policy?
Did KubeArmor successfully apply the policies I created?
The Log Feeder provides the answers by giving you a stream of events directly from KubeArmor:
It reports when an action was Blocked by a specific policy, providing details about the workload and the attempted action.
It reports when an action was Audited, showing you potentially suspicious behavior even if it wasn't severe enough to block.
It reports general System Events (logs), giving you visibility into the normal or unusual behavior of processes, file accesses, and network connections on your nodes and within containers.
Without the Log Feeder, KubeArmor would be enforcing policies blindly from a monitoring perspective. You wouldn't have the necessary visibility to understand your security posture, detect attacks (even failed ones), or troubleshoot policy issues.
Use Case Example: You want to see every time someone tries to execute a shell (/bin/sh, /bin/bash) inside any of your containers. You might create an Audit Policy for this. The Log Feeder is how you'll receive the notifications for these audited events.
How the Log Feeder Works (High-Level)
Event Source: The System Monitor observes kernel events (process execution, file access, etc.). It enriches these events with Container/Node Identity and sends them to the KubeArmor Daemon. The Runtime Enforcer also contributes by confirming if an event was blocked or audited by policy.
Reception by Daemon: The KubeArmor Daemon receives these enriched events.
Formatting (by Feeder): The Daemon passes the event data to the Log Feeder component. The Feeder takes the structured event data and converts it into the predefined Protobuf message format (e.g., Alert or Log message types defined in protobuf/kubearmor.proto).
Queueing: The Feeder manages internal queues or channels for different types of messages (Alerts, Logs, general KubeArmor Messages). It puts the newly formatted Protobuf message onto the appropriate queue/channel.
gRPC Server: The Feeder runs a gRPC server on a specific port (default 32767).
Client Subscription: External clients connect to this gRPC port and call specific gRPC methods (like WatchAlerts or WatchLogs) to subscribe to event streams.
Event Streaming: When a client subscribes, the Feeder gets a handle to the client's connection. It then continuously reads messages from its internal queues/channels and streams them over the gRPC connection to the connected client.
Here's a simple sequence diagram showing the flow:
This shows how events flow from the kernel, up through the System Monitor and Daemon, are formatted by the Log Feeder, and then streamed out to any connected clients.
Looking at the Code (Simplified)
The Log Feeder is implemented primarily in KubeArmor/feeder/feeder.go and KubeArmor/feeder/logServer.go, using definitions from protobuf/kubearmor.proto and the generated protobuf/kubearmor_grpc.pb.go.
First, let's look at the Protobuf message structures. These define the schema for the data that gets sent out.
Referencing protobuf/kubearmor.proto:
These Protobuf definitions specify the exact structure and data types for the messages KubeArmor will send, ensuring that clients know exactly what data to expect. The .pb.go and _grpc.pb.go files are automatically generated from this .proto file and provide the Go code for serializing/deserializing these messages and implementing the gRPC service.
Now, let's look at the Log Feeder implementation in Go.
Referencing KubeArmor/feeder/feeder.go:
Explanation:
NewFeeder: This function, called during Daemon initialization, sets up the data structures (EventStructs) to manage client connections, creates a network listener for the configured gRPC port, and creates and registers the gRPC server (LogServer). It passes a reference to EventStructs and other data to the LogService implementation.
ServeLogFeeds: This function is run as a goroutine by the KubeArmor Daemon. It calls LogServer.Serve(), which makes the gRPC server start listening for incoming client connections and handling gRPC requests.
PushLog: This method is called by the KubeArmor Daemon (specifically, the part that processes events from the System Monitor) whenever a new security event or log needs to be reported. It takes KubeArmor's internal tp.Log structure, converts it into the appropriate Protobuf message (pb.Alert or pb.Log), and then iterates through all registered client connections (stored in EventStructs) broadcasting the message to their respective Go channels (Broadcast). If a client isn't reading fast enough, the message might be dropped due to the channel buffer being full.
Now let's see the client-side handling logic within the Log Feeder's gRPC service implementation.
Referencing KubeArmor/feeder/logServer.go:
Explanation:
LogService: This struct is the concrete implementation of the gRPC service defined in protobuf/kubearmor.proto. It holds references to the feeder's state.
WatchAlerts: This method is a gRPC streaming RPC handler. When a client initiates a WatchAlerts call, this function is executed. It creates a dedicated Go channel (conn) for that client using AddAlertStruct. Then, it enters a for loop. Inside the loop, it waits for either the client to disconnect (<-svr.Context().Done()) or for a new pb.Alert message to appear on the client's dedicated channel (<-conn). When a message arrives, it sends it over the gRPC stream back to the client using svr.Send(resp). This creates the real-time streaming behavior.
WatchLogs: This method is similar to WatchAlerts but handles subscriptions for general system logs (pb.Log messages).
This shows how the Log Feeder's gRPC server manages multiple concurrent client connections, each with its own channel, ensuring that events pushed by PushLog are delivered to all interested subscribers efficiently.
Connecting to the Log Feeder
The most common way to connect to the Log Feeder is using the karmor command-line tool provided with KubeArmor.
To watch security alerts:
To watch system logs:
To watch both alerts and logs:
These commands are simply gRPC clients that connect to the KubeArmor Daemon's Log Feeder port on your nodes (or via the KubeArmor Relay service if configured) and call the WatchAlerts and WatchLogs gRPC methods.
You can also specify filters (e.g., by namespace or policy name) using karmor log options, which the Log Feeder's gRPC handlers can process (although the code snippets above show a simplified filter handling).
For integration with other systems, you would write a custom gRPC client application in your preferred language (Go, Python, Java, etc.) using the KubeArmor Protobuf definitions to connect to the feeder and consume the streams.
Log Feeder Components Summary
Component
Description
Located In
KubeArmor Role
gRPC Server
Listens for incoming client connections and handles RPC calls.
feeder/feeder.go
Exposes event streams to external clients.
LogService
Implementation of the gRPC service methods (WatchAlerts, WatchLogs).
Conclusion
The Log Feeder is your essential window into KubeArmor's activity. By collecting enriched security events and telemetry from the System Monitor and Runtime Enforcer, formatting them using Protobuf, and streaming them over a gRPC interface, it provides real-time visibility into policy violations (alerts) and system behavior (logs). Tools like karmor log and integrations with SIEM systems rely on the Log Feeder to deliver crucial security insights from your KubeArmor-protected environment.
This chapter concludes our detailed look into the core components of KubeArmor! You now have a foundational understanding of how KubeArmor defines policies, identifies workloads, enforces rules, monitors system activity using eBPF, orchestrates these actions with the Daemon, and reports everything via the Log Feeder.
Thank you for following this tutorial series! We hope it has provided a clear and beginner-friendly introduction to the fascinating world of KubeArmor.
// NewFeeder Function (Simplified)
func NewFeeder(node *tp.Node, nodeLock **sync.RWMutex) *Feeder {
fd := &Feeder{}
// Initialize data structures to hold connection channels
fd.EventStructs = &EventStructs{
MsgStructs: make(map[string]EventStruct[pb.Message]),
MsgLock: sync.RWMutex{},
AlertStructs: make(map[string]EventStruct[pb.Alert]),
AlertLock: sync.RWMutex{},
LogStructs: make(map[string]EventStruct[pb.Log]),
LogLock: sync.RWMutex{},
}
// Configure and start the gRPC server
fd.Port = fmt.Sprintf(":%s", cfg.GlobalCfg.GRPC) // Get port from config
listener, err := net.Listen("tcp", fd.Port)
if err != nil {
kg.Errf("Failed to listen a port (%s, %s)", fd.Port, err.Error())
return nil // Handle error
}
fd.Listener = listener
// Create the gRPC server instance
logService := &LogService{
QueueSize: 1000, // Define queue size for client channels
Running: &fd.Running,
EventStructs: fd.EventStructs, // Pass the connection store
}
fd.LogServer = grpc.NewServer(/* ... gRPC server options ... */)
// Register the LogService implementation with the gRPC server
pb.RegisterLogServiceServer(fd.LogServer, logService)
// ... other initialization ...
return fd
}
// ServeLogFeeds Function (Called by the Daemon)
func (fd *BaseFeeder) ServeLogFeeds() {
fd.WgServer.Add(1)
defer fd.WgServer.Done()
// This line blocks forever, serving gRPC requests until Listener.Close() is called
if err := fd.LogServer.Serve(fd.Listener); err != nil {
kg.Print("Terminated the gRPC service")
}
}
// PushLog Function (Called by the Daemon/System Monitor)
func (fd *Feeder) PushLog(log tp.Log) {
// ... code to process the incoming internal log struct (tp.Log) ...
// Convert the internal log struct (tp.Log) into the Protobuf Log or Alert struct (pb.Log/pb.Alert)
// This involves mapping fields like ContainerID, ProcessName, Resource, Action, PolicyName etc.
// The logic checks the type and fields to decide if it's an Alert or a general Log
if log.Type == "MatchedPolicy" || log.Type == "MatchedHostPolicy" || log.Type == "SystemEvent" {
// It's a security alert type of event
pbAlert := pb.Alert{}
// Copy fields from internal log struct to pbAlert struct
pbAlert.Timestamp = log.Timestamp
// ... copy other fields like ContainerID, PolicyName, Action, Resource ...
// Broadcast the pbAlert to all connected clients watching alerts
fd.EventStructs.AlertLock.Lock() // Lock for safe concurrent access
defer fd.EventStructs.AlertLock.Unlock()
for uid := range fd.EventStructs.AlertStructs {
select {
case fd.EventStructs.AlertStructs[uid].Broadcast <- &pbAlert: // Send to client's channel
default:
// If the client's channel is full, the message is dropped
kg.Printf("alert channel busy, alert dropped.")
}
}
} else {
// It's a general system log type of event
pbLog := pb.Log{}
// Copy fields from internal log struct to pbLog struct
pbLog.Timestamp = log.Timestamp
// ... copy other fields like ContainerID, ProcessName, Resource ...
// Broadcast the pbLog to all connected clients watching logs
fd.EventStructs.LogLock.Lock() // Lock for safe concurrent access
defer fd.EventStructs.LogLock.Unlock()
for uid := range fd.EventStructs.LogStructs {
select {
case fd.EventStructs.LogStructs[uid].Broadcast <- &pbLog: // Send to client's channel
default:
// If the client's channel is full, the message is dropped
kg.Printf("log channel busy, log dropped.")
}
}
}
}
// LogService Struct (Simplified)
type LogService struct {
QueueSize int // Max size of the channel buffer for each client
EventStructs *EventStructs // Pointer to the feeder's connection store
Running *bool // Pointer to the feeder's running status
}
// WatchAlerts Function (Simplified - gRPC handler)
// This function is called by the gRPC server whenever a client calls the WatchAlerts RPC
func (ls *LogService) WatchAlerts(req *pb.RequestMessage, svr pb.LogService_WatchAlertsServer) error {
// req contains client's request (e.g., filter options)
// svr is the gRPC server stream to send messages back to the client
// Add this client connection to the feeder's connection store
// This creates a new Go channel for this specific client
uid, conn := ls.EventStructs.AddAlertStruct(req.Filter, ls.QueueSize)
kg.Printf("Added a new client (%s, %s) for WatchAlerts", uid, req.Filter)
defer func() {
// This code runs when the client disconnects or an error occurs
close(conn) // Close the channel
ls.EventStructs.RemoveAlertStruct(uid) // Remove from the store
kg.Printf("Deleted the client (%s) for WatchAlerts", uid)
}()
// Loop continuously while KubeArmor is running and the client is connected
for *ls.Running {
select {
case <-svr.Context().Done():
// Client disconnected, exit the loop
return nil
case resp := <-conn:
// A new pb.Alert message arrived on the client's channel (pushed by PushLog)
if err := kl.HandleGRPCErrors(svr.Send(resp)); err != nil {
// Failed to send to the client (e.g., network issue)
kg.Warnf("Failed to send an alert=[%+v] err=[%s]", resp, err.Error())
return err // Exit the loop with an error
}
}
}
return nil // KubeArmor is shutting down, exit gracefully
}
// WatchLogs Function (Simplified - gRPC handler, similar to WatchAlerts)
// This function is called by the gRPC server whenever a client calls the WatchLogs RPC
func (ls *LogService) WatchLogs(req *pb.RequestMessage, svr pb.LogService_WatchLogsServer) error {
// ... Similar logic to WatchAlerts, but uses AddLogStruct, RemoveLogStruct,
// and reads from the LogStructs' Broadcast channel to send pb.Log messages ...
return nil // Simplified
}
karmor log --alert
karmor log --log
karmor log --alert --log
BPF (eBPF)
Welcome back to the KubeArmor tutorial! In the previous chapter, we explored the System Monitor, KubeArmor's eyes and ears inside the operating system, responsible for observing runtime events like file accesses, process executions, and network connections. We learned that the System Monitor uses a powerful kernel technology called eBPF to achieve this deep visibility with low overhead.
In this chapter, we'll take a closer look at BPF (Extended Berkeley Packet Filter), or eBPF as it's more commonly known today. This technology isn't just used by the System Monitor; it's also a key enforcer type available to the Runtime Enforcer component in the form of BPF-LSM. Understanding eBPF is crucial to appreciating how KubeArmor works at a fundamental level within the Linux kernel.
What is BPF (eBPF)?
feeder/logServer.go
Manages client connections and streams events.
EventStructs
Internal data structure (maps of channels) holding connections for each client type.
feeder/feeder.go
Enables broadcasting events to multiple clients.
Protobuf Defs
Define the structure of Alert and Log messages.
protobuf/kubearmor.proto
Standardizes the output format.
PushLog method
Method on the Feeder called by the Daemon to send new events.
feeder/feeder.go
Point of entry for events into the feeder.
Imagine the Linux kernel as the central operating system managing everything on your computer or server. Traditionally, if you wanted to add new monitoring, security, or networking features deep inside the kernel, you had to write C code, compile it as a kernel module, and load it. This is risky because bugs in kernel modules can crash the entire system.
eBPF provides a safer, more flexible way to extend kernel functionality. Think of it as a miniature, highly efficient virtual machine running inside the kernel. It allows you to write small programs that can be loaded into the kernel and attached to specific "hooks" (points where interesting events happen).
Here's the magic:
Safe: eBPF programs are verified by a kernel component called the "verifier" before they are loaded. The verifier ensures the program won't crash the kernel, hang, or access unauthorized memory.
Performant: eBPF programs run directly in the kernel's execution context when an event hits their hook. They are compiled into native machine code for the processor using a "Just-In-Time" (JIT) compiler, making them very fast.
Flexible: They can be attached to various hooks for monitoring or enforcement, including system calls, network events, tracepoints, and even Linux Security Module (LSM) hooks.
Data Sharing: eBPF programs can interact with user-space programs (like the KubeArmor Daemon) and other eBPF programs using shared data structures called BPF Maps.
Why KubeArmor Uses BPF (eBPF)
KubeArmor needs to operate deep within the operating system to provide effective runtime security for containers and nodes. It needs to:
See Everything: Monitor low-level system calls and kernel events across different container namespaces (Container/Node Identity).
Act Decisively: Enforce security policies by blocking forbidden actions before they can harm the system.
Do it Efficiently: Minimize the performance impact on your applications.
eBPF is the perfect technology for this:
Deep Visibility: By attaching eBPF programs to kernel hooks, KubeArmor's System Monitor gets high-fidelity data about system activities as they happen.
High-Performance Enforcement: When used as a Runtime Enforcer via BPF-LSM, eBPF programs can quickly check policies against events directly within the kernel, blocking actions instantly without the need to switch back and forth between kernel and user space for every decision.
Low Overhead: eBPF's efficiency means it adds minimal latency to system calls compared to older kernel security mechanisms or relying purely on user-space monitoring.
Kernel Safety: KubeArmor can extend kernel behavior for security without the risks associated with traditional kernel modules.
BPF in Action: Monitoring and Enforcement
Let's look at how BPF powers both sides of KubeArmor's runtime protection:
1. BPF for Monitoring (The System Monitor)
As we saw in Chapter 4, the System Monitor observes events. This is primarily done using eBPF.
How it works: Small eBPF programs are attached to kernel hooks related to file, process, network, etc., events. When an event triggers a hook, the eBPF program runs. It collects relevant data (like the path, process ID, Namespace IDs) and writes this data into a special shared memory area called a BPF Ring Buffer.
Getting Data to KubeArmor: The KubeArmor Daemon (KubeArmor Daemon) in user space continuously reads events from this BPF Ring Buffer.
Context: The daemon uses the Namespace IDs from the event data to correlate it with the specific container or node (Container/Node Identity) before processing and sending the alert via the Log Feeder.
Simplified view of monitoring data flow:
This shows the efficient flow: the kernel triggers a BPF program, which quickly logs data to a buffer that KubeArmor reads asynchronously.
Let's revisit a simplified code concept for the BPF monitoring program side (C code compiled to BPF):
Explanation:
struct event: Defines the structure of the data sent for each event.
kubearmor_events: Defines a BPF map of type RINGBUF. This is the channel for kernel -> user space communication.
SEC("kprobe/sys_enter_openat"): Specifies where this program attaches - at the entry of the openat system call.
bpf_ringbuf_reserve: Allocates space in the ring buffer for a new event.
bpf_ktime_get_ns, bpf_get_current_task, bpf_get_current_comm, bpf_probe_read_str: BPF helper functions used to get data from the kernel context (timestamp, task info, command name, string from user space).
bpf_ringbuf_submit: Sends the prepared event data to the ring buffer.
On the Go side, KubeArmor's System Monitor uses the cilium/ebpf library to load this BPF object file and read from the kubearmor_events map (the ring buffer).
Explanation:
loadMonitorObjects: Loads the compiled BPF program and map definitions from the .o file.
perf.NewReader(objs.KubearmorEvents, ...): Opens a reader for the specific BPF map named kubearmor_events defined in the BPF code. This map is configured as a ring buffer.
mon.SyscallPerfMap.Read(): Blocks until an event is available in the ring buffer, then reads the raw bytes sent by the BPF program.
The rest of the readEvents function (simplified out, but hinted at in Chapter 4 context) involves parsing these bytes back into a struct, looking up the container/node identity, and processing the event.
This demonstrates how BPF allows a low-overhead kernel component (the BPF program writing to the ring buffer) and a user-space component (KubeArmor Daemon reading from the buffer) to communicate efficiently.
2. BPF for Enforcement (BPF-LSM Enforcer)
When KubeArmor is configured to use the BPF-LSM Runtime Enforcer, BPF programs are used not just for monitoring, but for making enforcement decisions in the kernel.
How it works: BPF programs are attached to Linux Security Module (LSM) hooks. These hooks are specifically designed points in the kernel where security decisions are made (e.g., before a file is opened, before a program is executed, before a capability is used).
Policy Rules in BPF Maps: KubeArmor translates its Security Policies into a format optimized for quick lookup and stores these rules in BPF Maps. There might be nested maps where an outer map is keyed by Namespace IDs (Container/Node Identity) and inner maps store rules specific to paths, processes, etc., for that workload.
Decision Making: When an event triggers a BPF-LSM hook, the attached eBPF program runs. It uses the current process's Namespace IDs to look up the relevant policy rules in the BPF maps. Based on the rule found (or the default posture if no specific rule matches), the BPF program returns a value to the kernel indicating whether the action should be allowed (0) or blocked (-EPERM, which is kernel speak for "Permission denied").
Event Reporting: Even when an action is blocked, the BPF-LSM program (or a separate monitoring BPF program) will often still send an event to the ring buffer so KubeArmor can log the blocked attempt.
Simplified view of BPF-LSM enforcement flow:
This diagram shows the pre-configuration step (KubeArmor loading the program and rules) and then the fast, kernel-internal decision path when an event occurs.
Let's revisit a simplified BPF C code concept for enforcement (part of enforcer.bpf.c):
Explanation:
struct outer_key: Defines the key structure for the outer map (kubearmor_containers), using pid_ns and mnt_ns from the process's identity.
kubearmor_containers: A BPF map storing references to other maps (or rule data directly in simpler cases), allowing rules to be organized per container/namespace.
SEC("lsm/bprm_check_security"): Attaches this program to the LSM hook that is called before a new program is executed.
BPF_PROG(...): Macro defining the BPF program function.
get_outer_key: Helper function to get the Namespace IDs for the current task.
bpf_map_lookup_elem(&kubearmor_containers, &okey): Looks up the map (or data) associated with the current process's namespace IDs.
The core logic involves reading event data (like the program path), looking up the corresponding rule in the BPF maps, and returning 0 to allow or -EPERM to block, based on the rule's action flag (RULE_DENY).
Events are also reported to the ring buffer (kubearmor_events) for logging, similar to the monitoring path.
On the Go side, the BPF-LSM Runtime Enforcer component loads these programs and, crucially, populates the BPF Maps with the translated policies.
Explanation:
loadEnforcerObjects: Loads the compiled BPF enforcement code.
link.AttachLSM: Attaches a specific BPF program (objs.EnforceProc) to a named kernel LSM hook (lsm/bprm_check_security).
be.BPFContainerMap = objs.KubearmorContainers: Gets a handle (reference) to the BPF map defined in the C code. This handle allows the Go program to interact with the map in the kernel.
AddContainerPolicies: This conceptual function shows how KubeArmor translates high-level policies into a kernel-friendly format (e.g., flags like RULE_DENY, RULE_EXEC) and uses BPFContainerMap.Update to populate the maps. The Namespace IDs (pidns, mntns) are used as keys to ensure policies are applied to the correct container context.
This illustrates how KubeArmor uses user-space code to set up the BPF environment in the kernel, loading programs and populating maps. Once this is done, the BPF programs handle enforcement decisions directly within the kernel when events occur.
BPF Components Overview
BPF technology involves several key components:
Component
Description
Where it runs
KubeArmor Usage
BPF Programs
Small, safe programs written in a C-like language, compiled to BPF bytecode
Kernel
Monitor events, Enforce policies at hooks
BPF Hooks
Specific points in the kernel where BPF programs can be attached
Conclusion
In this chapter, you've taken a deeper dive into BPF (eBPF), the powerful kernel technology that forms the backbone of KubeArmor's runtime security capabilities. You learned how eBPF enables KubeArmor to run small, safe, high-performance programs inside the kernel for both observing system events (System Monitor) and actively enforcing security policies at low level hooks (Runtime Enforcer via BPF-LSM). You saw how BPF Maps are used to share data and store policy rules efficiently in the kernel.
Understanding BPF highlights KubeArmor's modern, efficient approach to container and node security. In the next chapter, we'll bring together all the components we've discussed by looking at the central orchestrator on each node
// Simplified BPF C code for monitoring (part of system_monitor.c)
struct event {
u64 ts;
u32 pid_id; // PID Namespace ID
u32 mnt_id; // Mount Namespace ID
u32 event_id; // Type of event
char comm[16]; // Process name
char path[256]; // File path or network info
};
// Define a BPF map of type RINGBUF for sending events to user space
struct {
__uint(type, BPF_MAP_TYPE_RINGBUF);
__uint(max_entries, 1 << 24);
} kubearmor_events SEC(".maps"); // This name is referenced in Go code
SEC("kprobe/sys_enter_openat") // Attach to the openat syscall entry
int kprobe__sys_enter_openat(struct pt_regs *ctx) {
struct event *task_info;
// Reserve space in the ring buffer
task_info = bpf_ringbuf_reserve(&kubearmor_events, sizeof(*task_info), 0);
if (!task_info)
return 0; // Could not reserve space, drop event
// Populate the event data
task_info->ts = bpf_ktime_get_ns();
struct task_struct *task = (struct task_struct *)bpf_get_current_task();
task_info->pid_id = get_task_pid_ns_id(task); // Helper to get NS ID
task_info->mnt_id = get_task_mnt_ns_id(task); // Helper to get NS ID
task_info->event_id = 1; // Example: 1 for file open
bpf_get_current_comm(&task_info->comm, sizeof(task_info->comm));
// Get path argument (simplified greatly)
// Note: Real BPF code needs careful handling of user space pointers
const char *pathname = (const char *)PT_REGS_PARM2(ctx);
bpf_probe_read_str(task_info->path, sizeof(task_info->path), pathname);
// Submit the event to the ring buffer
bpf_ringbuf_submit(task_info, 0);
return 0;
}
// Simplified Go code for reading BPF events (part of systemMonitor.go)
// systemMonitor Structure (relevant parts)
type SystemMonitor struct {
// ... other fields ...
SyscallPerfMap *perf.Reader // Represents the connection to the ring buffer
// ... other fields ...
}
// Function to load BPF objects and start reading
func (mon *SystemMonitor) StartBPFMonitoring() error {
// Load the compiled BPF code (.o file)
objs := &monitorObjects{} // monitorObjects corresponds to maps and programs in the BPF .o file
if err := loadMonitorObjects(objs, nil); err != nil {
return fmt.Errorf("failed to load BPF objects: %w", err)
}
// mon.bpfObjects = objs // Store loaded objects (simplified)
// Open the BPF ring buffer map for reading
// "kubearmor_events" matches the map name in the BPF C code
rd, err := perf.NewReader(objs.KubearmorEvents, os.Getpagesize())
if err != nil {
objs.Close() // Clean up loaded objects
return fmt.Errorf("failed to create BPF ring buffer reader: %w", err)
}
mon.SyscallPerfMap = rd // Store the reader
// Start a goroutine to read events from the buffer
go mon.readEvents()
// ... Attach BPF programs to hooks (simplified out) ...
return nil
}
// Goroutine function to read events
func (mon *SystemMonitor) readEvents() {
for {
record, err := mon.SyscallPerfMap.Read() // Read a raw event from the kernel
if err != nil {
// ... error handling, check if reader was closed ...
return
}
// Process the raw event data (parse bytes, add context)
// As shown in Chapter 4 context:
// dataBuff := bytes.NewBuffer(record.RawSample)
// ctx, err := readContextFromBuff(dataBuff) // Parses struct event
// ... lookup containerID using ctx.PidID, ctx.MntID ...
// ... format and send event for logging ...
}
}
// Simplified BPF C code for enforcement (part of enforcer.bpf.c)
// Outer map: PidNS+MntNS -> reference to inner map (simplified to u32 for demo)
struct outer_key {
u32 pid_ns;
u32 mnt_ns;
};
struct {
__uint(type, BPF_MAP_TYPE_HASH_OF_MAPS); // Or HASH, simplified
__uint(max_entries, 256);
__type(key, struct outer_key);
__type(value, u32); // In reality, this points to an inner map
__uint(pinning, LIBBPF_PIN_BY_NAME);
} kubearmor_containers SEC(".maps"); // Matches map name in Go code
// Inner map (concept): Path -> Rule
struct data_t {
u8 processmask; // Flags like RULE_EXEC, RULE_DENY
};
// Inner maps are created/managed by KubeArmor in user space
SEC("lsm/bprm_check_security") // Attach to LSM hook for program execution
int BPF_PROG(enforce_proc, struct linux_binprm *bprm, int ret) {
struct task_struct *t = (struct task_struct *)bpf_get_current_task();
struct outer_key okey;
get_outer_key(&okey, t); // Helper to get PidNS+MntNS
// Look up the container's rules map using Namespace IDs
u32 *inner_map_fd = bpf_map_lookup_elem(&kubearmor_containers, &okey);
if (!inner_map_fd) {
return ret; // No rules for this container, allow by default
}
// Get the program's path (simplified)
struct path f_path = BPF_CORE_READ(bprm->file, f_path);
char path[256];
// Simplified path reading logic...
bpf_probe_read_str(path, sizeof(path), /* path pointer */);
// Look up the rule for this path in the inner map (conceptually)
// struct data_t *rule = bpf_map_lookup_elem(inner_map_fd, &path); // Conceptually
struct data_t *rule = /* Simplified: simulate lookup */ NULL; // Replace with actual map lookup
// Decision logic based on rule and event type (BPF_CORE_READ bprm->file access mode)
if (rule && (rule->processmask & RULE_EXEC)) {
if (rule->processmask & RULE_DENY) {
// Match found and action is DENY, block the execution
// Report event (simplified out)
return -EPERM; // Block
}
// Match found and action is ALLOW (or AUDIT), allow execution
// Report event (if AUDIT) (simplified out)
return ret; // Allow
}
// No specific DENY rule matched. Check default posture (simplified)
u32 default_posture = /* Look up default posture in another map */ 0; // 0 for Allow
if (default_posture == BLOCK_POSTURE) {
// Default is BLOCK, block the execution
// Report event (simplified out)
return -EPERM; // Block
}
return ret; // Default is ALLOW or no default, allow
}
// Simplified Go code for loading BPF enforcement objects and populating maps (part of bpflsm/enforcer.go)
type BPFEnforcer struct {
// ... other fields ...
objs enforcerObjects // Holds loaded BPF programs and maps
// ... other fields ...
}
// NewBPFEnforcer Function (simplified)
func NewBPFEnforcer(...) (*BPFEnforcer, error) {
be := &BPFEnforcer{}
// Load the compiled BPF code (.o file) containing programs and map definitions
objs := enforcerObjects{} // enforcerObjects corresponds to maps and programs in the BPF .o file
if err := loadEnforcerObjects(&objs, nil); err != nil {
return nil, fmt.Errorf("failed to load BPF objects: %w", err)
}
be.objs = objs // Store loaded objects
// Attach programs to LSM hooks
// The AttachLSM call links the BPF program to the kernel hook
// be.objs.EnforceProc refers to the BPF program defined with SEC("lsm/bprm_check_security")
link, err := link.AttachLSM(link.LSMOptions{Program: objs.EnforceProc})
if err != nil {
objs.Close()
return nil, fmt.Errorf("failed to attach BPF program to LSM hook: %w", err)
}
// be.links = append(be.links, link) // Store link to manage it later (simplified)
// Get references to the BPF maps defined in the C code
// "kubearmor_containers" matches the map name in the BPF C code
be.BPFContainerMap = objs.KubearmorContainers
// ... Attach other programs (file, network, capabilities) ...
// ... Setup ring buffer for alerts (like in monitoring) ...
return be, nil
}
// AddContainerPolicies Function (simplified - conceptual)
func (be *BPFEnforcer) AddContainerPolicies(containerID string, pidns, mntns uint32, policies []tp.SecurityPolicy) error {
// Translate KubeArmor policies (tp.SecurityPolicy) into a format
// suitable for BPF map lookup (e.g., map of paths -> rule flags)
// translatedRules := translatePoliciesToBPFRules(policies)
// Create or get a reference to an inner map for this container (using BPF_MAP_TYPE_HASH_OF_MAPS)
// The key for the outer map is the container's Namespace IDs
outerKey := struct{ PidNS, MntNS uint32 }{pidns, mntns}
// Conceptually:
// innerMap, err := bpf.CreateMap(...) // Create inner map if it doesn't exist
// err = be.BPFContainerMap.Update(outerKey, uint32(innerMap.FD()), ebpf.UpdateAny) // Link outer key to inner map FD
// Populate the inner map with the translated rules
// for path, ruleFlags := range translatedRules {
// ruleData := struct{ ProcessMask, FileMask uint8 }{...} // Map ruleFlags to data_t
// err = innerMap.Update(path, ruleData, ebpf.UpdateAny)
// }
// Simplified Update (directly indicating container exists with rules)
containerMapValue := uint32(1) // Placeholder value
if err := be.BPFContainerMap.Update(outerKey, containerMapValue, ebpf.UpdateAny); err != nil {
return fmt.Errorf("failed to update BPF container map: %w", err)
}
be.Logger.Printf("Loaded BPF-LSM policies for container %s (pidns:%d, mntns:%d)", containerID, pidns, mntns)
return nil
}
Kernel
Entry/exit of syscalls, tracepoints, LSM hooks
BPF Maps
Efficient key-value data structures for sharing data
Kernel (accessed by both kernel BPF and user space)
Store policy rules, Store event data (ring buffer), Store identity info
BPF Verifier
Kernel component that checks BPF programs for safety before loading
Kernel
Ensures KubeArmor's BPF programs are safe
BPF JIT
Compiles BPF bytecode to native machine code for performance
Kernel
Makes KubeArmor's BPF operations fast
BPF Loader
User-space library/tool to compile C code, load programs/maps into kernel
User Space
KubeArmor Daemon uses cilium/ebpf library as loader
Policy Examples for Containers
Here, we demonstrate how to define security policies using our example microservice (multiubuntu).
Explanation: The purpose of this policy is to block the execution of '/bin/sleep' in the containers with the 'group-1' label. For this, we define the 'group-1' label in selector -> matchLabels and the specific path ('/bin/sleep') in process -> matchPaths. Also, we put 'Block' as the action of this policy.
Verification: After applying this policy, please get into one of the containers with the 'group-1' (using "kubectl -n multiubuntu exec -it ubuntu-X-deployment-... -- bash") and run '/bin/sleep'. You will see that /bin/sleep is blocked.
Block accessing specific executable matching labels, In & NotIn operator ()
Explanation: The purpose of this policy is to block the execution of 'apt' binary in all the workloads in the namespace multiubuntu, who contains label container=ubuntu-1. For this, we define the 'container=ubuntu-1' as value and operator as 'In' for key label in selector -> matchExpressions and the specific execname ('apt') in process -> matchPaths. The other expression container=ubuntu-3 value and operator as 'NotIn' for key label
Block accessing specific executable matching labels, NotIn operator ()
Explanation: The purpose of this policy is to block the execution of 'apt' binary in all the workloads in the namespace multiubuntu, who doesn't contains label container=ubuntu-1. For this, we define the 'container=ubuntu-1' as value and operator as 'In' for key label in selector -> matchExpressions and the specific execname ('apt') in process -> matchPaths. Also, we put 'Block' as the action of this policy.
Block all executables in a specific directory ()
Explanation: The purpose of this policy is to block all executables in the '/sbin' directory. Since we want to block all executables rather than a specific executable, we use matchDirectories to specify the executables in the '/sbin' directory at once.
Verification: After applying this policy, please get into the container with the 'ubuntu-1' label and run '/sbin/route' to see if this command is allowed (this command will be blocked).
Block all executables in a specific directory and its subdirectories ()
Explanation: As the extension of the previous policy, we want to block all executables in the '/usr' directory and its subdirectories (e.g., '/usr/bin', '/usr/sbin', and '/usr/local/bin'). Thus, we add 'recursive: true' to extend the scope of the policy.
Verification: After applying this policy, please get into the container with the 'ubuntu-2' label and run '/usr/bin/env' or '/usr/bin/whoami'. You will see that those commands are blocked.
Allow specific executables to access certain files only ()
Explanation: Here, we want the container with the 'ubuntu-3' label only to access certain files by specific executables. Otherwise, we want to block any other file accesses. To achieve this goal, we define the scope of this policy using matchDirectories with fromSource and use the 'Allow' action.
Verification: In this policy, we allow /bin/cat to access the files in /credentials only. After applying this policy, please get into the container with the 'ubuntu-3' label and run 'cat /credentials/password'. This command will be allowed with no errors. Now, please run 'cat /etc/hostname'. Then, this command will be blocked since /bin/cat is only allowed to access /credentials/*.
Allow a specific executable to be launched by its owner only ()
Explanation: This policy aims to allow a specific user (i.e., user1) only to launch its own executable (i.e., hello), which means that we do not want for the root user to even launch /home/user1/hello. For this, we define a security policy with matchPaths and 'ownerOnly: ture'.
Verification: For verification, we also allow several directories and files to change users (from 'root' to 'user1') in the policy. After applying this policy, please get into the container with the 'ubuntu-3' label and run '/home/user1/hello' first. This command will be blocked even though you are the 'root' user. Then, please run 'su - user1'. Now, you are the 'user1' user. Please run '/home/user1/hello' again. You will see that it works now.
File Access Restriction
Allow accessing specific files only ()
Explanation: The purpose of this policy is to allow the container with the 'ubuntu-4' label to read '/credentials/password' only (the write operation is blocked).
Network Operation Restriction
Audit ICMP packets ()
Explanation: We want to audit sending ICMP packets from the containers with the 'ubuntu-5' label while allowing packets for the other protocols (e.g., TCP and UDP). For this, we use 'matchProtocols' to define the protocol (i.e., ICMP) that we want to block.
Capabilities Restriction
Block Raw Sockets (i.e., non-TCP/UDP packets) ()
Explanation: We want to block any network operations using raw sockets from the containers with the 'ubuntu-1' label, meaning that containers cannot send non-TCP/UDP packets (e.g., ICMP echo request or reply) to other containers. To achieve this, we use matchCapabilities and specify the 'CAP_NET_RAW' capability to block raw socket creations inside the containers. Here, since we use the stream and datagram sockets to TCP and UDP packets respectively, we can still send those packets to others.
System calls alerting
Alert for all unlink syscalls
Generated telemetry
Alert on all rmdir syscalls targeting anything in /home/ directory and sub-directories
Generated telemetry
KubeArmor Events
Supported formats
Native Json format (this document)
is not mandatory because if we mention something in 'In' operator, everything else is just not slected for matching. Also, we put 'Block' as the action of this policy.
Verification: After applying this policy, please exec into any container who contains label container=ubuntu-1 within the namespace 'multiubuntu' and run 'apt'. You can see the binary is blocked. Then try to do same in other workloads who doesn't contains label container=ubuntu-1, the binary won't be blocked.
Verification: After applying this policy, please exec into any container who contains label container=ubuntu-1 within the namespace 'multiubuntu' and run 'apt'. You can see the binary is not blocked. Then try to do same in other workloads who doesn't contains label container=ubuntu-1, the binary will be blocked.
Verification: After applying this policy, please get into the container with the 'ubuntu-4' label and run 'cat /credentials/password'. You can see the contents in the file. Now, please run 'echo "test" >> /credentials/password'. You will see that the write operation will be blocked.
Explanation: In this policy, we do not want the container with the 'ubuntu-5' label to access any files in the '/credentials' directory and its subdirectories. Thus, we use 'matchDirectories' and 'recursive: true' to define all files in the '/credentials' directory and its subdirectories.
Verification: After applying this policy, please get into the container with the 'ubuntu-5' label and run 'cat /secret.txt'. You will see the contents of /secret.txt. Then, please run 'cat /credentials/password'. This command will be blocked due to the security policy.
Verification: After applying this policy, please get into the container with the 'ubuntu-5' label and run 'curl https://kubernetes.io/'. This will work fine. Then, run 'ping 8.8.8.8'. You will see 'Permission denied' since the 'ping' command internally uses the ICMP protocol.
Verification: After applying this policy, please get into the container with the 'ubuntu-1' label and run 'curl https://kubernetes.io/'. This will work fine. Then, run 'ping 8.8.8.8'. You will see 'Operation not permitted' since the 'ping' command internally requires a raw socket to send ICMP packets.
Container alerts are generated when there is a policy violation or audit event that is raised due to a policy action. For example, a policy might block execution of a process. When the execution is blocked by KubeArmor enforcer, KubeArmor generates an alert event implying policy action. In the case of an Audit action, the KubeArmor will only generate an alert without actually blocking the action.
The primary difference in the container alerts events vs the telemetry events (showcased above) is that the alert events contains certain additional fields such as policy name because of which the alert was generated and other metadata such as "Tags", "Message", "Severity" associated with the policy rule.
Container Alerts Fields format
Alert Field
Description
Example
Action
specifies the action of the policy it has matched.
Audit/Block
ClusterName
gives information about the cluster for which the alert was generated
Note that KubeArmor also alerts events blocked due to other system policy enforcement. For example, if an SELinux native rule blocks an action, KubeArmor will report those as well as DefaultPosture events. Following is an example of such event:
Note that KubeArmor also alerts events blocked due to other system policy enforcement. For example, if an SELinux native rule blocks an action, KubeArmor will report those as well as DefaultPosture events. Following is an example of such event: